ANYCUBIC Photon Mono M7 PRO 14K Resin 3D Printer, 170mm/h Fast Printing, 10.1'' Mono LCD with COB LighTurbo 3.0 Source, Dynamic Temperature Control Resin Vat, Build Volume 8.77''x4.96''x9.05''
$689.99 (as of June 18, 2025 23:32 GMT +00:00 - More infoProduct prices and availability are accurate as of the date/time indicated and are subject to change. Any price and availability information displayed on [relevant Amazon Site(s), as applicable] at the time of purchase will apply to the purchase of this product.)Ever find yourself gazing at those sleek, speedy RC cars and wondering if you could build one yourself? You’re in luck! This guide walks you through how to 3D print your own RC car using a brushless motor, offering a unique twist on a classic hobby.
Anycubic Coupon – $5 off $50+ sitewide with code DIY5OFF
3D Printed RC Car with a Twist of Brushless Motor
This project combines additive manufacturing and radio control technology, melding the digital and physical realms. Ideal for tinkerers, hobbyists, and anyone with a mechanical curiosity, this project provides a pathway to learning about design and engineering in an accessible manner.
Introduction: A Mechanical Engineer’s Passion Project
I’m Lee, from Lee Curiosity, and I’m a mechanical engineer with a passion for 3D printing. This article details my journey in creating my first 3D printed RC car, which uses a brushless motor for propulsion. It wasn’t always smooth sailing, but the lessons learned along the way were invaluable.
Supplies: Gathering Your Arsenal
Before you embark on this adventure, you’ll need to gather a few essential components. These parts combine to form the backbone of your 3D printed RC car, enabling it to move, respond, and function as intended.
Here’s a list of the materials you should prepare:
| Component | Description |
|---|---|
| MC6C mini–TX AND RX | Transmitter and receiver combo for remote control. |
| Brushless motor | Provides the power to drive the car, delivering higher efficiency and performance than brushed motors. |
| ESC 40A | Electronic Speed Controller to regulate power to the brushless motor. |
| 65 mm Wheels | The means of motion for your car, with the size chosen for balance and maneuverability. |
| Hex Coupler 4mm | Connects the wheels to the axles. |
| S90G servo | Controls the steering of the car. |
| Shaft Ø4×150 | Forms the rear axle of the car. |
| M3x45 | General-purpose screws for assembly. |
| 3S Battery | Provides power to the electronic components. |
| M3x15 and nuts | Used for securing various parts of the chassis. |
| F604zz bearing | Enables smooth rotation of the rear axle. |
Step 1: Design Your 3D Model
As a mechanical engineer, the design phase is where my passion truly ignites. It’s about taking an idea and shaping it into something tangible, a blueprint for the physical world.
I dedicated approximately two weeks to designing this RC car in Autodesk Fusion 360, refining the original concept until it met my vision. This process – from brainstorming to seeing your design materialize through 3D printing and assembly – is profoundly rewarding. The design phase is where your creativity takes physical form.

Anycubic Coupon – $5 off $50+ sitewide with code DIY5OFF
Step 2: 3D Printing the Components for This Project
Now that your design is complete, the next step is bringing it to life through 3D printing. This involves transforming your digital model into a series of physical components that will form the structure of your RC car.
Once your design is finalized, you’ll need to print all the necessary components. You can find all of the files available for download at Cults. Keep in mind that the printing time may vary depending on the printer you use. In my case, it took around 20 hours with my Kingroon K3PS Pro, which is relatively slow due to its budget-friendly nature. Faster printing can be achieved with more popular models like the Ender 3 or Anycubic.
Step 3: Assembly the Chassis
With all the components printed, it’s time to assemble the chassis. This is where the structure of the car begins to take form, providing the foundation for all other components.
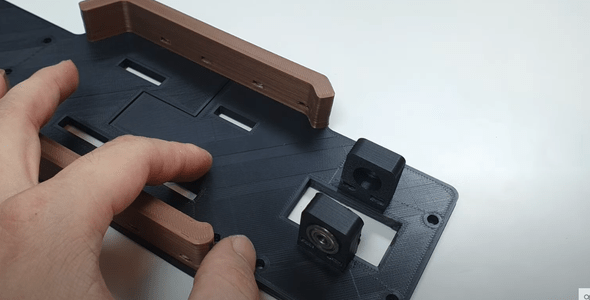
After all necessary components are prepared, assemble the chassis. Use M3x15 bolts and nuts to connect the chassis pieces together. Ensure you clean the parts beforehand, as 3D printers may sometimes leave residue or imperfections.
Step 4: Assemble the Rear Axles
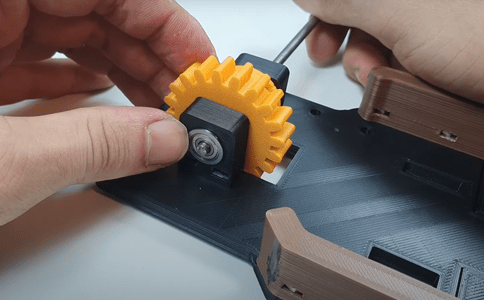
After the chassis is complete, attention turns to the rear axle system. This is a critical step in building your 3D printed RC car, as it involves setting up the mechanism that transfers power from the motor to the wheels, enabling movement.
With the chassis assembled, the next step involves constructing the rear axle system. For this project involving a brushless motor, speed reduction is crucial for better performance. However, the initial design resulted in a car that was still too fast and difficult to control, this highlighted the need for future upgrades.
Begin by attaching the shaft holder to the bearing and then mounting it to the chassis, securing it in place with M3x15 bolts and nuts. Since the shaft may be slightly larger than the bearing, sanding it down may be necessary to ensure a proper fit. For the driven gear, securely attach it to the shaft using M3 bolts.
Step 5: Mounting the Wheels and Brushless Motor
With the rear axle assembled, the next step is to mount the wheels and brushless motor. This involves connecting the components that provide movement and power to the RC car, bringing it closer to completion.
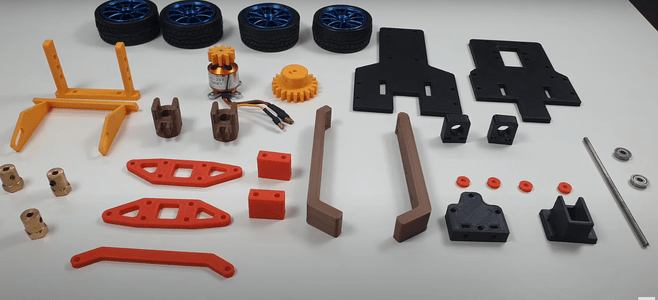
After securing the rear axle to the shaft holder, prepare your 65 mm wheels and 4 mm hex couplers. Affix the coupler to the shaft and then attach the wheels using two M4x10 bolts. For the brushless motor, mount it to the custom-designed bracket on the chassis. Ensure proper alignment between the gears. The smaller gear was initially attached with adhesive, this could lead to future issues.
Step 6: Assemble the Front Axle
You’re more than halfway through the build. Now, the focus shifts to the front axle and steering system, essential for controlling the direction of the RC car.
Now let’s build the front axle with a basic steering system. I opted for an SG90 Servo to control the front wheels, though it might be a primitive setup, future upgrades will improve its performance.
Step 7: Electronics Components
The heart of any RC car lies in its electronic components. These parts enable you to control the car remotely, dictating its speed and direction.
For a RC car, there are basic components that you must have.
Step 8: Connect the Electronics Components
Connecting the electronic components is a critical step, bridging the gap between power, control, and movement.
Connect the ESC to the brushless motor (VCC to VCC, GND to GND, Signal to Signal). Then, connect the ESC and Servo to the RX (Servo to channel 1, ESC to channel 3). Finally, connect the battery to the ESC. Secure these components to the chassis with wires to prevent them from detaching during operation.
Step 9: Accessories
Adding accessories enhances the look and feel of your RC car, allowing you to customize it to your liking.
Adding accessories for this car for better looks. Now it’s time to test and appreciate it.
Anycubic Coupon – $5 off $50+ sitewide with code DIY5OFF


