ANYCUBIC Photon Mono M7 PRO 14K Resin 3D Printer, 170mm/h Fast Printing, 10.1'' Mono LCD with COB LighTurbo 3.0 Source, Dynamic Temperature Control Resin Vat, Build Volume 8.77''x4.96''x9.05''
$689.99 (as of June 18, 2025 23:32 GMT +00:00 - More infoProduct prices and availability are accurate as of the date/time indicated and are subject to change. Any price and availability information displayed on [relevant Amazon Site(s), as applicable] at the time of purchase will apply to the purchase of this product.)In the world of 3D printing, supports can be a necessary but frustrating element. They can cause prints to take longer, mar the surfaces, and sometimes stick too well, making them difficult to remove. However, with a deeper understanding of how supports work and how to adjust them, you can achieve excellent results. The Prusa 3D team has shared four valuable tips to improve your experience with 3D printing supports. Whether you are a beginner or have been printing for years, these tips will help you achieve beautiful, flawless prints.
First and foremost, turning on supports is the easiest way to get started. However, it is important to experiment with the settings, such as choosing to apply supports only on the build plate and adjusting the support angle. By decreasing the support angle, you can reduce the number of supports and support material, resulting in faster prints. Another crucial aspect to consider is the z distance, which determines the gap between the support material and the model. Finding the right balance is essential to prevent the supports from sticking to the model. Lastly, manual placement of supports provides granular control, allowing you to add or block supports in specific areas of your print. Prusa’s latest beta release introduces a painting tool that enables precise support placement for expert users. By implementing these support tips, you can achieve perfect 3D prints and improve your overall printing experience.

Tip 1: Turning on Supports
Understanding the purpose of supports in 3D printing
Supports are structures created during the 3D printing process that provide necessary structural support for overhanging or complex features in a model. Without supports, these features would not be able to print properly and would result in failed or distorted prints. Supports are essential in 3D printing to ensure the successful creation of intricate designs and improve print quality.
Turning on supports in your slicer software
To enable supports in your slicer software, you need to access the support settings. The location of these settings may vary depending on the slicer software you are using, but they are typically found in the “Print Settings” or “Supports” section. Look for an option to toggle supports on or off.
Exploring the option to select ‘Build plate Only’ for supports placement
When turning on supports, there is often an option to select “Build plate Only” for supports placement. This means that the supports will only be generated on the build plate of your printer, avoiding unnecessary placement on internal structures or cavities. Experimenting with this option can help you customize the placement of supports and optimize print quality.
Tip 2: Adjusting Support Angle
Understanding the default support angle on your printer
By default, most 3D printers and slicer software set a support angle of 55 degrees or greater. This default angle ensures that even beginner users can achieve successful prints with proper support. However, understanding and adjusting the support angle can lead to improved print quality and reduced support material usage.
How to adjust the support angle for better results
To adjust the support angle, you need to access the support settings in your slicer software. Look for an option to modify the support angle and decrease it to a smaller value. Reducing the support angle means that fewer supports will be generated, resulting in faster print times and less support material required.
The benefits of reducing the support angle
Lowering the support angle has several benefits. Firstly, it reduces the number of supports generated, resulting in shorter print times and saving material costs. Additionally, prints with lower support angles often have cleaner surfaces and minimal support marks, making the post-processing easier. Note that not all printers can handle extremely low support angles, so it is recommended to experiment and find a balance that works best for your specific printer.
Find 3D Printing Accessories Here
Tip 3: Managing Z Distance
Understanding the importance of maintaining a gap between the model and support material
The Z distance, also known as the gap or distance between the model and support material, is a crucial factor in achieving successful 3D prints. Maintaining an appropriate distance ensures that the supports do not stick or fuse with the model, making it easier to remove them after printing.
Impact of Z distance on print quality
The Z distance plays a significant role in the quality of the first layer of the print. If the distance is too large, the print may have a poor adhesion, resulting in a weaker structure. On the other hand, if the distance is too small, the supports may fuse with the model, making it difficult to separate them without causing damage.
Balancing the distance to avoid fusion and maintain support structure
Finding the right Z distance requires experimentation and adjustment based on the specific printer and filament being used. It is recommended to start with a moderate distance and gradually increase or decrease it to achieve the desired balance. Ideally, the supports should provide enough stability to print the overhanging features while allowing for easy removal without causing damage to the model.
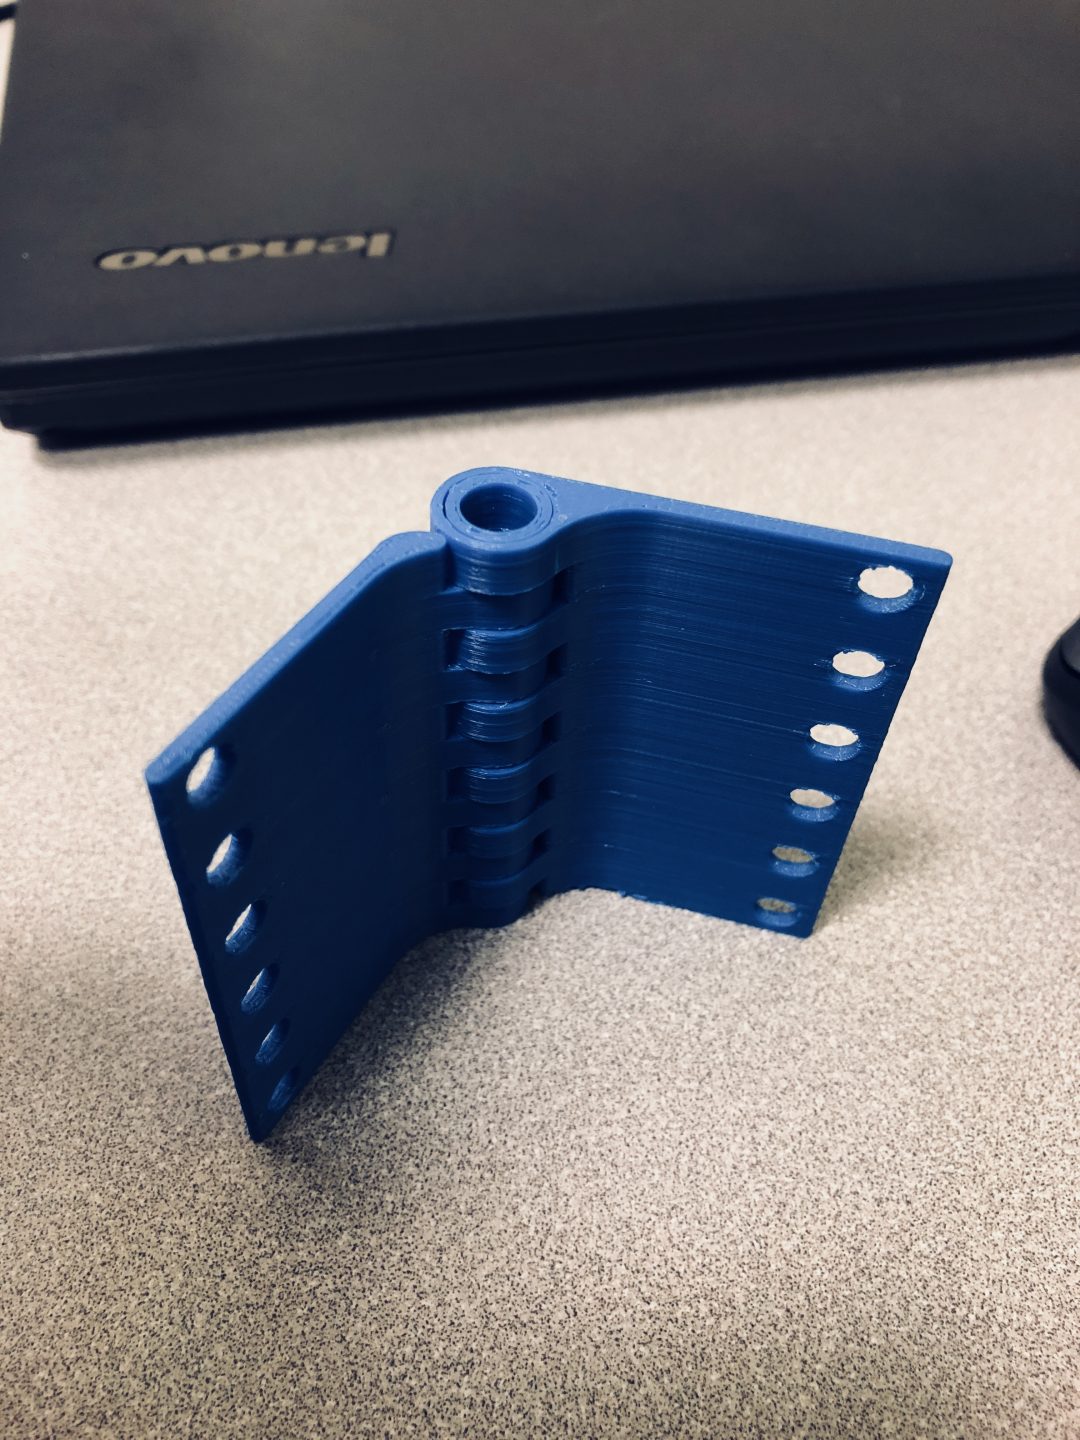
Tip 4: Manual Placement of Supports
Exploring support enforcers and blockers
Support enforcers and blockers are tools that allow for manual placement of supports on specific areas of the model. Support enforcers create supports in the selected areas, while support blockers prevent supports from generating in particular regions. This level of customization is beneficial when precise support placement is required.
Benefits of manually placing supports
Manually placing supports provides users with more control over the print process. It ensures supports are only added where necessary, reducing support material usage and improving print quality. Additionally, manual placement allows for customization based on the unique requirements of each model, avoiding unnecessary supports that may obstruct or damage the final print.
Introduction to the advanced support painting feature in Prusa Slicer
The latest beta release of Prusa Slicer introduces an advanced support painting feature. This feature allows users to literally “paint” on the model, indicating where supports should be added or excluded. By giving users granular control over support placement, this tool enhances the overall customization and quality of prints. The Prusa team has released an in-depth tutorial video on this feature, which can be found on the Prusa YouTube channel.

Conclusion
Recap of the four support tips for perfect 3D prints
In this article, we explored four essential tips for optimizing supports in 3D printing. Turning on supports is the first step, followed by adjusting the support angle to reduce material usage and improve print time. Managing the Z distance ensures appropriate support structure without fusing to the model, while manual placement of supports allows for precise customization. These tips, when applied effectively, can significantly enhance 3D print quality.
Encouragement to experiment and customize supports for individual projects
It is essential to remember that 3D printing is a dynamic and creative process. The tips provided here serve as a starting point, and it is encouraged to experiment and customize supports based on the specific requirements of each project. By understanding how supports work and adjusting them accordingly, you can achieve excellent results in your 3D prints.
The importance of staying updated with the latest features and tutorials from Prusa
As the field of 3D printing continues to evolve, staying updated with the latest features, tutorials, and advancements is crucial. Prusa offers a wealth of resources, including tutorials, tips, tricks, and updates, on their YouTube channel. Keeping up with these resources will ensure you are equipped with the knowledge and tools needed to make the most of your 3D printing experience.
Maintain Your 3D Printer with these Tools
Creality ABS Filament 1.75mm, 3D Printer Filament, Excellent Resistance, Odorless Non-Toxic, Stability, Tough, 1kg(2.2lbs) Printing Filament for 3D Printer (Black)
$22.99 (as of June 18, 2025 23:32 GMT +00:00 - More infoProduct prices and availability are accurate as of the date/time indicated and are subject to change. Any price and availability information displayed on [relevant Amazon Site(s), as applicable] at the time of purchase will apply to the purchase of this product.)
Official Creality Hyper PLA Filament 1.75mm, High Speed PLA 30-600mm/s Rapid 3D Printer Filament, Dimensional Accuracy +/-0.02mm, Fit Most FDM 3D Printers, 1KG(2.2lbs) Spool Black
$27.99 (as of June 18, 2025 23:32 GMT +00:00 - More infoProduct prices and availability are accurate as of the date/time indicated and are subject to change. Any price and availability information displayed on [relevant Amazon Site(s), as applicable] at the time of purchase will apply to the purchase of this product.)
ANYCUBIC 10K Resin 3D Printer, Photon Mono 4 LCD 3D Printer with 7-inch Mono Screen, Upgraded LighTurbo Matrix and Printing Platform, Printing Size of 6.04''x3.42''x6.49''
$159.99 (as of June 18, 2025 23:32 GMT +00:00 - More infoProduct prices and availability are accurate as of the date/time indicated and are subject to change. Any price and availability information displayed on [relevant Amazon Site(s), as applicable] at the time of purchase will apply to the purchase of this product.)
Revopoint Inspire 3D Scanner for 3D Printing Handheld, 3D Printer Scanner 0.2mm Precision, Full Color 3D Model Scanning for Car Customization, Digital Art, DIY Projects, Support Android/iOS/Mac/Win
$339.99 (as of June 18, 2025 23:32 GMT +00:00 - More infoProduct prices and availability are accurate as of the date/time indicated and are subject to change. Any price and availability information displayed on [relevant Amazon Site(s), as applicable] at the time of purchase will apply to the purchase of this product.)