
Official Creality Ender 3 3D Printer Fully Open Source with Resume Printing Function DIY Printers Build Volulme 8.66x8.66x9.84 inch
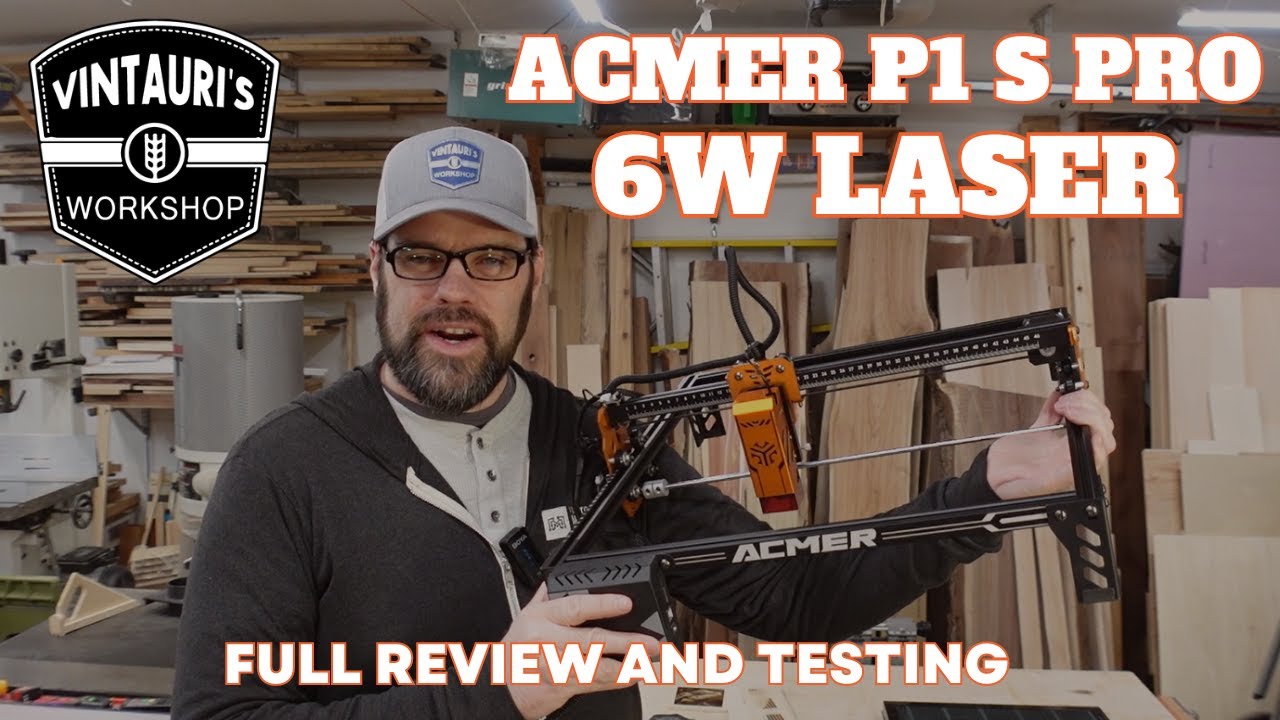
$179.00 (as of March 8, 2025 20:51 GMT +00:00 - More infoProduct prices and availability are accurate as of the date/time indicated and are subject to change. Any price and availability information displayed on [relevant Amazon Site(s), as applicable] at the time of purchase will apply to the purchase of this product.)Do you often find yourself intrigued by the world of laser engraving and wondering if an affordable machine like the ACMER P1 S PRO 6W could meet your projects’ needs? You’ll be pleased to know that this laser engraver, despite its budget-friendly price, boasts an impressive feature set designed to handle a variety of materials. This review aims to provide an in-depth look into what this compact laser unit can achieve, presenting a thorough evaluation of its performance, strengths, and areas where it excels.

Buy Photon Mono M5 Get Free 1KG Resin
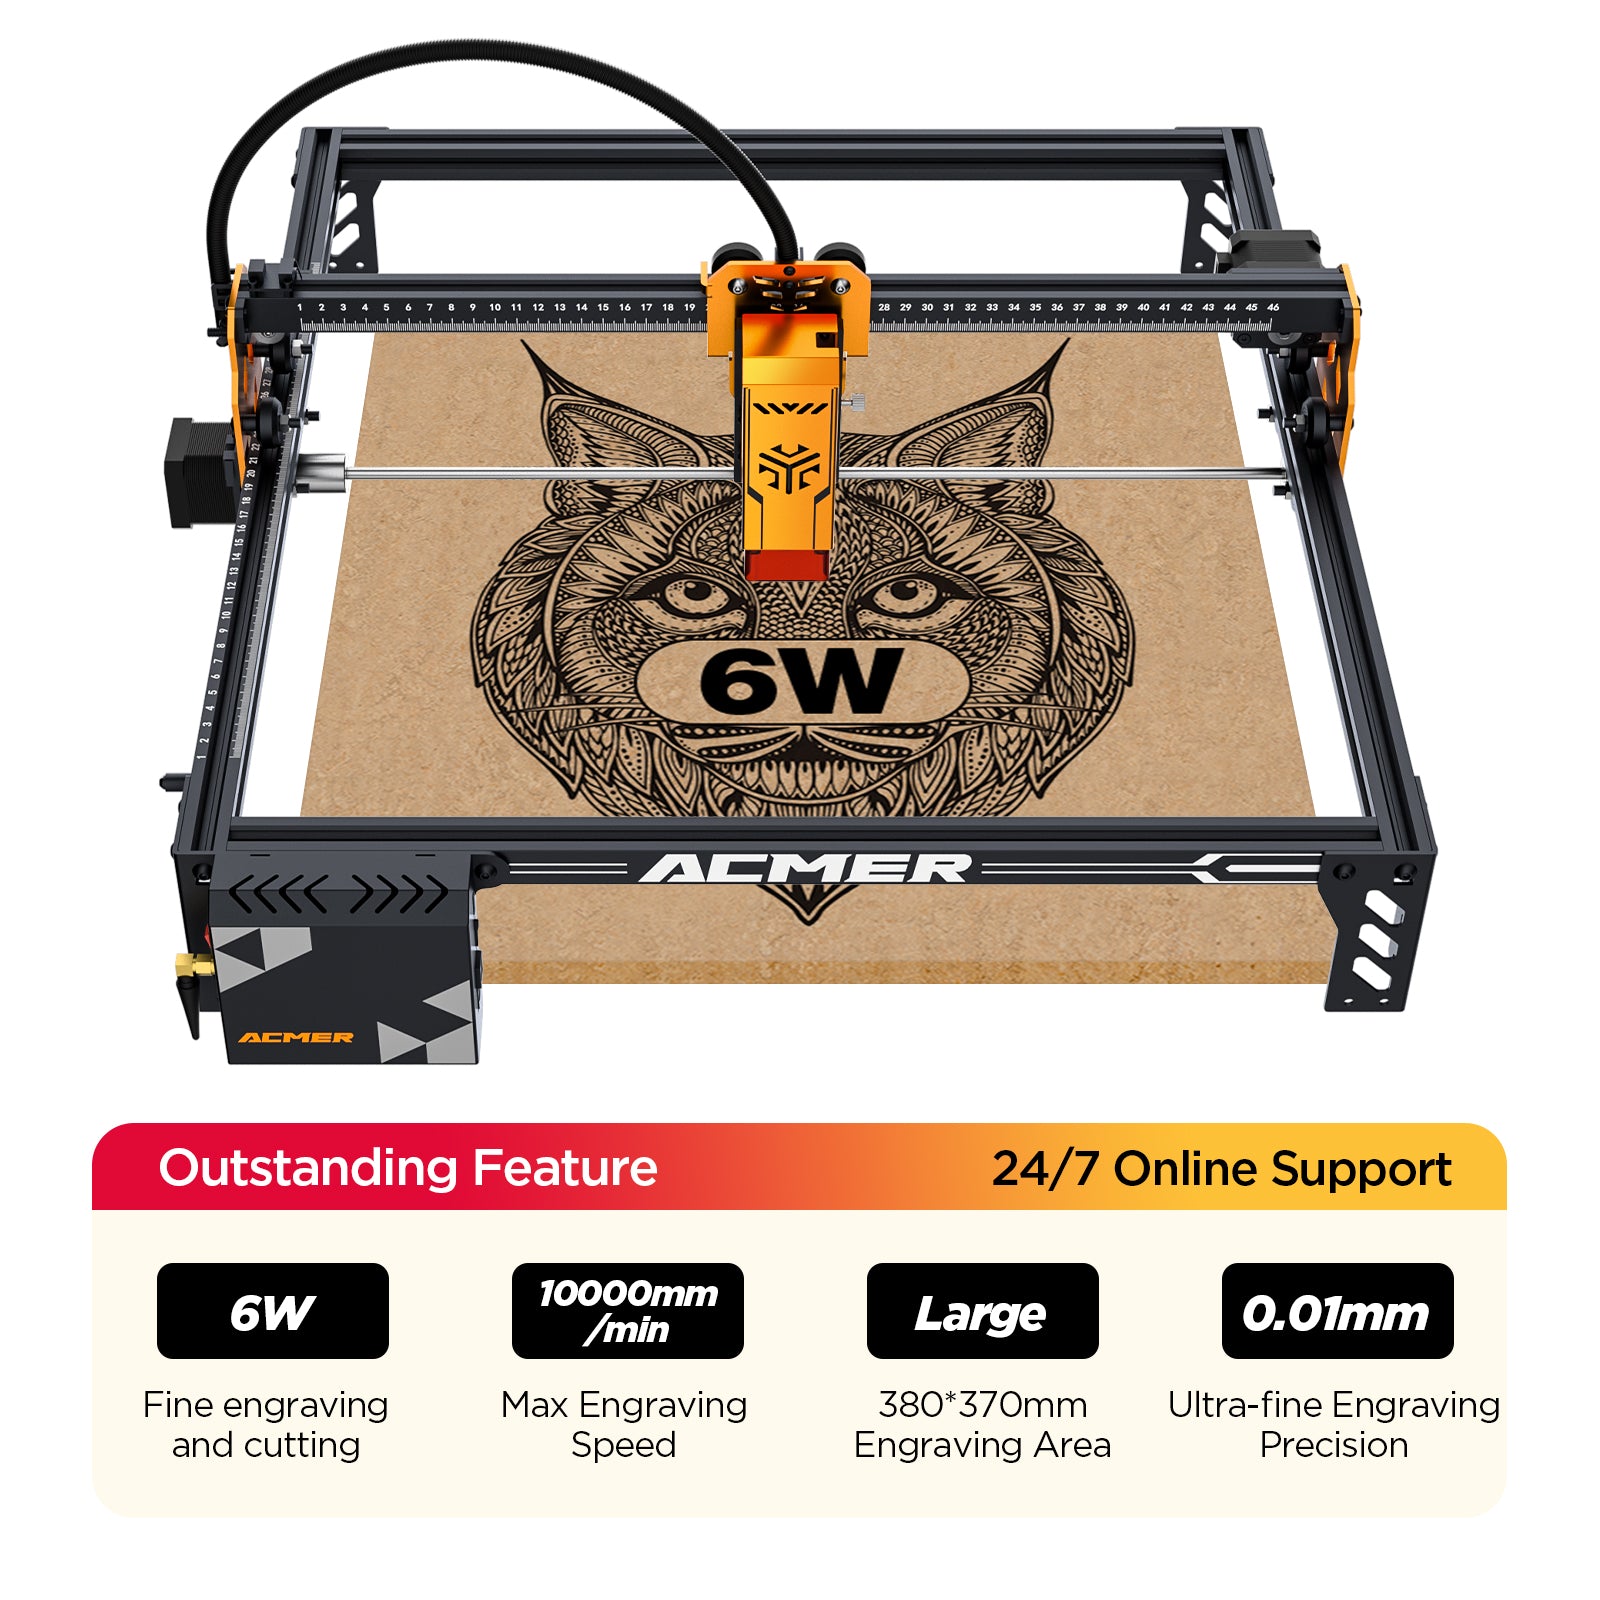
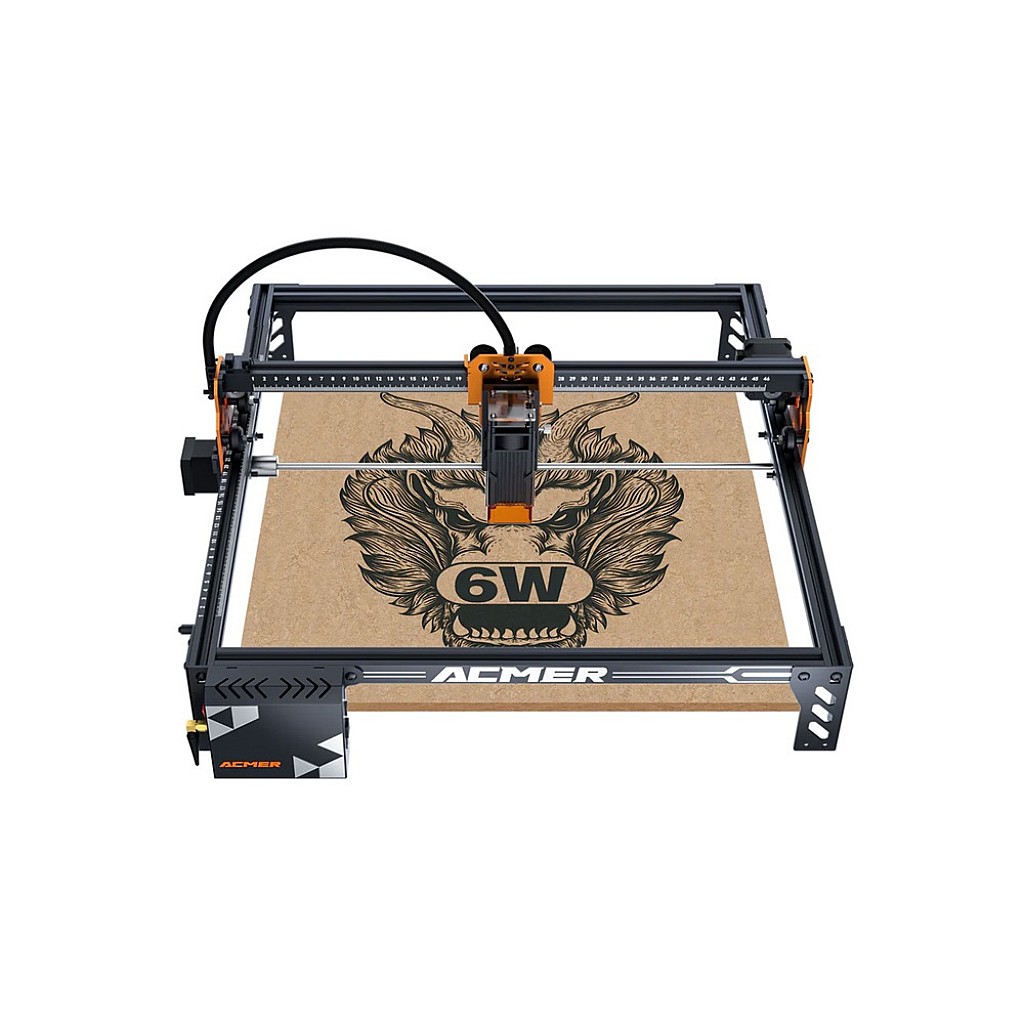
ACMER P1 S PRO 6W Specifications
Understanding the specifications of any laser engraver is essential before making a purchase decision. The ACMER P1 S PRO 6W comes equipped with a 6-watt laser output and a full metal structure. Here’s a quick overview of the machine’s technical details:
| Specification | Details |
|---|---|
| Laser Output | 6W |
| Structure | Full metal |
| Engraving Speed | 10000mm/min |
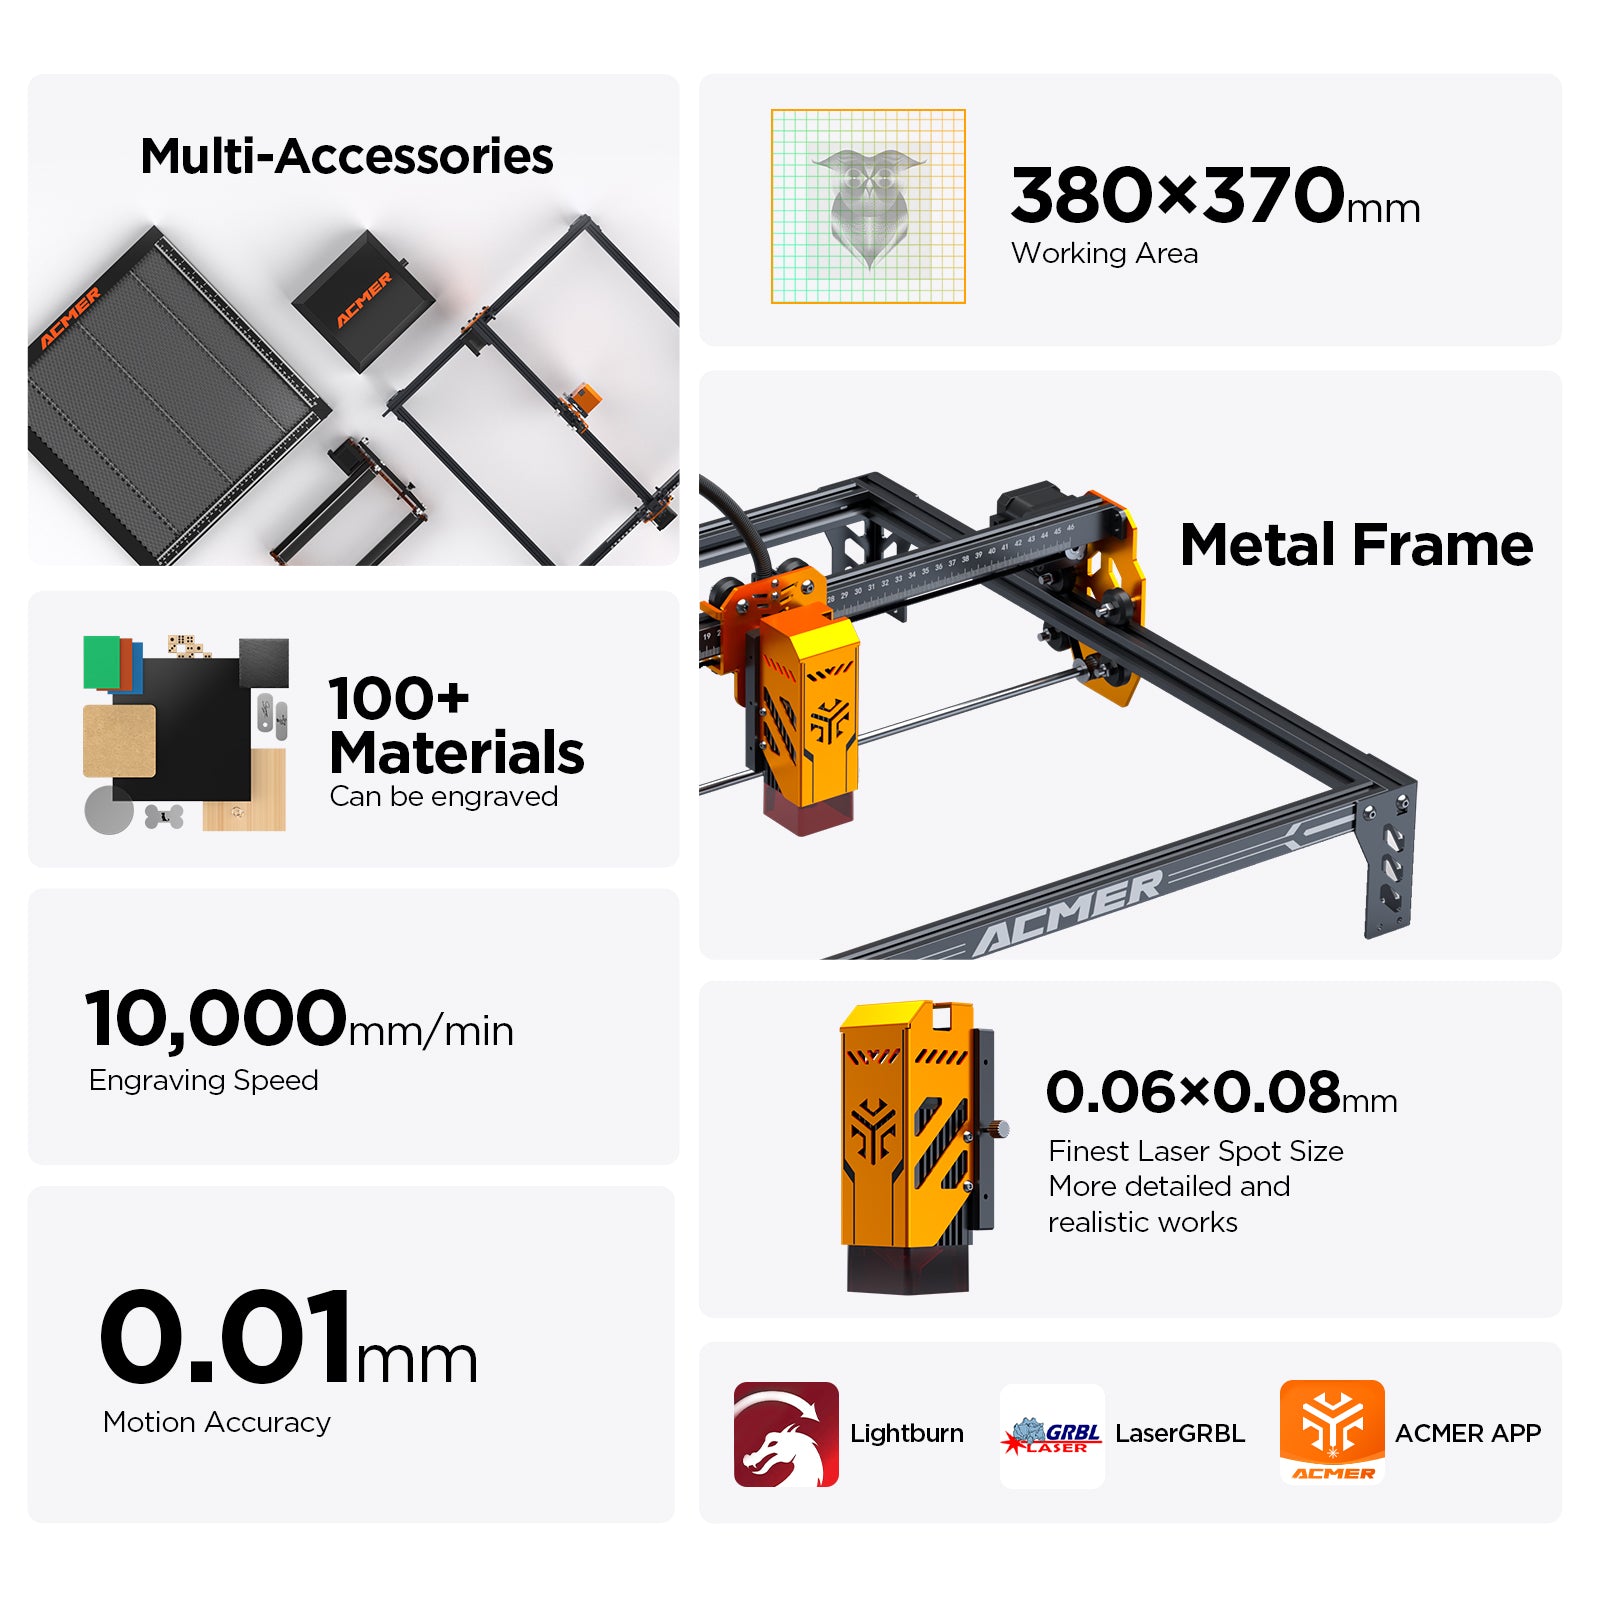
| Engraving Area | 380mm x 370mm |
| Engraving Accuracy | 0.06 – 0.08mm |
| Motion Accuracy | 0.01mm |
| Compatible Software | Lightburn, LaserGRBL, ACMER App |
| Power Supply | 24V/3A |
| Connection Options | USB cable, Micro SD card, Wi-Fi |
| Price Range | $177 – $354 |
The wide range of compatible software offers versatility, allowing you to choose whichever platform you are most comfortable with. The speed and accuracy specifications hint at a reliable machine capable of fine details and quick operations.
Unboxing and Setup
Receiving your new ACMER P1 S PRO 6W is just the beginning; the setup process can make or break your experience. Fortunately, the unit comes well-packaged, and despite its intricate structure, it is quite user-friendly to assemble. It took me approximately 30 minutes to complete the assembly following the included instructions and using the provided tools.
Step-by-Step Setup Process
- Assemble the Frame: Begin with the straightforward task of piecing together the frame and gantry. All components fit together seamlessly.
- Install the Laser Unit: Next, affix the laser unit to the frame, ensuring all connections are secure.
- Connect the Cables: Once the physical assembly is complete, connect the necessary cables.
Additionally, you’ll need to install LightBurn or LaserGRBL software on your PC and the ACMER app on your phone. The package conveniently includes a USB drive with files, guides, and initial settings for both cutting and engraving. This thoughtful inclusion is particularly beneficial for first-time laser engraver owners.
$30 off $400+ Anycubic Products with code AC30OFF
Laser Unit Calibration
Proper calibration is vital for achieving optimal performance from a laser engraver. The ACMER P1 S PRO 6W features a manual focus system aided by a small focusing tool. The process is straightforward but crucial for ensuring your engravings are precise.
Calibrating the Laser Unit
- Remove Red Light Cover: Detach the red plastic cover from the laser unit, which is magnetically fastened.
- Adjust the Laser Unit: Loosen the bolt on the side of the laser unit to allow movement. Place the focusing tool under the laser housing and lower it until it touches the tool.
- Secure the Position: Tighten the side bolt to lock the laser unit in place.
- Replace the Red Cover: Finally, reattach the red cover to complete the calibration.
This simple process guarantees the laser is focused correctly, which is critical for achieving detailed and accurate engraving results.
Features
The ACMER P1 S PRO 6W comes with several notable features that enhance its functionality and user experience.
Laser Unit
The standout feature is its 6-watt laser unit, enclosed in a colored aluminum case with the ACMER logo. This unit is powerful enough to perform a range of tasks, from intricate engravings to cutting thin materials in a single pass.
End Stops for X-Y Axis
These end stops simplify the process of homing and lining up materials, contributing to more consistent and precise operations.
Wi-Fi Capability
The Wi-Fi feature allows you to connect your laser engraver to the MKS Laser App, providing control over various functions directly from your smartphone. This added convenience can streamline your workflow, especially for quick adjustments or when operating in a different area of your workspace.
Build Quality
Constructed with a robust all-aluminum frame and anodized in an attractive gold-bronze color, the ACMER P1 S PRO 6W boasts both durability and aesthetic appeal. The gantry and frame are equipped with scales, useful for accurately positioning the laser.
6-Watt Laser Module
For a machine at its price point, the 6-watt laser module delivers impressive performance. It offers detailed engraving and can cut through thin materials with ease. The unit performed considerably well during testing, proving that even a low-watt laser can be versatile and efficient.
Tested Materials
To give you a real-world example of what the ACMER P1 S PRO 6W can achieve, various materials were tested, including:
Slate Engraving
Engraving on slate is becoming increasingly popular, especially for coasters and signs. Initially, I had reservations about whether the 6-watt laser could effectively engrave slate, but the results were quite impressive. The machine produced detailed engravings with a notable depth.
Anodized Aluminium
For those interested in customizing business cards, anodized aluminum is a fantastic option. The ACMER P1 S PRO 6W handled this material exceptionally well, delivering sharp and precise engravings with just one pass.
Wood Engraving
Wood is a commonly used material in laser engraving due to its ease and aesthetic results. Despite being a lower wattage unit, this laser handled wood engraving swiftly, achieving excellent detail and depth of color at a speed of 8000mm/min at full power.
Wood Cutting
Cutting wood, particularly thicker pieces, can be challenging for a low-watt laser. The ACMER P1 S PRO 6W produced excellent results, even for intricate cuts. It managed to cut through thin basswood cleanly and accurately in just one pass, a testament to its capability despite its lower power output.
Materials and Supplies
When working with a laser engraver, the choice of materials and supplies can significantly impact your results. Here are some tips for selecting the best materials for your projects:
Selecting the Right Wood
For wood engraving and cutting, softer woods like basswood are ideal due to their texture and ease of cutting. Hardwood can also be used but may require more power and slower speeds.
Engraving on Metal
Anodized aluminum offers a smooth surface and sharp contrast for engravings. Ensure the metal is properly coated to achieve the best results.
Specialized Materials
Slate and glass can be engraved with remarkable detail using the ACMER P1 S PRO 6W. However, they may require specific settings and tests to achieve the desired depth and clarity.
General Material Settings
Getting the settings right is crucial for achieving optimal results on different materials. Here’s a basic guide to get you started:
| Material | Power (%) | Speed (mm/min) | Passes |
|---|---|---|---|
| Slate | 100 | 3000 | 1 |
| Anodized Aluminum | 100 | 1400 | 1 |
| Wood Engraving | 100 | 8000 | 1 |
| Wood Cutting | 100 | 3000 | 1 |
These settings serve as a starting point. Always perform a test sample before committing to your final piece to fine-tune the settings as needed.
Enclosure and Air Purifier
Safety is paramount when operating a laser engraver. Using an enclosure and air purifier can significantly reduce the risks associated with laser engraving, such as exposure to fumes and potential reflections from the laser beam.
Importance of an Enclosure
An enclosure confines the laser unit, preventing accidental exposure to the laser beam. It also contains any debris generated during the engraving or cutting process.
Role of an Air Purifier
Laser engraving can produce fumes, especially when working with certain types of wood or plastics. An air purifier helps keep the air clean, making your workspace safer and more pleasant to work in.
Comparison with Other Laser Engravers
How does the ACMER P1 S PRO 6W stack up against other laser engravers in its class? Let’s take a closer look.
Price
One of the standout advantages of the ACMER P1 S PRO 6W is its price. Ranging from $177 to $354, it’s one of the more affordable options on the market, making it accessible for hobbyists and professionals on a budget.
Performance
In terms of performance, the 6-watt laser unit punches above its weight. While it may not compete with higher-wattage commercial units, it holds its own in terms of detailed engraving and the ability to cut thin materials in a single pass.
Versatility
The ACMER P1 S PRO 6W offers a range of connectivity options and software compatibility, making it versatile and user-friendly. Its Wi-Fi capability for app control is an added bonus not present in many similarly priced models.
Conclusion and Pros & Cons
The ACMER P1 S PRO 6W is a compact yet powerful laser engraver that offers impressive results across various materials. It’s an excellent choice for those looking to get into laser engraving without breaking the bank. Here’s a summary of the pros and cons to consider:
Pros
- Affordable: Competitive pricing makes it accessible.
- Performance: Capable of detailed engravings and cutting thin materials.
- Build Quality: Sturdy all-metal construction with a premium finish.
- Ease of Use: Simple setup and calibration.
- Versatility: Compatible with multiple software platforms and offers Wi-Fi control.
Cons
- Limited Power: While sufficient for many tasks, higher power units might be necessary for thicker materials or more rapid cutting.
- Manual Calibration: Requires manual focus which might be tricky for beginners.
- No Air Assist: Cutting performance could benefit from an air assist feature to improve results and reduce residue.
In conclusion, the ACMER P1 S PRO 6W proves that you don’t need a high-wattage, expensive laser engraver to achieve excellent results. Whether you’re a hobbyist or a budding professional, this machine offers a well-rounded set of features that can meet most of your engraving and cutting needs while keeping your budget intact. So why not consider the ACMER P1 S PRO 6W for your next project? It’s a decision that could open up new creative possibilities for you.
Buy Photon Mono M5 Get Free 1KG Resin

Official CR PETG 3D Printer Filament 1.75mm 1KG (2.2lbs), High Precision Strong Toughness, Odorless Better Flow Moistureproof 3D Printing Ender Filament (Black)
$12.99 (as of March 8, 2025 20:51 GMT +00:00 - More infoProduct prices and availability are accurate as of the date/time indicated and are subject to change. Any price and availability information displayed on [relevant Amazon Site(s), as applicable] at the time of purchase will apply to the purchase of this product.)
ELEGOO PLA Filament 1.75mm Black 1KG, 3D Printer Filament Dimensional Accuracy +/- 0.02mm, 1kg Cardboard Spool(2.2lbs) 3D Printing Filament Fits for Most FDM 3D Printers
$14.99 (as of March 6, 2025 16:28 GMT +00:00 - More infoProduct prices and availability are accurate as of the date/time indicated and are subject to change. Any price and availability information displayed on [relevant Amazon Site(s), as applicable] at the time of purchase will apply to the purchase of this product.)
12 Piece Multi-Angle Marker 6 Sided Set: 3D Scanner 6mm Dots, 3D Scanning Spray & 3D Scanner Turntable Compatible, Accurate Tracking Markers, 3D Tracking Dot Reference Point Markers for 3D Scanning
$18.99 (as of March 8, 2025 20:51 GMT +00:00 - More infoProduct prices and availability are accurate as of the date/time indicated and are subject to change. Any price and availability information displayed on [relevant Amazon Site(s), as applicable] at the time of purchase will apply to the purchase of this product.)
ELEGOO Mars 5 Ultra 9K MSLA Resin 3D Printer, Smart Mechanical Sensor, Fast Printing Up to 150mm/h, AI Camera, WiFi Cluster Printing, Automatic Leveling, Large Printing Size 6.04 * 3.06 * 6.49 inch
$335.99 (as of March 8, 2025 20:51 GMT +00:00 - More infoProduct prices and availability are accurate as of the date/time indicated and are subject to change. Any price and availability information displayed on [relevant Amazon Site(s), as applicable] at the time of purchase will apply to the purchase of this product.)