AOSEED 3D Printer for Kids, Beginner 3D Printer with 8 PLA Filament Set, Huge Toy Library & Modify, Wi-Fi & App Control, Create STEM Toys, High Precision, W/ 15+ Mini 3D Design Module, X-Maker Joy
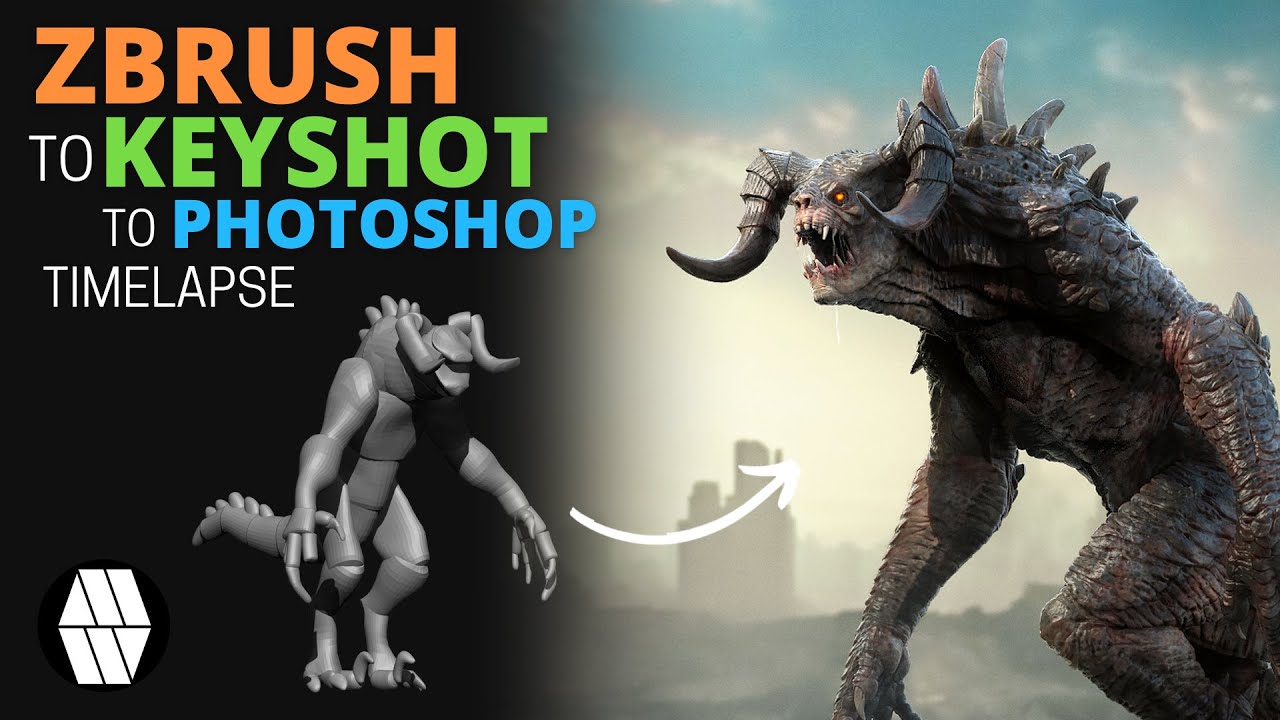
$254.98 (as of June 19, 2025 23:45 GMT +00:00 - More infoProduct prices and availability are accurate as of the date/time indicated and are subject to change. Any price and availability information displayed on [relevant Amazon Site(s), as applicable] at the time of purchase will apply to the purchase of this product.)Ever wonder how you could bring Fallout’s ferocious Deathclaw to life in a stunning 3D model using ZBrush? This guide is your go-to resource for creating a high-poly Deathclaw model ready for your portfolio or future projects.

Buy Photon Mono M5 Get Free 1KG Resin
Introduction
Creating a high-quality Deathclaw model inspired by Fallout is no small feat. With ZBrush, KeyShot, and Photoshop in your toolkit, you can build a high-poly model that showcases your skills. This guide focuses on building a detailed Deathclaw model, highlighting the process from gathering references to rendering the final piece.
The Tools You’ll Need
Familiarize yourself with the tools you’ll utilize in this guide:
- ZBrush: Your primary 3D sculpting tool.
- PureRef: Essential for organizing your references.
- KeyShot: For rendering.
- Photoshop: To composite your renders.

$30 off $400+ Anycubic Products with code AC30OFF
Step-by-Step Process
Collect References
To start, deeply immerse yourself in reference images. Use game screenshots, concept art, and even pictures of real-world reptiles for a well-rounded perspective. A program like PureRef is invaluable here, helping you keep everything organized and easily accessible.
Form Primitive Shapes
Begin your modeling journey by blocking out the Deathclaw’s silhouette using primitive shapes in ZBrush. This step is crucial for getting the proportions right before you delve into more intricate details.
Refine Silhouette
Using the Move and Smooth brushes, adjust the primitive shapes to match your references. This ensures your base has the correct proportions and is ready for more detailed sculpting.
First Sculpting Pass
Merge your primitive shapes using DynaMesh. This step allows you to work on the overall muscle forms. Use standard brushes to start defining major muscle groups and anatomical structures.
Add Early Details
Increase the model’s resolution and begin focusing on landmark details like scales, wrinkles, and other distinct features. Capturing these elements early on lays a solid foundation for more refined details later.
Retopologize
Here, use ZRemesh to create clean topology. Once you’ve achieved a clean base mesh, subdivide and reproject details for a cleaner and more detailed model. Now, your model is not only detailed but also easier to work with.
Fine Detail Pass
At this stage, enhance the model with fine details like wrinkles and skin textures. Brushes like DamStandard, Standard, Smooth, and Clay are your best friends here. Pay special attention to how skin folds and scales interact with each other.
Build the Head
Your model’s head is its focal point, so spend significant time detailing it. Concentrate on the mouth, eyes, and nose to ensure they reflect the fearsome nature of a Deathclaw.
Create the Body
Different textures for different parts of the skin add realism. Focus on the reptilian, scaly skin for the outer parts and softer skin for the underbelly. This contrast enriches the creature’s overall look.
Add Arms
The arms should showcase a distinction between the hard, scaly surfaces on the exterior and the softer underside. This duality adds depth to the model.
Make the Legs
Keep a balance between wrinkle flow and scale layout as you detail the legs. This balance ensures the legs look natural yet formidable.
Design the Tail
Use references extensively to create the tail. Brushes will help you add interesting textures and details, making the tail look as realistic as possible.
Create Claws
Start with primitive cylinders for each claw. Use various brushes for shaping, ZRemesh for clean topology, and detailing techniques to give the claws a sharp, menacing appearance.
Add Alpha Details
Incorporate alpha details sparingly to enhance textures. These should complement your hand-sculpted details rather than overshadow them.
Finalizing Model
At this stage, your Deathclaw should be ready for showcase. If you wish, you can add additional steps like retopology, UV mapping, and texturing to further polish your model.
Add Color
Using the standard brushes with RGB settings adjusted, paint your Deathclaw model. Draw inspiration for color palettes from reptiles, ensuring to capture the menacing look of the creature.
Create Masks for Details
Masking techniques allow you to add finer color and texture details between scales and softer skin areas. This step brings out the nuanced textures that make your model stand out.
Pose the Creature
The Transpose Master in ZBrush is an incredible tool for dynamic posing. Present your Deathclaw in an action-packed pose to enhance its appeal and intrigue.

Rendering and Compositing
Once your model is complete, transfer it to KeyShot for rendering. KeyShot provides powerful tools to achieve realistic lighting and shadowing. Finally, use Photoshop to composite your renders, ensuring a portfolio-quality result.

Additional Tips and Tricks
Consistent Review
Regularly comparing your model against references ensures you stay true to the Deathclaw’s iconic look. Periodically tweak and adjust your model to maintain accuracy.
Detail Hierarchy
Not all details are created equal. Prioritize primary shapes and forms before getting lost in fine details. This practice keeps the model coherent and visually striking.
Use Layers
Leverage ZBrush’s layering capabilities to manage different detail passes. Layers allow for non-destructive editing, making it easier to refine or change details without affecting the entire model.
Save Frequently
Given the complexity of ZBrush models, frequent saving is crucial. Regularly create incremental saves to ensure a back-up at different stages of your workflow.
You now have a comprehensive roadmap to model a ferocious Deathclaw in ZBrush. Each step brings you closer to creating a high-quality, portfolio-ready piece that captures the essence of one of Fallout’s most iconic creatures. Happy sculpting!
Buy Photon Mono M5 Get Free 1KG Resin
ELEGOO Rapid PLA Plus Filament 1.75mm Black & White 2KG, PLA+ 3D Printer Filament for 30-600 mm/s High Speed Printing, Dimensional Accuracy +/- 0.02 mm, 2 Pack 1kg Spool(2.2lbs)
$28.98 (as of June 19, 2025 23:45 GMT +00:00 - More infoProduct prices and availability are accurate as of the date/time indicated and are subject to change. Any price and availability information displayed on [relevant Amazon Site(s), as applicable] at the time of purchase will apply to the purchase of this product.)
Creality Original Ultra Removable Magnetic 3D Printer Build Surface Heated Bed Cover for Ender 3/Ender 3 Pro/Ender 3 V2/Ender 3 V2 Neo/Ender 3 Neo/Ender 3 S1/3 S1 Pro/Ender 5 Pro 235X235mm
$9.99 (as of June 19, 2025 23:45 GMT +00:00 - More infoProduct prices and availability are accurate as of the date/time indicated and are subject to change. Any price and availability information displayed on [relevant Amazon Site(s), as applicable] at the time of purchase will apply to the purchase of this product.)
Creality K1C 3D Printer, 2024 New Version 3D Printers with 600mm/s Fast Printing Speed, Support Carbon Fiber Filament 300℃ High-Temp Print, Auto Leveling and Clog-Free Direct Extruder
$559.00 (as of June 19, 2025 23:45 GMT +00:00 - More infoProduct prices and availability are accurate as of the date/time indicated and are subject to change. Any price and availability information displayed on [relevant Amazon Site(s), as applicable] at the time of purchase will apply to the purchase of this product.)
ELEGOO Neptune 3 Pro FDM 3D Printer with Auto Bed Leveling, Dual-Gear Direct Extruder, Dual Lead Screw Drive, Removable Capacitive Screen, 8.85x8.85x11in Large Printing Size
$209.99 (as of June 19, 2025 23:45 GMT +00:00 - More infoProduct prices and availability are accurate as of the date/time indicated and are subject to change. Any price and availability information displayed on [relevant Amazon Site(s), as applicable] at the time of purchase will apply to the purchase of this product.)