ELEGOO Mars 5 Ultra 9K MSLA Resin 3D Printer, Smart Mechanical Sensor, Fast Printing Up to 150mm/h, AI Camera, WiFi Cluster Printing, Automatic Leveling, Large Printing Size 6.04 * 3.06 * 6.49 inch
$284.89 (as of June 18, 2025 23:32 GMT +00:00 - More infoProduct prices and availability are accurate as of the date/time indicated and are subject to change. Any price and availability information displayed on [relevant Amazon Site(s), as applicable] at the time of purchase will apply to the purchase of this product.)Have you ever wondered whether there’s a better way to manage the complexities of trimming in AutoCAD? If you’re nodding your head, you’re in the right place. In today’s guide, I’ll walk you through the various ways to utilize the Trim command in AutoCAD, making your design process quicker and more efficient.

Anycubic 3D Materials Sale: Resin & PLA from $9.49/kg
The Trim Command: An Overview
The Trim command is beloved by many AutoCAD users for its straightforward functionality and versatility. Whether you need to cut down your drawing’s components to size or ensure pristine geometry, the Trim command is here to save the day. It’s worth noting that the command has evolved over the years, now providing two distinct modes: Standard Mode and Quick Mode. By understanding both modes and their options for object selection, you can significantly streamline your workflow.
Why is the Trim Command Important?
Using the Trim command allows you to refine your sketches efficiently. Instead of creating perfection from the start, you can draw rough sketches and trim the excess parts. This approach is typically faster and more forgiving, enabling smoother design revisions and adjustments.
Standard Mode Trim
This may seem counterintuitive, but let’s start with Standard Mode even though it is not the default mode. Think of it as Classic Mode, harking back to the more traditional form of the Trim command.
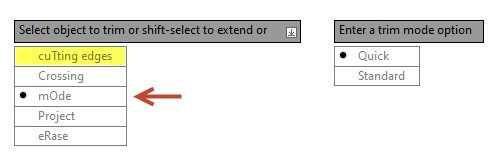
Switching to Standard Mode
To use Standard Mode consistently, you can specify “Mode” and then select “Standard.” Alternatively, while you’re in Quick Mode, you can select “Cutting Edges” (or type “T”) to temporarily switch to selecting cutting planes.
Performing a Trim in Standard Mode
In Standard Mode, you begin by evaluating what needs to be trimmed, followed by finding or creating a cutting plane or planes. Here’s a simple process to follow:
- Launch the Command: Activate the Trim command.
- Select Your Planes: Choose the cutting planes.
- Exit Plane Selection Mode: Press the spacebar or enter key.
- Select Objects to Trim: Choose the items you wish to trim.
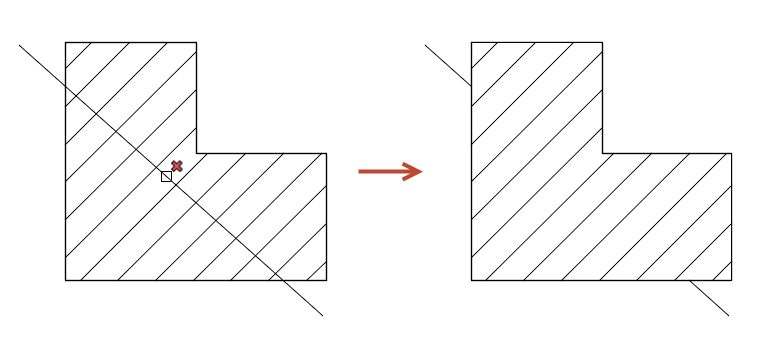
In older versions of AutoCAD, you would select specific cutting planes before trimming. However, with some newer versions, hitting enter at the cutting plane prompt configures AutoCAD to consider everything as a cutting plane. This streamlines the trimming process and is particularly useful when working with complex designs.
Take a look at the following screenshot to get a better understanding:
This demonstrates how allowing everything to be a cutting plane can simplify your job, especially when you only need some components trimmed.

Anycubic 3D Materials Sale: Resin & PLA from $9.49/kg
Quick Mode Trim
In AutoCAD 2021, the Trim command was updated to make Quick Mode the default. This was a significant shift that, while a bit jarring for long-time users, resulted in a more efficient trimming process.
Advantages of Quick Mode
Quick Mode assumes that everything in your drawing could serve as a cutting plane, reducing your need to manually select them. This shortcut moves you directly into selecting the objects you want to trim.
How to Use Quick Mode
- Start the Command: Activate the Trim command.
- Select Objects: Choose objects directly without specifying cutting planes.
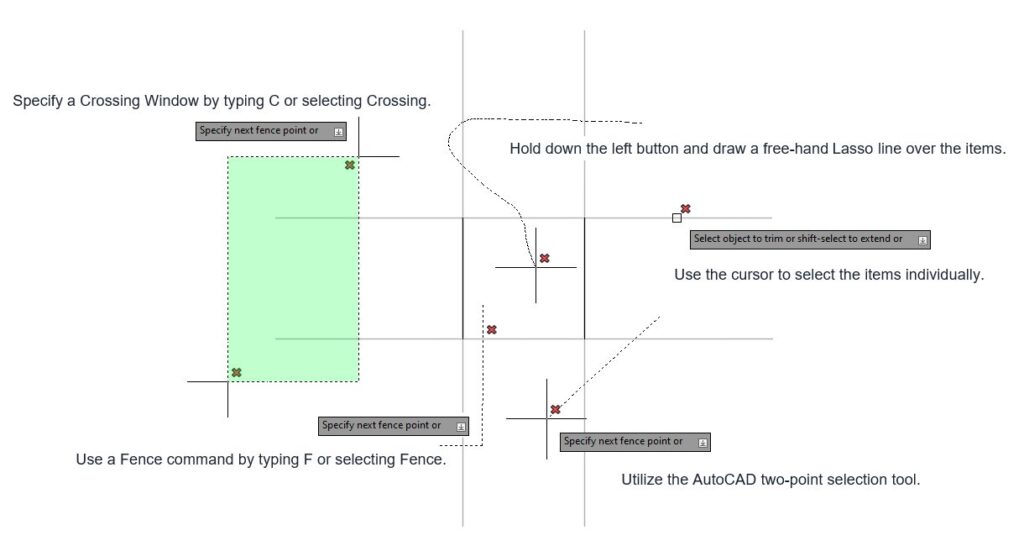
Selection Options in Quick Mode
Quick Mode offers several selection options:
- Single Object Selection: Use the pickbox to click on individual items.
- Lasso Selection: Hold your left mouse button and drag to create a free-hand lasso around the items you want to trim.
Many users find the lasso method particularly satisfying due to its efficiency and ease. Below is a screenshot illustrating different selection methods:
Trimming Hatches
Interaction with Quick Mode
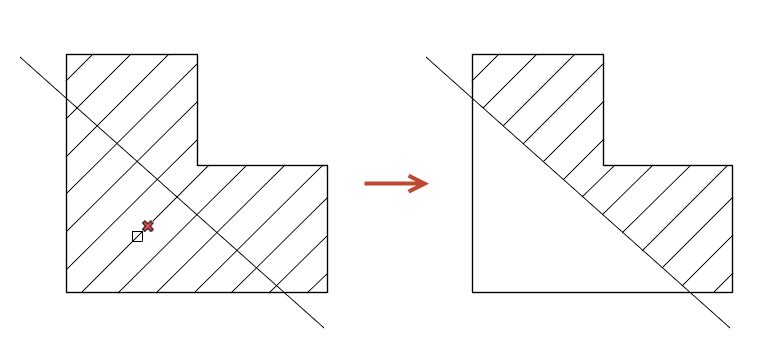
You might be wondering how hatches interact with Quick Mode trimming. By default, hatches are ignored as cutting planes. This behavior can be seen in the following image:
However, hatches can be trimmed as other object types. The following image demonstrates this:
Using TRIMEDGES Variable
If you don’t want hatches to be ignored as cutting planes, you can leverage the TRIMEDGES variable. Set this on/off switch to zero (off), and now individual lines within a hatch will act as cutting planes. Here’s what that looks like:
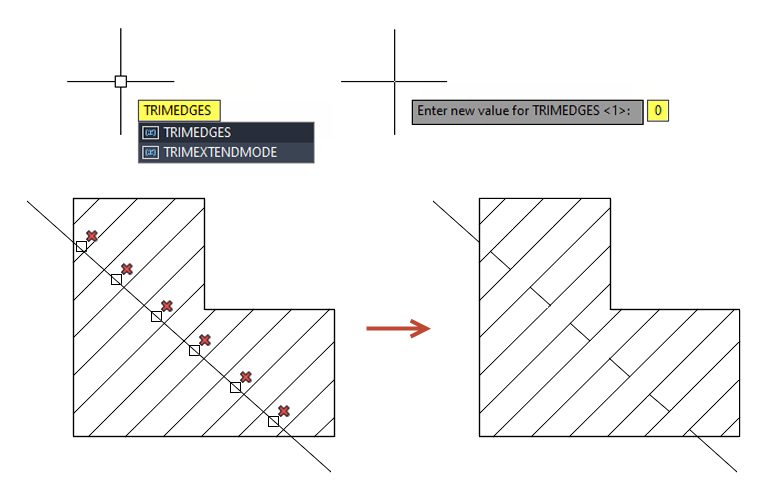
The TRIMEDGES setting is saved in the registry, so once you change it, the setting remains until you modify it again.
Bonus Tips
The Shift Button Trick
Guess what? You can also extend objects while in Trim mode by holding down the Shift key while selecting. Conversely, if you’re in the Extend command, holding Shift will enable trimming. This toggle can save you a significant amount of time and clicks.
That’s All Folks
The evolution and new functionalities of the Trim command in AutoCAD really do make it a versatile and powerful tool. Whether you’re a long-time user or new to AutoCAD, getting acquainted with both modes of the Trim command can boost your productivity.
The Swiss Army Knife of AutoCAD
With different modes, numerous selection options, and the ability to alternate between trimming and extending, the Trim command truly lives up to its reputation as the Swiss Army Knife of your modification toolbox.
More Tuesday Tips
Did you find this guide helpful? We have a collection of other tips to make your AutoCAD experience even better. Feel free to check out our Tuesday Tips series for more ideas. Have any tips yourself? Share them in the comments!
The post How to Trim in AutoCAD: Tuesday Tips With Frank appeared first on AutoCAD Blog.
Anycubic 3D Materials Sale: Resin & PLA from $9.49/kg

Official Creality Hyper PLA Filament 1.75mm, High Speed PLA 30-600mm/s Rapid 3D Printer Filament, Dimensional Accuracy +/-0.02mm, Fit Most FDM 3D Printers, 1KG(2.2lbs) Spool Black
$27.99 (as of June 18, 2025 23:32 GMT +00:00 - More infoProduct prices and availability are accurate as of the date/time indicated and are subject to change. Any price and availability information displayed on [relevant Amazon Site(s), as applicable] at the time of purchase will apply to the purchase of this product.)
SUNLU 3D Printer Filament Bundle Multicolor PETG Filament 1.75mm, Individually Vacuum-Sealed, 2kg in Total, 0.25kg per Spool, 8 Pack, 8 Colors, Black+White+Red+Yellow+Pink+Blue+Orange+Green
$35.99 (as of June 18, 2025 23:32 GMT +00:00 - More infoProduct prices and availability are accurate as of the date/time indicated and are subject to change. Any price and availability information displayed on [relevant Amazon Site(s), as applicable] at the time of purchase will apply to the purchase of this product.)
Creality 3D Scanner, Raptor Scanner for 3D Printing, Hybrid Technology for Versatile Scanning, High Precision with 0.02mm, Anti-Shake Tracking, 24-Bit Fast Full-Color Scanning for Windows macOS
$1,499.00 (as of June 18, 2025 23:32 GMT +00:00 - More infoProduct prices and availability are accurate as of the date/time indicated and are subject to change. Any price and availability information displayed on [relevant Amazon Site(s), as applicable] at the time of purchase will apply to the purchase of this product.)
Fengzhe 6.0mm 3D Scanning Markers for 3D Scanner, Accurate Tracking Dots, Reference Point Markers, and Diffuse Reflection for Precise Optical Tracking and 3D Scanning(500 Per Pack)
$14.99 (as of June 18, 2025 23:32 GMT +00:00 - More infoProduct prices and availability are accurate as of the date/time indicated and are subject to change. Any price and availability information displayed on [relevant Amazon Site(s), as applicable] at the time of purchase will apply to the purchase of this product.)