
Fully Assembled Mini 3D Printer for Kids and Beginners - Complete Starter Kit with Auto Leveling 3D Printing Machine, 10M PLA Filament, and SD Card - WiFi 3D Home Printer for MAC, Windows, and Linux
$244.99 (as of May 29, 2025 10:56 GMT +00:00 - More infoProduct prices and availability are accurate as of the date/time indicated and are subject to change. Any price and availability information displayed on [relevant Amazon Site(s), as applicable] at the time of purchase will apply to the purchase of this product.)Are you ready to unlock your creative potential and breathe life into your design ideas using 3D CAD software?

Anycubic Coupon – $5 off $50+ sitewide with code DIY5OFF
Introduction to Designing a Lamp Shade with 3D CAD Software
Designing a lampshade is a thrilling project that requires a blend of artistic vision, technical skills, and attention to detail. With the advent of user-friendly 3D design tools like SelfCAD, the process of creating custom lamp shades has become more accessible and enjoyable. Whether you’re a design enthusiast or a professional looking to refine your skills, this tutorial will guide you through the step-by-step process of designing a stunning lamp shade using SelfCAD.
Getting Started with SelfCAD
Before we dive into the design process, let’s take a moment to familiarize ourselves with the SelfCAD interface. SelfCAD is a cloud-based 3D CAD software that offers a wide range of tools and features to help you create complex designs with ease. To access the interactive tutorial for this article, visit the SelfCAD website and follow the link to the tutorial page.
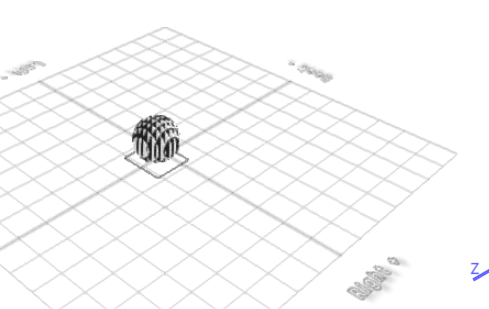
Step 1: Creating the Base Shape
The first step in designing our lamp shade is to create the base shape. For this, we’ll use the Torus tool, which can be found in the 3D Shapes Category on the Toolbar.
| Tool | Settings |
|---|---|
| Torus | Tube Radius: 2, Rotation x: 45 |
Click on the Torus tool to create the base shape, and set the Tube Radius to 2 and Rotation x to 45. Click to finalize the Torus.

Anycubic Coupon – $5 off $50+ sitewide with code DIY5OFF
Step 2: Adding Copies and Symmetry
Next, we’ll add copies of the base shape to create a symmetrical design. To do this, we’ll use the Copy Offsets tool, which can be found in the Tools Category on the Toolbar.
| Tool | Settings |
|---|---|
| Copy Offsets | Operation: Pivot, Amount of copies: 14 |
Click on the Copy Offsets tool and set the Operation to Pivot and the Amount of copies to 14. Click the Copy button to create the copies, and then click the ‘x’ to close the Copy Offsets panel.
Step 3: Merging Shapes and Adding a Second Torus
Now that we have our symmetrical design, let’s merge the shapes using the Stitch & Scoop tool. Then, we’ll add a second Torus shape to create the lamp shade’s interior.
| Tool | Settings |
|---|---|
| Stitch & Scoop | Union |
| Torus | Ring Radius: 15, Tube Radius: 1, Position y: 73 |
Click on the Stitch & Scoop tool and select Union. Then, create a second Torus shape with the specified settings.
Step 4: Scaling and Transforming the Design
With our lamp shade starting to take shape, it’s time to scale and transform the design. We’ll use the Scale tool to adjust the size and symmetry of the lamp shade.
| Tool | Settings |
|---|---|
| Scale | Symmetry: true, z: 75 |
Click on the Scale tool and set Symmetry to true and z to 75 using the highlighted gizmo. Click ‘x’ to close the Transformation panel.
Step 5: Finalizing the Design
The final step is to merge the shapes and create a single, cohesive design. Use the Copy Offsets tool to create copies of the second Torus shape, and then merge them using the Stitch & Scoop tool.
| Tool | Settings |
|---|---|
| Copy Offsets | Operation: Pivot, Amount of copies: 10 |
| Stitch & Scoop | Union |
Click on the Copy Offsets tool and set the Operation to Pivot and the Amount of copies to 10. Click the Copy button to create the copies, and then click the ‘x’ to close the Copy Offsets panel. Finally, use the Stitch & Scoop tool to merge the shapes and create a single, cohesive design.
Conclusion
Congratulations! You’ve successfully designed a stunning lamp shade using SelfCAD. As you continue to hone your design skills, remember that SelfCAD offers a wealth of resources to support your learning journey. To deepen your understanding and explore more advanced features, consider checking out the interactive tutorials and structured learning experiences available on the SelfCAD website.
| Resource | Description |
|---|---|
| Interactive Tutorials | https://www.selfcad.com/tutorials |
| SelfCAD Academy | https://www.selfcad.com/academy/curriculum/ |
| 3D Modeling 101 | https://www.youtube.com/@3dmodeling101 |
By leveraging the power of SelfCAD and the resources available, you can unlock your full creative potential and bring your design ideas to life.
Anycubic Coupon – $5 off $50+ sitewide with code DIY5OFF

ELEGOO Rapid PETG Filament 1.75mm Black 1KG, High Speed 30-600mm/s 3D Printer Filament Dimensional Accuracy +/- 0.02 mm, 1kg Cardboard Spool(2.2lbs) Fits for Most FDM 3D Printers
$13.49 (as of May 29, 2025 10:56 GMT +00:00 - More infoProduct prices and availability are accurate as of the date/time indicated and are subject to change. Any price and availability information displayed on [relevant Amazon Site(s), as applicable] at the time of purchase will apply to the purchase of this product.)
3DHoJor PLA Pro (PLA+) Filament 1.75mm, 3D Printer Filament, Cardboard Spool, Dimensional Accuracy +/- 0.03 mm - Blue, 1kg
$13.99 (as of May 29, 2025 10:56 GMT +00:00 - More infoProduct prices and availability are accurate as of the date/time indicated and are subject to change. Any price and availability information displayed on [relevant Amazon Site(s), as applicable] at the time of purchase will apply to the purchase of this product.)
Revopoint MINI 2 3D Scanner for 3D Printing Handheld, 3D Printer Scanner Up to 0.02mm Precision, Industrial Blue Light, Full Color Model Scan for Small Objects, Standard
$829.00 (as of May 28, 2025 10:49 GMT +00:00 - More infoProduct prices and availability are accurate as of the date/time indicated and are subject to change. Any price and availability information displayed on [relevant Amazon Site(s), as applicable] at the time of purchase will apply to the purchase of this product.)
ANYCUBIC Photon Mono M7 PRO 14K Resin 3D Printer, 170mm/h Fast Printing, 10.1'' Mono LCD with COB LighTurbo 3.0 Source, Dynamic Temperature Control Resin Vat, Build Volume 8.77''x4.96''x9.05''
$499.99 (as of May 29, 2025 10:56 GMT +00:00 - More infoProduct prices and availability are accurate as of the date/time indicated and are subject to change. Any price and availability information displayed on [relevant Amazon Site(s), as applicable] at the time of purchase will apply to the purchase of this product.)