Creality 3D Printer, K1 SE Fully Assembled Auto Leveling FDM 3D Printers for Kids and Beginners, 600mm/s Max High-Speed Printing, Core XY All Metal Structure, Larger Print Size 250x220x220mm
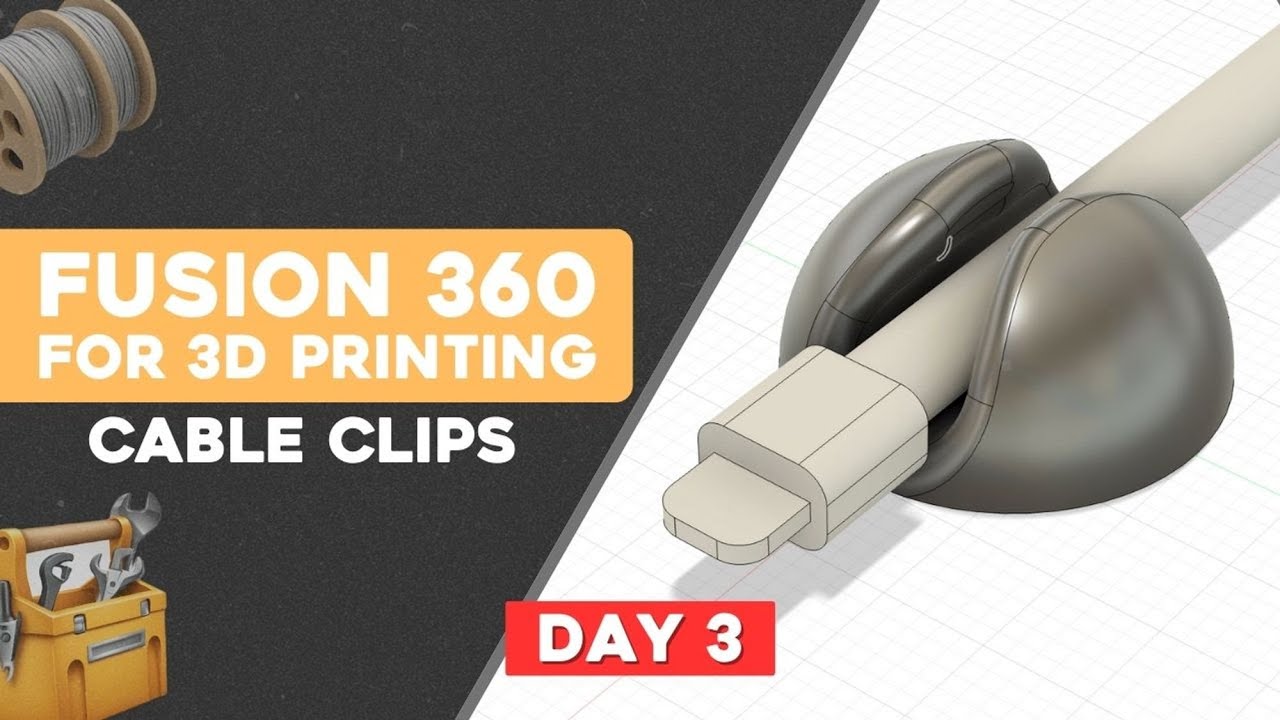
$279.00 (as of June 19, 2025 23:45 GMT +00:00 - More infoProduct prices and availability are accurate as of the date/time indicated and are subject to change. Any price and availability information displayed on [relevant Amazon Site(s), as applicable] at the time of purchase will apply to the purchase of this product.)In this tutorial, you will learn how to use Fusion 360 to create 3D printable cable clips. The video begins by guiding you through the process of creating a new component for the cable clip organizer. Then, it demonstrates how to create a sphere as the base shape and split it in half to achieve the desired shape for the cable tie. Next, a plane is created tangent to the design to create a sketch for the slot or hole. The tutorial provides step-by-step instructions and suggests using TPU material for easier cable placement. Additionally, it includes instructions on creating a cable design, although it is not necessary for the main objective of creating the cable organizer. Follow along with Brandon Santana in this informative Fusion 360 tutorial to enhance your 3D printing skills and create functional cable clip organizers.
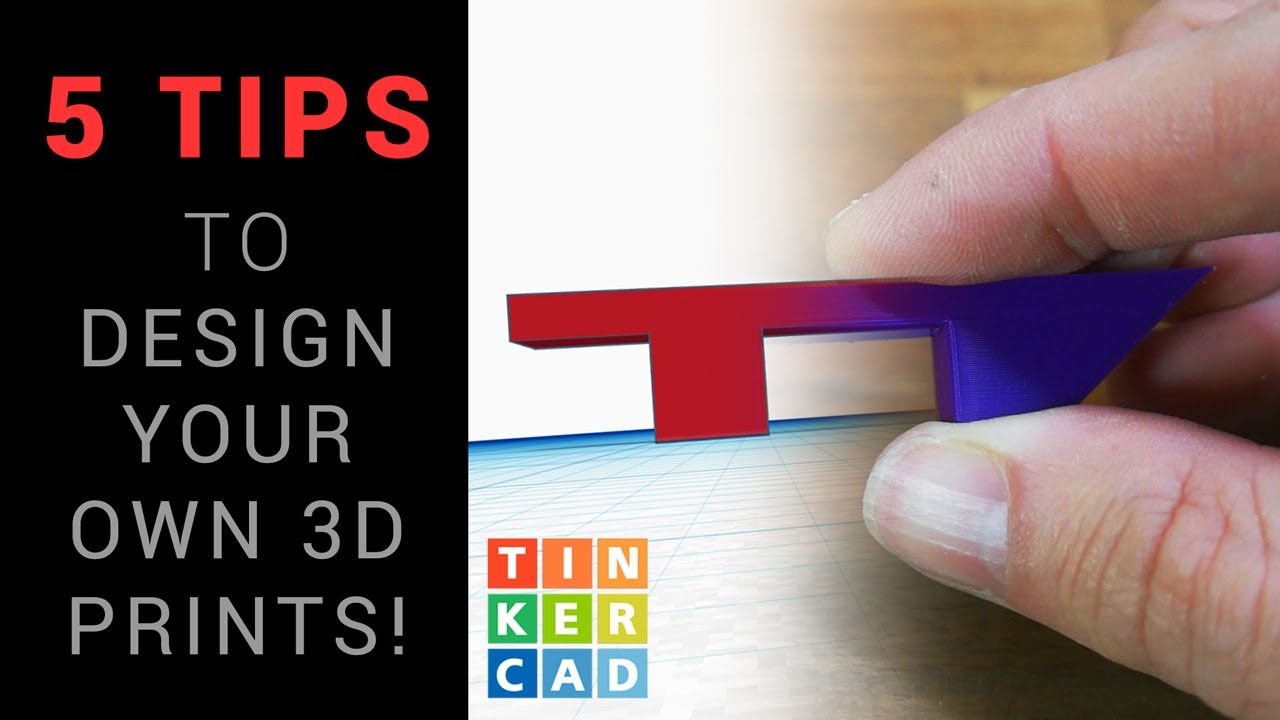
Day 3: Learn Fusion 360 for 3D Printing | Cable Clip Organizer
Welcome back to Day 3 of our Fusion 360 tutorial series! In today’s lesson, we will be focusing on creating 3D printable cable clips using Fusion 360. This tutorial will provide you with step-by-step instructions on creating a cable clip organizer, and we will also explore some additional tips and tricks for using Fusion 360. So let’s get started!

This image is property of i.ytimg.com.

Creating a New Component
To begin, open a blank canvas in Fusion 360. Once you have the canvas open, hover over to the “Create” tab and select “New Component”. This will allow us to create a new component specifically for our 3D printable cable organizer. Give your component a name, such as “Cable Organizer”, and press okay to create it.
Creating the Base Shape
The next step in creating our cable clip organizer is to create the base shape. We will be using a sphere as the base shape for our design. To create the sphere, navigate to the “Create” tab and select “Sphere” from the dropdown menu. Fusion 360 will prompt you to select a plane to create the sphere. Choose the bottom plane and select the origin as the center of the sphere. Drag the sphere out to a diameter of 20mm. You can adjust the size of the sphere by selecting the arrow and dragging it, or by manually entering the desired size in the dialogue box. Once you are satisfied with the size, press okay.

Splitting the Sphere
Now that we have created the base shape, we need to split the sphere in half to get the desired shape for our cable tie. To do this, press “S” on your keyboard to bring up the design shortcuts menu. Type in “Split Body” and select the split body option. Select the sphere as the body to split, and choose the bottom plane as the splitting tool. You should now see two bodies in the browser, one for the bottom half and one for the top half. Turn off the bottom body, as we will only be using the top part for our cable organizer.
Creating a Tangent Plane
Next, we need to create a tangent plane in order to create a sketch for the slot or hole in our design. Press “S” on your keyboard again and type in “Plane” in the design shortcuts menu. Choose the option for “Tangent to Face at Point”. Select the split shape as the face, and select the origin as the point of reference. Fusion 360 will create a plane that is tangent to the top half of the sphere. This plane will serve as the reference for our sketch.
This image is property of i.ytimg.com.
Creating a Sketch
Now that we have our tangent plane, we can create a 2D sketch for our cable organizer design. Access the sketch menu and choose the create sketch option. Select the tangent plane as the plane for the sketch. This will allow us to draw our design directly onto the tangent plane. Give your sketch a name, such as “Cable Clip Sketch”.
Drawing the Circle
With the sketch open, we can now start drawing the circle that will serve as our cable slot or hole. Access the circle tool and choose the center diameter circle option. Define the diameter of the circle as 6mm. Drag the circle onto the sketch and position it where you want the hole to be located.

This image is property of i.ytimg.com.
Defining the Position
To ensure that the circle is positioned correctly, we need to use the line tool to define its position. Access the line tool and choose the line option. Draw a line from the center of the circle to the origin. This will help us align the circle properly in the sketch.
Dimensioning the Line
Now that we have the line in place, we can dimension it to ensure it is at a right angle. Access the dimension tool and choose the linear dimension option. Select the line and the edge of the circle. Set the dimension to 90 degrees. This will constrain the line to a right angle position.

This image is property of i.ytimg.com.
Choosing the Material
Before we conclude our design, it is worth considering the material that will be used for 3D printing the cable organizer. We recommend using TPU (Thermoplastic Polyurethane) material for its flexibility and durability. This material is ideal for cable management purposes as it allows for easy insertion and removal of cables.
Conclusion
In this tutorial, we have learned how to create a 3D printable cable clip organizer using Fusion 360. We started by creating a new component and then proceeded to create the base shape using a sphere. We split the sphere in half and created a tangent plane for our sketch. We then created a sketch, drew a circle, and dimensioned a line to define the position of our cable slot. Finally, we discussed the importance of choosing the right material for 3D printing and concluded the design process. We hope you found this tutorial helpful and that you are now equipped with the knowledge to create your own cable clip organizer using Fusion 360. Stay tuned for more Fusion 360 tutorials in this series!
Join the 3D Printing Community: https://www.skool.com/makeit3d
Want to Learn How to Launch and Sell Your 3D Prints? https://www.makeit3d.co/offer
In this video…
Fusion 360 Hobbyist License: https://www.autodesk.com/products/fus…
Download the Free Hotkey Cheatsheet: https://www.canva.com/design/DAF4fp6s…
Like the content I’m producing? Buy me a Coffee! https://www.buymeacoffee.com/bransant
Check out my personal work https://links.makeit3d.co/
Socials:
/ bran_sant
/ santbran


Creality 3D Printer Tool Kit, 74Pcs 3D Printing Tool Wrap Kit Assembly/Removal/Filament Cutting Set 3D Printer Accessories for All FDM Printers Cleaning Finishing Printing
$31.99 (as of June 19, 2025 23:45 GMT +00:00 - More infoProduct prices and availability are accurate as of the date/time indicated and are subject to change. Any price and availability information displayed on [relevant Amazon Site(s), as applicable] at the time of purchase will apply to the purchase of this product.)
MYNT3D 3D Pen Mat Kit, DesignPad + FreePad,Black
$19.00 (as of June 19, 2025 23:45 GMT +00:00 - More infoProduct prices and availability are accurate as of the date/time indicated and are subject to change. Any price and availability information displayed on [relevant Amazon Site(s), as applicable] at the time of purchase will apply to the purchase of this product.)
Revopoint MIRACO Plus 3D Scanner for 3D Printing Handheld, 3D Printer Scanner with Photogrammetry, Up to 0.02mm Precision, Full-Color Scan for Small to Large Objects, 32GB RAM
$1,529.99 (as of June 19, 2025 23:45 GMT +00:00 - More infoProduct prices and availability are accurate as of the date/time indicated and are subject to change. Any price and availability information displayed on [relevant Amazon Site(s), as applicable] at the time of purchase will apply to the purchase of this product.)
Upgraded Tina2S 3D Printer, HEPHI3D 3D Printers WiFi Cloud Printing Auto Bed Leveling, Fully Assembled Mini 3D Printers for Beginners, Silent Print, Fully Open Source DIY 3D Printers for Home, School
$204.99 (as of June 19, 2025 23:45 GMT +00:00 - More infoProduct prices and availability are accurate as of the date/time indicated and are subject to change. Any price and availability information displayed on [relevant Amazon Site(s), as applicable] at the time of purchase will apply to the purchase of this product.)