
ANYCUBIC Photon Mono 4, Resin 3D Printer with 7'' 10K Mono LCD Screen, Stable LighTurbo Light Source and 70mm/h Fast Printing, Print Volume 6.04'' x 3.42'' x 6.49''
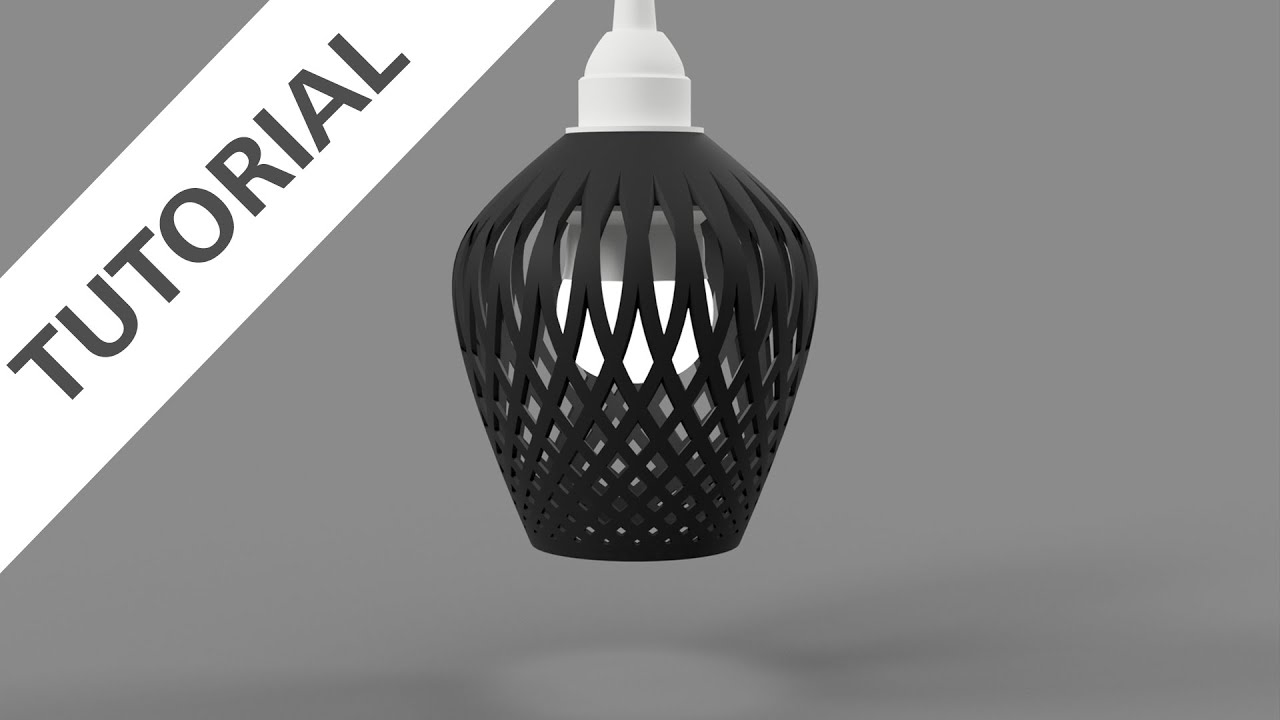
$159.99 (as of June 18, 2025 23:32 GMT +00:00 - More infoProduct prices and availability are accurate as of the date/time indicated and are subject to change. Any price and availability information displayed on [relevant Amazon Site(s), as applicable] at the time of purchase will apply to the purchase of this product.)In the video tutorial “Fusion 360: Design a 3D Printed Lampshade,” Fusion 360 Evangelist Taylor Stein guides viewers through the process of creating their own unique lampshade design using Fusion 360 software. The tutorial focuses on designing a lampshade that can be 3D printed and used with a standard lamp cord, which is available for purchase separately. Stein demonstrates how to sketch the silhouette of the lampshade, revolve it to create a solid, split the body to create a ring at the top and bottom, create a hole for the cord, shell the lampshade to create a hollow form, and create a pattern through the middle section. The design can be edited and exported as an STL file for 3D printing.
In this video tutorial, Fusion 360 Evangelist Taylor Stein walks you through the step-by-step process of designing a 3D printable lampshade using Fusion 360 software. The tutorial provides instructions on sketching the silhouette, revolving it to create a solid, splitting the body to create a ring, creating a hole for the cord, shelling the lampshade, and creating a pattern through the middle section. The design is based on the Ikea second chord set and the dimensions are provided. Stein encourages viewers to use the provided instructions as a starting point to create their own unique lampshade designs.
Fusion 360: Design a 3D Printed Lampshade

Overview of Fusion 360 Software
Fusion 360 is a powerful CAD (Computer-Aided Design) and CAM (Computer-Aided Manufacturing) software developed by Autodesk. It is widely used by designers and engineers for creating 3D models and prototypes. Fusion 360 offers a comprehensive set of tools and features that enable users to design, simulate, and fabricate their ideas. It is a cloud-based platform, meaning that users can access their projects from anywhere with an internet connection and collaborate with others in real-time.
Introduction to the Lampshade Design Tutorial
In this tutorial, Fusion 360 Evangelist Taylor Stein walks you through the process of designing a 3D printed lampshade. The lampshade is specifically designed to be used with a standard lamp cord, which can be purchased separately. The tutorial provides step-by-step instructions on how to create a 3D printable design using Fusion 360 software. It encourages viewers to unleash their creativity and design their own unique lampshades using the provided instructions.


Materials and Tools Needed
To follow along with this tutorial, you will need access to Fusion 360 software, which can be downloaded from the Autodesk website. Additionally, you will need a computer capable of running the software smoothly. It is also recommended to have a reliable internet connection for accessing the cloud-based features of Fusion 360.
Step 1: Sketching the Silhouette
The first step in designing the 3D printed lampshade is to sketch its silhouette. To do this, open Fusion 360 and select the “Create Sketch” option from the Sketch menu. Choose one of the vertical planes as the sketching plane. Then, use the line tool to draw a vertical line starting from the origin. You can dimension the line to match the desired height of the lampshade. Next, draw two lines for the top and bottom of the silhouette, taking into account the dimensions provided in the reference image. Finally, connect the bottom left with the top left using the spline tool to create a closed profile for the lampshade.

Step 2: Revolving the Sketch
After sketching the silhouette, the next step is to revolve it to create the solid shape of the lampshade. To do this, select the “Revolve” command from the Create menu. Choose the profile we just sketched as the revolve profile and select the vertical axis or line as the revolve axis. Adjust any necessary settings, such as the angle of revolution, and click OK. This will create the main body of the lampshade.
Step 3: Splitting the Body
In this step, we will add a ring at the top and bottom of the lampshade by splitting the body. To do this, select the “Offset Plane” command from the Construct menu. Choose a flat surface to offset from, and specify the offset distance. Create a new construction plane through the lampshade using this offset. Then, select the “Split Body” command from the Modify menu. Choose the body to split and the newly created construction plane as the splitting tool. This will split the body into two separate bodies, creating the rings at the top and bottom of the lampshade.

Step 4: Creating a Hole for the Cord
Next, we will create a hole in the lampshade for the lamp cord to pass through. Use the “Create Sketch” command to sketch a circle on the top face of the lampshade. Dimension the circle to match the diameter of the cord, leaving a small gap for clearance. Then, select the “Extrude” command from the Create menu. Select the inner profile of the circle and extrude it through the part. Make sure to change the extent to “2” and select the bottom surface of the lampshade as the surface to extrude to. This will create a clean cut for the cord to fit through.
Step 5: Shelling the Lampshade
In order to create a hollow form for the lampshade, we will shell out the interior of the design. Select the “Shell” command from the Modify menu. Choose the top face and the bottom face of the lampshade as the faces to remove. Enter the desired wall thickness for the shell, keeping in mind the constraints of your 3D printer. Click OK, and Fusion 360 will create a hollow form for the lampshade, saving material and reducing weight.
Step 6: Creating a Pattern
To add visual interest to the lampshade, we will create a pattern through the middle section. Start by creating a new sketch on a plane that runs through the middle of the part. Use the “Project” command to project the existing geometry into the sketch. This will allow you to reference the existing shape when creating the pattern. Then, use the “Line” tool to draw a line through the middle section, adjusting the positioning as desired. You can also experiment with the curvature of the line using control points and tangent handles.
Step 7: Mirroring the Feature
In this step, we will mirror the pattern feature around the main body to create a symmetrical design. Select the “Mirror” command from the Create menu. Choose the pattern feature as the feature to mirror and select the main body as the mirror plane. Adjust any necessary settings, such as the number of instances. Fusion 360 will automatically create the mirrored feature, completing the symmetrical design.
Editing and Exporting the Design
Fusion 360 allows for easy editing of the design at any point in the process. Simply right-click on the feature in the timeline and choose “Edit” to make any necessary changes. Once you are satisfied with the design, you can export it as an STL file for 3D printing. To do this, select the design body in the model workspace, go to the “Make” workspace, and choose the “3D Print” option. Adjust any necessary settings, such as the scaling and orientation, and save the STL file to your desired location.
Conclusion
Designing a 3D printed lampshade using Fusion 360 is a rewarding and creative process. By following the steps outlined in this tutorial, you can create your own unique lampshade designs that are both functional and aesthetically pleasing. Fusion 360 provides a user-friendly interface and powerful features that enable you to bring your ideas to life. So go ahead and unleash your creativity, and start designing your own 3D printed lampshades today!
Follow along with Fusion 360 Evangelist, Taylor Stein (@taylor_stein), as he guides you through the process of designing a 3D-printable lampshade for an off-the-shelf lamp cord. Create your own unique lampshade today!
► Get Fusion 360 | http://autode.sk/1ZJbgj6
SUBSCRIBE | http://autode.sk/11vxXeD
FACEBOOK | http://autode.sk/19jII5A
TWITTER | http://autode.sk/19jIJXc
IKEA Lamp Cord: http://autode.sk/1ReRYMF

MYNT3D 3D Pen Mat Kit, DesignPad + FreePad,Black
$19.00 (as of June 18, 2025 23:32 GMT +00:00 - More infoProduct prices and availability are accurate as of the date/time indicated and are subject to change. Any price and availability information displayed on [relevant Amazon Site(s), as applicable] at the time of purchase will apply to the purchase of this product.)
ANYCUBIC PLA Filament 1.75mm Bundle, 3D Printing PLA Filament 1.75mm Dimensional Accuracy +/- 0.02mm, 1KG Spool (2.2 lbs), 2KG Black+Black
$23.99 (as of June 18, 2025 23:32 GMT +00:00 - More infoProduct prices and availability are accurate as of the date/time indicated and are subject to change. Any price and availability information displayed on [relevant Amazon Site(s), as applicable] at the time of purchase will apply to the purchase of this product.)
ELEGOO Neptune 3 Pro FDM 3D Printer with Auto Bed Leveling, Dual-Gear Direct Extruder, Dual Lead Screw Drive, Removable Capacitive Screen, 8.85x8.85x11in Large Printing Size
$209.99 (as of June 18, 2025 23:32 GMT +00:00 - More infoProduct prices and availability are accurate as of the date/time indicated and are subject to change. Any price and availability information displayed on [relevant Amazon Site(s), as applicable] at the time of purchase will apply to the purchase of this product.)
3D Scanning Marker & Turntable Kit – 6.0mm Inner Diameter Adhesive Dots with Auto Rotating Turntable, 600 Reference Markers for Handheld 3D Scanners, Reverse Engineering & Metrology
(as of June 18, 2025 23:32 GMT +00:00 - More infoProduct prices and availability are accurate as of the date/time indicated and are subject to change. Any price and availability information displayed on [relevant Amazon Site(s), as applicable] at the time of purchase will apply to the purchase of this product.)