ELEGOO Mercury Plus V3.0 Wash and Cure Station, 7.5 L Large Capacity, Compatible with Mars Saturn Photon Halot MSLA LCD DLP 3D Printers
$159.99 (as of June 17, 2025 23:14 GMT +00:00 - More info)Have you ever found yourself struggling with inconsistent temperatures on your 3D printer, leading to uneven layer quality and failed prints? If you’ve experienced this, then you’re not alone. Many 3D printing enthusiasts encounter these issues, which can often be traced back to inadequate PID tuning for your hotend and heatbed. Understanding and performing PID tuning ensures a more stable temperature control, greatly improving your print quality. Let’s dive into the essentials of PID tuning in Klipper and how you can achieve more precise temperature control.

Anycubic 3D Materials Sale: Resin & PLA from $9.49/kg
Why Perform PID Tuning in Klipper?
PID tuning in Klipper is essential for maintaining consistent temperatures during the 3D printing process. PID stands for Proportional-Integral-Derivative, which is an algorithm used to control the temperature by adjusting the power supplied to the heaters.
Benefits of PID Tuning
- Temperature Stability: Proper PID tuning maintains your target temperature within a narrow range, minimizing fluctuations that can impact print quality.
- Print Quality: Consistent temperatures lead to better layer adhesion, reducing defects and improving the overall quality of your prints.
- Equipment Longevity: Properly tuned heaters experience less thermal stress, which can extend the life of your hotend and heatbed.
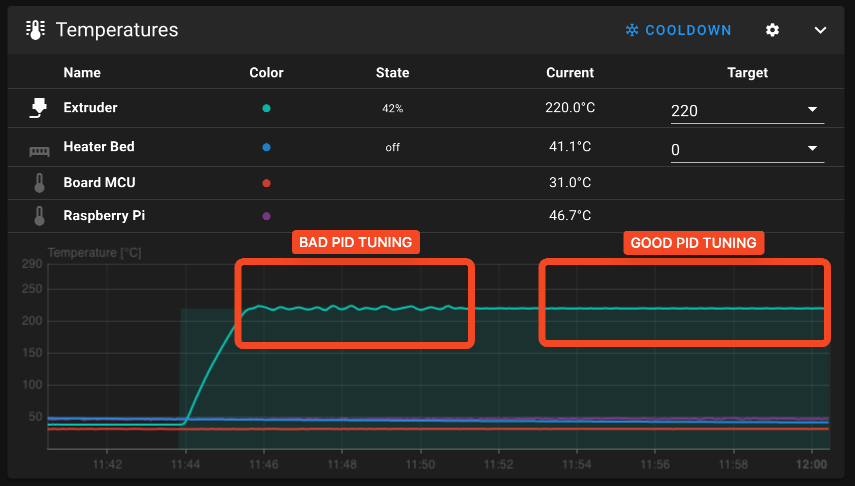
If your PID settings are not tuned correctly, the system might overshoot the target temperature, causing inconsistent temperatures that affect the printed layers differently. This could result in warping, poor layer adhesion, and even thermal damage over time.
Prerequisites for PID Tuning in Klipper
Before beginning the PID tuning process in Klipper, make sure to follow these prerequisites to achieve the best results:
- Room Temperature: Ensure both the hotend and the heatbed are at room temperature.
- Silicone Sock: If your hotend has a silicone sock protection, make sure it’s set correctly.
- Magnetic Flex Plate: If you use a magnetic flex plate, ensure it is attached as it would be during printing.
These preparations help in achieving a more accurate calibration, as they mimic the actual printing conditions closely.

Anycubic 3D Materials Sale: Resin & PLA from $9.49/kg
Hotend PID Tuning in Klipper
Ensuring your hotend reaches and maintains the desired temperature is crucial for producing high-quality 3D prints. Here’s a step-by-step guide to tune your hotend’s PID settings in Klipper:
Steps for Hotend PID Tuning
- Home the Printer: Home your printer and adjust the nozzle position to the center of the bed with about 5cm of clearance.
- Set Heatbed Temperature: Set the heatbed temperature to 60°C.
- Turn on Part Cooling Fans: Set the part cooling fans to 100% using the
M106 S255command. - Run PID Calibration Command: To start PID calibration for the hotend, use the command
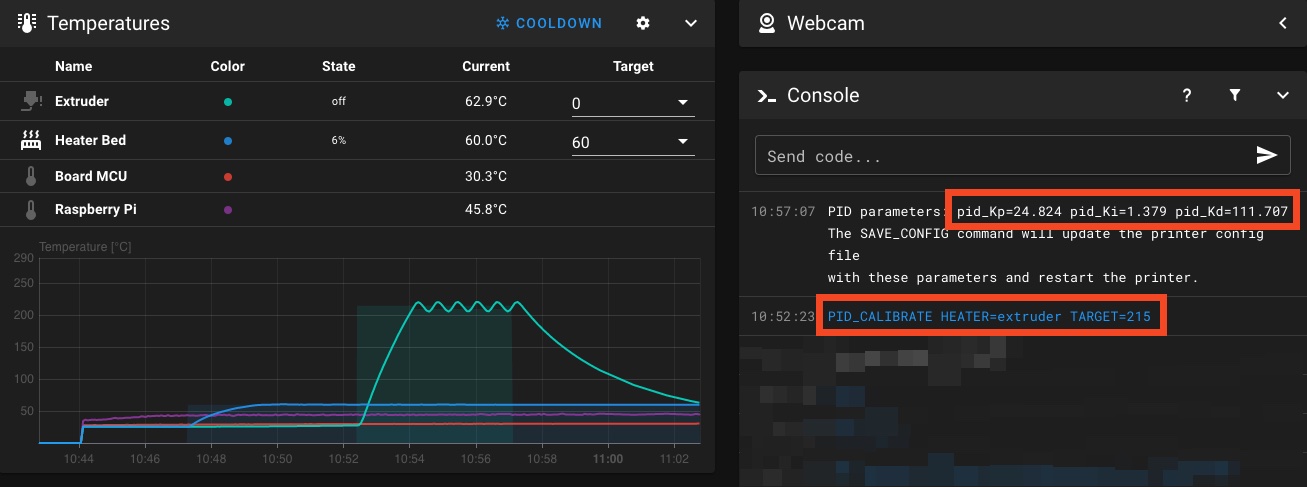
PID_CALIBRATE HEATER=extruder TARGET=215. - Wait for Completion: Allow the calibration process to complete. This might take a few minutes.
- Save the Settings: Once completed, run
SAVE_CONFIGto save the new PID settings to your printer configuration file.
Choosing the Right Target Temperature
The target temperature should be close to the material you use most often. For instance:
- PLA/PETG/ABS/ASA/TPU: 215°C generally works well.
- ABS: If you predominantly print with ABS, consider setting the target to 240°C.
Adjusting the target temperature helps the PID algorithm fine-tune the settings for the specific requirements of each filament type.
Heatbed PID Tuning in Klipper
A well-tuned heatbed is crucial for ensuring even adhesion across the build surface, which helps in reducing print defects and warping. Here’s how to calibrate your heatbed:
Steps for Heatbed PID Tuning
- Home the Printer: Home the printer and position the nozzle in the middle of the bed, maintaining a 5cm clearance.
- Turn on Part Cooling Fans: Use the command
M106 S255to set the part cooling fans to 100%. - Run PID Calibration Command: Initiate the heatbed PID tuning with the command
PID_CALIBRATE HEATER=heater_bed TARGET=60. - Wait for Completion: Allow the process to finalize, which may take a few minutes.
- Save the Settings: Once done, persist the new parameters with
SAVE_CONFIG.
Choosing the Right Target Temperature
Similar to the hotend, the target temperature for the heatbed should reflect the materials you typically use:
- PLA/PETG/ABS/ASA/TPU: 60°C is generally effective.
- ABS: For ABS, a target of 100°C is recommended.
Properly tuning the heatbed for these temperatures ensures optimal adhesion and reduces the chances of print deformation.

Save Klipper PID Tuning Values
Once you’ve completed the PID tuning process, it’s important to save the settings so your printer can utilize them during every print.
Automatic Save
When you run the SAVE_CONFIG command, Klipper automatically adds the new PID values to your printer.cfg file, ensuring they’re applied consistently.
Manual Save
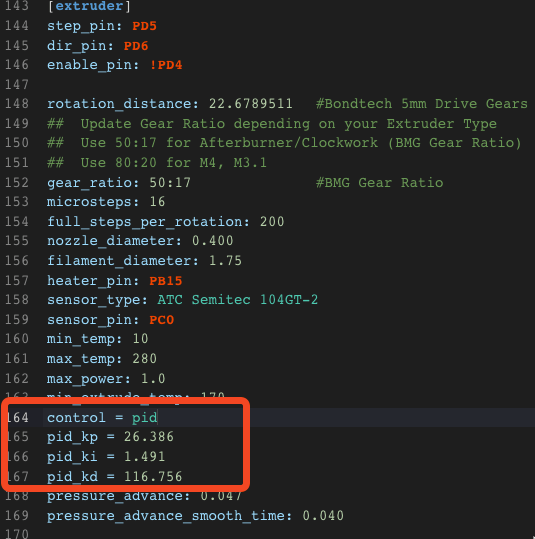
If you prefer, you can manually add the PID values to your printer.cfg file:
- Open
printer.cfg. - Navigate to the sections for the hotend and heatbed.
- Add the PID values under the
[extruder]and[heater_bed]configurations.
Here’s an example configuration:
[extruder]
Sample PID parameters
pid_Kp = 21.0 pid_Ki = 1.2 pid_Kd = 90.0
[heater_bed]
Sample PID parameters
pid_Kp = 54.0 pid_Ki = 10.0 pid_Kd = 800.0
These values ensure that your hotend and heatbed maintain a stable temperature, improving your printing results.
Wrapping Up
Completing the PID tuning process in Klipper can make a noticeable difference in the quality of your 3D prints. By ensuring that your hotend and heatbed maintain stable temperatures, you reduce the risk of defects and improve the consistency of your prints.
If your temperature graphs show fluctuations greater than 0.5°C to 1°C, you might need to repeat the PID tuning process. Sometimes, a secondary tuning can help refine the settings further, achieving even better results.
Keeping these settings optimized ensures your 3D printing experience remains smooth, with fewer failed prints and superior print quality. If you’ve found this guide helpful, consider sharing it with fellow 3D printing enthusiasts, or supporting platforms that bring you valuable, hands-on content.
Feel free to comment below with your experiences, tips, or questions about PID tuning in Klipper. Your insights could help others achieve better 3D printing results!
Anycubic 3D Materials Sale: Resin & PLA from $9.49/kg


