FLASHFORGE Adventurer 5M 3D Printer,600mm/s Max High-Speed FDM 3D Printers with Fully Auto Leveling, 280°C Direct Extruder with Quick Detachable Nozzle, Effective Cooling, Core XY Structure
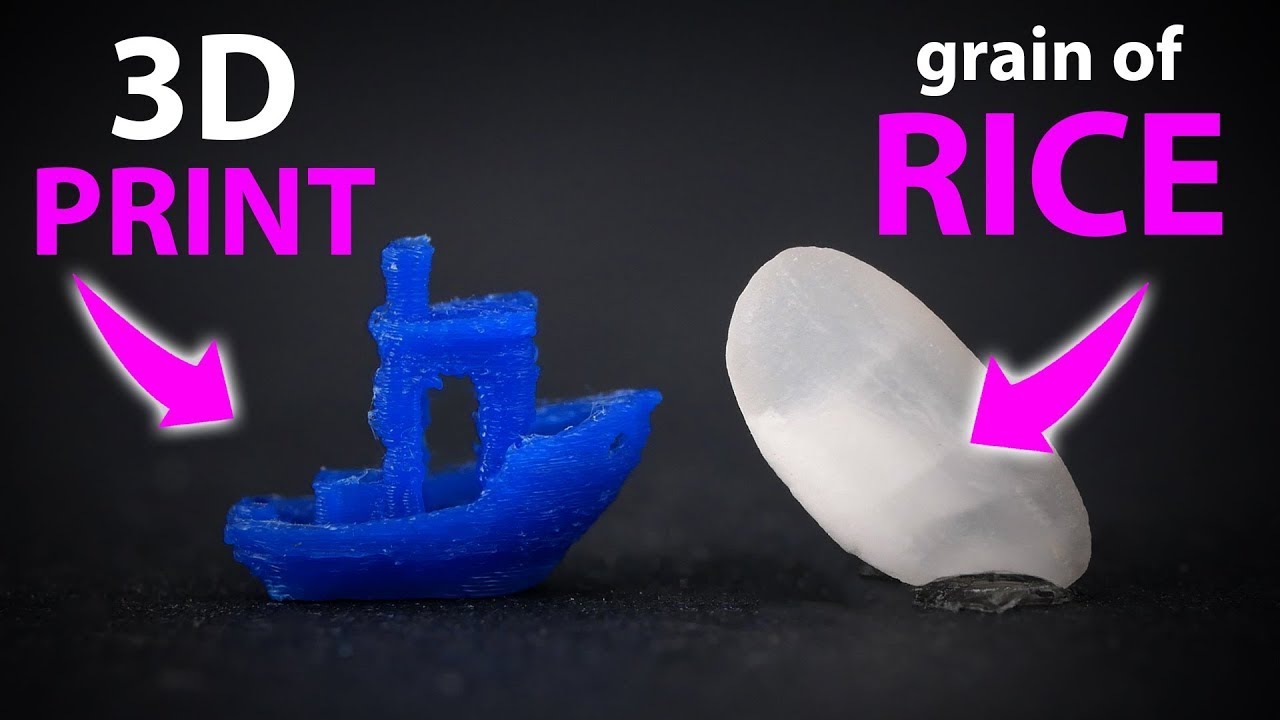
$279.00 (as of May 29, 2025 10:56 GMT +00:00 - More infoProduct prices and availability are accurate as of the date/time indicated and are subject to change. Any price and availability information displayed on [relevant Amazon Site(s), as applicable] at the time of purchase will apply to the purchase of this product.)In the video tutorial titled “How to Blender To 3D Printer – The Basics,” the creator provides a detailed guide on using Blender for 3D printing. The tutorial covers importing a 3D model into Blender, making minor modifications, and exporting it for 3D printing. The presenter demonstrates how to import either an STL file or an OBJ file into Blender, simplifies the geometry of the 3D model, and makes specific adjustments. The tutorial also mentions the option of exporting the modified model as an OBJ file instead of an STL file. The video concludes with the presenter showcasing the 3D printed result and mentioning the availability of a future video on remixing models. If you’re new to Blender or interested in learning the basics of using Blender for 3D printing, this tutorial is a great starting point.
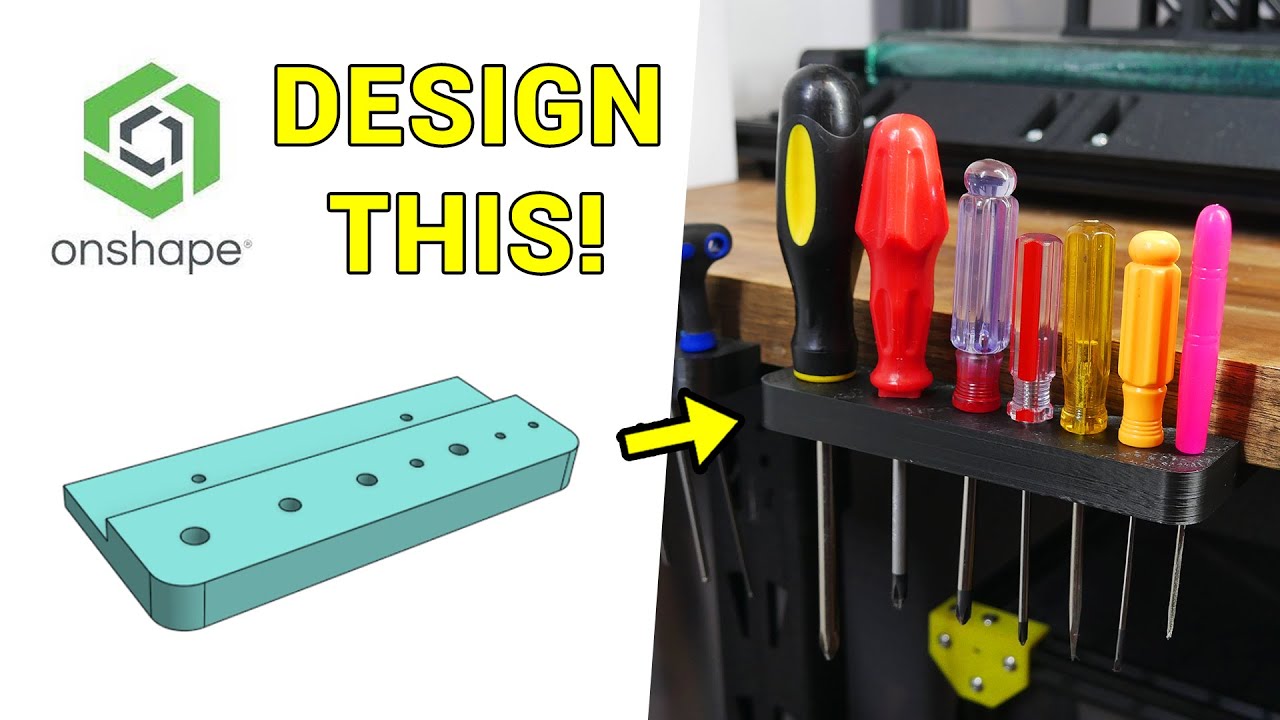
In the video, the presenter, Jonathan from Make Tales, shares a workflow of importing a 3D model into Blender, making modifications, and exporting it for 3D printing. Specifically, he modifies a custom pegboard design by adjusting the hole spacing and adding an offset to the pegs. Throughout the tutorial, Jonathan provides step-by-step instructions and demonstrates the use of tools like the 3D Print Toolbox add-on in Blender. He also mentions the availability of additional Blender courses and invites viewers to leave any questions in the comments section. Whether you’re a beginner or looking to expand your skills in Blender for 3D printing, this tutorial offers valuable insights and practical tips.

Importing a 3D Model into Blender
Understanding file formats for 3D printing
Before we dive into importing 3D models into Blender, it’s essential to understand the different file formats used for 3D printing. The two most common file formats are STL (Standard Tessellation Language) and OBJ (Object).
STL files are widely used in 3D printing because they describe the surface geometry of a 3D object using triangles. The file consists of a collection of triangular facets that approximate the shape of the object. This format doesn’t include any information about colors, textures, or other attributes.
On the other hand, OBJ files store both the 3D geometry of the object and additional information such as colors, textures, and materials. OBJ files are more versatile and can be used in various 3D software programs, making them a popular choice for exporting and importing 3D models.
Using the Import function in Blender
Once you have your desired 3D model file saved in either STL or OBJ format, you can import it into Blender using the Import function. In Blender, navigate to “File” and select “Import.” From the dropdown menu, choose the appropriate file format (OBJ or STL) of your 3D model file.
Bringing in an STL file
If your 3D model is saved in an STL file format, select “Import STL” from the Import menu. Browse your computer files to locate the STL file you want to import, and click “Import STL.” Blender will now import the 3D model into your workspace, and you can see it displayed on the screen.
Bringing in an OBJ file
For OBJ files, choose “Import OBJ” from the Import menu. Locate the OBJ file on your computer and click “Import OBJ.” Blender will now import the 3D model into your workspace, and you can see it displayed on the screen. OBJ files may contain multiple objects, so Blender will import each object as a separate mesh.
Modifying the 3D Model
Tools for editing the 3D model
Blender offers a wide range of tools for editing and modifying 3D models. These tools are located in the toolbar on the left side of the Blender workspace. Some of the essential tools for modifying 3D models include:
- Selection tools: Allows you to select and manipulate individual vertices, edges, or faces of the 3D model.
- Transform tools: Enables you to move, rotate, and scale the selected components of the model.
- Modifier tools: Provides various modifiers that can be applied to the 3D model to achieve different effects.
- Sculpting tools: Allows you to sculpt and shape the 3D model using brushes and textures.
Making minor adjustments to the geometry
Once you have imported the 3D model into Blender, you may need to make minor adjustments to its geometry. This can include resizing or reshaping certain parts of the model to fit your specific requirements. To do this, select the desired components of the model (vertices, edges, or faces) and use the transform tools to manipulate them.
For example, if you want to scale a specific part of the model, select the corresponding vertices and use the scale tool to make it larger or smaller. Blender provides precise control over these transformations, enabling you to achieve the desired modifications.
Scaling and resizing the model
Scaling and resizing the entire 3D model can be necessary to fit your desired specifications for 3D printing. Blender allows you to scale the model uniformly or along specific axes. To scale the entire model, select it and use the scale tool to increase or decrease its size.
If you need to resize the model while maintaining its proportions, you can lock the scale on certain axes. This ensures that the model’s dimensions are adjusted proportionally without distorting its shape.
Adding or removing details
In addition to resizing and scaling, you may also want to add or remove details from the 3D model. Blender provides various tools for sculpting and modifying the geometry of the model. These tools allow you to add or remove vertices, edges, and faces to achieve the desired level of detail.
For example, you can use the sculpting tools to create intricate textures or patterns on the surface of the model. You can also use the modifier tools to add complex shapes or cut out specific areas of the model.


Customizing a Pegboard Model
Overview of the custom pegboard model
In this tutorial, we will be working with a custom pegboard model. A pegboard is a type of tool organizer with a grid of regularly spaced holes that are used to hang various tools and accessories. The goal is to modify the pegboard model to fit specific specifications.
Identifying the desired specifications
Before making any modifications to the pegboard model, it’s crucial to identify the desired specifications. This includes determining the desired size of the pegboard, the layout of the holes, and any additional features or accessories that need to be incorporated.
For example, if you want the pegboard to fit a specific wall space, you’ll need to measure the width and height available. You’ll also need to decide on the spacing and arrangement of the holes to accommodate the tools or accessories you plan to hang.
Modifying the size and hole layout
Once you have identified the desired specifications, you can start modifying the pegboard model in Blender. Use the scaling and resizing tools to adjust the overall size of the pegboard to fit the desired dimensions.
Next, you can use the editing tools to modify the hole layout. This may involve adding or removing holes, changing the spacing between the holes, or creating custom patterns or arrangements.
Optimizing the geometry for 3D printing
When customizing the pegboard model, it’s crucial to optimize the geometry for 3D printing. This involves ensuring that the model is watertight, manifold, and free from any potential printing issues.
Use Blender’s 3D Print Toolbox add-on to check the model for any potential errors or inconsistencies. The add-on provides tools to check for non-manifold geometry, thin walls, and other issues that may affect the printing process. Make any necessary adjustments or repairs to ensure the model is ready for 3D printing.
Checking the Model for 3D Printing
Using the 3D Print Toolbox add-on in Blender
To ensure the pegboard model is suitable for 3D printing, it’s essential to use Blender’s 3D Print Toolbox add-on. This add-on provides a range of tools to check the model for potential printing issues and errors.
To use the 3D Print Toolbox add-on, navigate to the “Object Data Properties” panel in Blender and select “3D Print.” Click the “Check All” button to run a comprehensive check on the model. The add-on will highlight any potential issues that need to be addressed before printing.
Ensuring the model is manifold and watertight
One of the critical aspects of preparing a 3D model for printing is ensuring that it is manifold and watertight. Manifold geometry refers to a solid, closed surface without any holes, gaps, or overlapping faces. Watertight geometry means that the model is entirely closed and doesn’t have any internal cavities.
The 3D Print Toolbox add-on will help identify if the pegboard model has any non-manifold edges, duplicate faces, or other issues that may affect its printability. Use the editing tools in Blender to fix these issues and ensure the model is manifold and watertight.
Checking for potential printing issues
In addition to manifold geometry, it’s important to check for potential printing issues such as thin walls, overhangs, or unsupported features. The 3D Print Toolbox add-on will flag any areas of the model that may cause problems during the printing process.
Inspect the model and use the analysis tools provided by the add-on to identify and address these potential issues. You may need to make adjustments to the geometry, add support structures, or modify certain features to ensure successful 3D printing.
Repairing any errors or inconsistencies
If the 3D Print Toolbox add-on identifies any errors or inconsistencies in the pegboard model, it’s crucial to address them before exporting for 3D printing. Use the editing and sculpting tools in Blender to repair any issues and optimize the geometry.
Depending on the specific errors, you may need to add or remove vertices, adjust the topology, or smooth out any irregularities. Once you have made the necessary repairs, run another check using the 3D Print Toolbox add-on to ensure the model is now error-free.

Exporting the 3D Model
Choosing the appropriate file format
Before exporting the pegboard model for 3D printing, you need to choose the appropriate file format. The most common file formats for 3D printing are STL and OBJ.
If you want to export a file that contains only the 3D geometry without any additional attributes, textures, or colors, STL is a suitable choice. On the other hand, if you want to preserve additional information such as materials and textures, OBJ is a more versatile file format.
Consider the requirements of your 3D printing software and choose the file format that best suits your needs.
Exporting as an STL file
To export the pegboard model as an STL file, navigate to “File” and select “Export.” Choose the STL file format from the export options and select the destination folder where you want to save the file. Give the export file a name and click “Export.”
Keep in mind that when exporting as an STL file, Blender will triangulate the geometry to create a mesh of interconnected triangles. This representation ensures compatibility with most 3D printing software and devices.
Exporting as an OBJ file
If you want to preserve additional information such as materials, textures, or colors, you can export the pegboard model as an OBJ file. The process for exporting an OBJ file is similar to that of an STL file.
Navigate to “File” and select “Export.” Choose the OBJ file format from the export options and select the destination folder where you want to save the file. Give the export file a name and click “Export.”
Understanding the differences between file formats
It’s important to be aware of the differences between file formats when exporting 3D models for 3D printing. STL files are more commonly used in 3D printing due to their compatibility with most printers and slicing software. However, they do not contain additional information such as colors or materials.
OBJ files, on the other hand, provide more versatility and can preserve additional attributes. However, not all 3D printers and slicing software may support OBJ files. Therefore, it’s essential to consider the requirements and limitations of your specific printing setup when choosing the file format.
Tips and Best Practices
Keeping the file size manageable
When working with 3D models in Blender, it’s essential to keep the file size manageable. Complex and detailed models can quickly become large files, making them challenging to work with and potentially causing performance issues.
To keep the file size manageable, consider optimizing the geometry by simplifying or reducing unnecessary details. Remove any duplicate or overlapping vertices, edges, or faces that may contribute to the file size. Regularly review and clean up your Blender project to ensure it remains streamlined and efficient.
Avoiding non-manifold geometry
Non-manifold geometry refers to 3D models that aren’t properly closed or have overlapping faces, duplicate edges, or other errors. These issues can cause problems during the 3D printing process and result in failed prints or poor print quality.
To avoid non-manifold geometry, be diligent in checking and fixing any errors or inconsistencies in the model. Use Blender’s editing tools and the analysis features of the 3D Print Toolbox add-on to identify and address these issues before exporting for 3D printing.
Optimizing for 3D printing materials
Different 3D printing materials have different properties and requirements. When designing or modifying a 3D model for printing, it’s essential to consider the specific characteristics of the material you plan to use.
For example, if you’re printing with a flexible or brittle material, you may need to adjust the thickness or structural integrity of certain parts of the model. Similarly, if you want to use a specific type of surface finish or texture, you may need to modify the geometry accordingly.
Consult the guidelines and specifications provided by your chosen 3D printer and material manufacturer to ensure your model is optimized for the specific materials you plan to use.
Using support structures effectively
Support structures are often necessary when printing complex 3D models that feature overhangs or fragile elements. Support structures provide temporary scaffolding during the printing process, which can be removed afterward.
When designing or modifying a 3D model, consider the need for support structures and incorporate them effectively. Blender offers tools and features to generate and customize support structures based on your specific requirements. Adjust the settings and parameters to achieve the desired support structure functionality and ensure successful 3D printing.

Additional Resources
Paid course for mastering Blender 3.0+ for 3D printing
If you want to dive deeper into using Blender for 3D printing and become a pro at it, consider taking the paid course offered by the presenter of the tutorial. The course is specifically tailored to help you master Blender 3.0+ for 3D printing through practical modeling. It provides in-depth lessons and techniques to enhance your skills and optimize your workflow.
Useful links for learning Blender
Learning Blender can be a rewarding and ongoing journey. In addition to the tutorial video, the presenter recommends exploring other useful links that can help you expand your knowledge and expertise in Blender. These resources may include online tutorials, documentation, forums, and communities dedicated to Blender.
Take advantage of these resources to further develop your skills, learn new techniques, and stay up to date with the latest developments in Blender for 3D printing.
Online communities and forums for 3D printing
Engaging with online communities and forums dedicated to 3D printing can provide valuable insights, advice, and support from fellow enthusiasts and experts. These platforms allow you to connect with like-minded individuals, share your work, ask questions, and learn from others’ experiences.
Whether you have specific technical questions or want to showcase your creations, online communities and forums are excellent places to seek guidance, exchange ideas, and stay connected to the 3D printing community.
Recommended 3D printing services
If you don’t have access to a 3D printer or prefer to outsource the printing process, there are several reputable 3D printing services available. These services allow you to upload your 3D model, select the desired printing options, and have your design printed and delivered to your doorstep.
The presenter may mention and recommend specific 3D printing services that offer high-quality prints and reliable service. Consider exploring these services to bring your designs to life without the need for a personal 3D printer.
Addressing Viewer Questions
Encouraging viewers to leave questions in the comments
Throughout the tutorial, the presenter encourages viewers to leave any questions they may have in the comments section. This invitation creates an interactive and engaging experience for the viewers and allows them to seek clarification or additional guidance on specific topics covered in the video.
Planned follow-up videos to address common queries
The creator of the tutorial mentions that they have planned follow-up videos to address common queries or topics that require more in-depth explanations. These videos serve as a resource for viewers to further expand their knowledge and receive more detailed instructions on specific aspects of 3D printing with Blender.
Responding to specific viewer questions and concerns
As viewers engage with the tutorial and leave comments, the presenter is committed to responding to specific questions and concerns raised by viewers. This personal interaction not only creates a sense of community and support but also ensures that viewers receive the help and guidance they need to succeed in their own 3D printing projects.
Providing additional guidance and clarifications
In addition to addressing specific questions and concerns, the presenter may provide additional guidance and clarifications on certain topics discussed in the tutorial. This could include expanding on specific techniques, sharing additional tips and tricks, or offering alternative approaches to achieve desired results.
By going the extra mile to provide comprehensive explanations and assistance, the presenter ensures that viewers have a thorough understanding of the concepts and techniques covered in the tutorial.
Conclusion
In conclusion, this tutorial provides a comprehensive guide to importing 3D models into Blender, making modifications, and exporting them for 3D printing. By understanding file formats, utilizing Blender’s tools, customizing models, and checking for 3D printing compatibility, users can optimize their workflow and achieve successful print results.
Blender is a powerful software tool that empowers users to create and modify 3D models for a variety of purposes, including 3D printing. By following the tips, best practices, and resources provided in this tutorial, users can enhance their skills, expand their knowledge, and create impressive 3D printed objects.
The tutorial not only demonstrates the practical aspects of importing, modifying, and exporting 3D models but also emphasizes the importance of Blender in the 3D printing workflow. Blender offers a range of features, tools, and capabilities that enable users to realize their creative vision and bring their designs to life through 3D printing.
By showcasing the 3D printed result and teasing future videos on remixing models, the tutorial instills a sense of excitement and curiosity in viewers. It encourages them to explore, experiment, and continue their journey in Blender and 3D printing.
So, whether you’re a beginner or an experienced user, take advantage of the knowledge and guidance provided in this tutorial to improve your skills, unleash your creativity, and make your mark in the world of 3D printing with Blender.
UPDATED VERSION OF THIS VIDEO – A detailed guide on the basics of bringing a file into and out of Blender for 3D printing. You will learn how to make a minor change to the file and then export it as an .stl and .obj for 3D printing.
This tutorial covers the very basics of Blender for 3D printing. If you are unfamiliar with Blender, I recommend taking my intro course to quickly master it.
Learn Blender 3.0+ Fast For 3D Printing Through Practical Modeling (Paid Course)
Other Useful Links:
- Learn Blender Precision Series 2.9 – Learn Blender 3.1/2.9+ Through Precision Modeling
- Learn Blender Precision Series 2.8 (OLD) – Intro to Blender 2.8 & Precision Modeling
If you have any questions, please leave them in the comments section below, and I will do my best to respond as soon as possible.
🛠 Subscribe To Keep Making: Click here
📨 Share with a friend: How to Blender To 3D Printer – The Basics | Tutorial | Blender for 3D Printing
📺 Watch My Most Recent Upload: Click here
Other Places Where you can find me:
- Patreon: makertales
- Instagram: makertales
- Twitter: themakertales
- Facebook: makertales
Time Stamps: Not applicable.

SUNLU PLA Plus Filament 1.75mm Black 1KG, Neatly Wound 3D Printer Filament 1.75mm, PLA+ 1000g, Dimensional Accuracy +/- 0.02 mm, Fit Most FDM 3D Printers, 1kg Spool (2.2lbs), Black
$14.99 (as of May 29, 2025 10:56 GMT +00:00 - More infoProduct prices and availability are accurate as of the date/time indicated and are subject to change. Any price and availability information displayed on [relevant Amazon Site(s), as applicable] at the time of purchase will apply to the purchase of this product.)
Polymaker Matte PLA Filament Charcoal Black 1.75mm 1kg 3D Printing Filament, PolyTerra 3D Printer PLA Filament
$20.99 (as of May 29, 2025 10:56 GMT +00:00 - More infoProduct prices and availability are accurate as of the date/time indicated and are subject to change. Any price and availability information displayed on [relevant Amazon Site(s), as applicable] at the time of purchase will apply to the purchase of this product.)
Revopoint MetroX 3D Scanner for 3D Printing, Handheld 3D Printer Scanner Blue Laser Scan, Metrology-Grade Precision 0.01mm for Metal Dark Object, Up to 60fps Speed, Support Windows macOS, Advanced
$1,199.00 (as of May 28, 2025 10:49 GMT +00:00 - More infoProduct prices and availability are accurate as of the date/time indicated and are subject to change. Any price and availability information displayed on [relevant Amazon Site(s), as applicable] at the time of purchase will apply to the purchase of this product.)
Creality CR-Scan Ferret Pro 3D Scanner, Wireless Scanning with 24-Bit Full-Color & Anti-Shake Tracking, Fast High-Quality Scanning, Compatible with Windows, Mac, iOS & Android
$449.00 (as of May 28, 2025 10:49 GMT +00:00 - More infoProduct prices and availability are accurate as of the date/time indicated and are subject to change. Any price and availability information displayed on [relevant Amazon Site(s), as applicable] at the time of purchase will apply to the purchase of this product.)