FLASHFORGE 3D Printer AD5M, CoreXY 600mm/s High-Speed Printer with 1-Click Auto Leveling, High-Temp Direct Drive Extruder, 3s Quick-Swap Nozzle, 220×220×220mm Build Volume
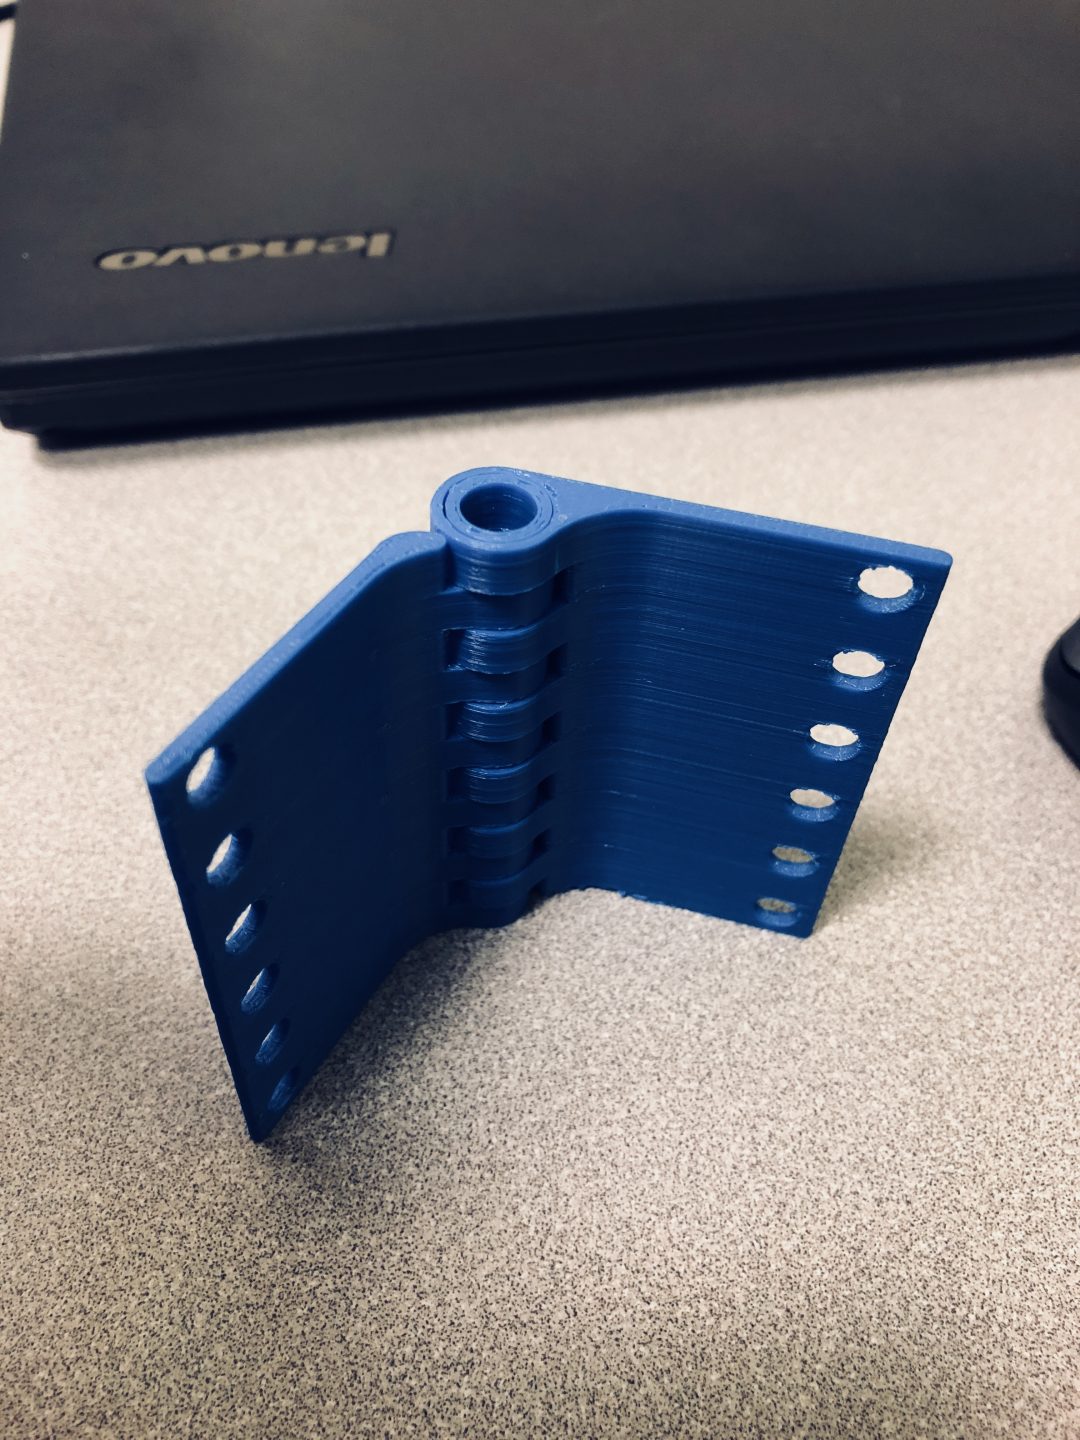
$259.00 (as of June 18, 2025 23:32 GMT +00:00 - More infoProduct prices and availability are accurate as of the date/time indicated and are subject to change. Any price and availability information displayed on [relevant Amazon Site(s), as applicable] at the time of purchase will apply to the purchase of this product.)In the video titled “How to design 3D Printable Hinges – Make moving parts!” by Maker’s Muse, you’ll learn about different hinge designs that can be used for 3D printed designs with moving parts. The video showcases five specific hinge designs that have been personally tested and used for 3D printing. You’ll first learn about the pin hinge, which consists of a hollow part and a pin running through it. Then, you’ll explore a variation of the pin hinge with circular nubs that interlock the two parts together. The video also covers the concept of living hinges, which take advantage of certain properties of certain types of plastics to create a foldable hinge. Another variation of the living hinge is discussed, where the plastic can be used as a lever or pin to lock and release the hinge. Lastly, the use of fasteners is explored, where additional hardware is added to create a heavy-duty hinge. The video provides Fusion 360 archive files and encourages viewers to share their results of using printing place hinges in their designs on social media. Overall, this video tutorial is a great resource for anyone interested in learning how to design 3D printable hinges for their projects.
If you’re looking for guidance on how to design 3D printable hinges, look no further! In the tutorial video “How to design 3D Printable Hinges – Make moving parts!” by Maker’s Muse, you’ll be introduced to five different hinge designs that have been specifically tested and used for 3D printing. From pin hinges and hinge variations with circular nubs to living hinges and the use of fasteners, this video covers it all. You’ll also have access to Fusion 360 archive files and have the opportunity to share your own designs using these hinges on social media. Whether you’re a beginner or have some experience with 3D printing, this tutorial is sure to provide you with valuable insights and inspiration for your future projects.


Pin Hinge Design
Introduction to pin hinge design
When it comes to creating 3D printed designs with moving parts, hinges are an essential component. They allow for flexibility and enable various mechanisms to work smoothly. One popular type of hinge design is the pin hinge. This design consists of a hollow part and a pin that runs through it. The pin hinge allows for rotational movement and can be used in a wide range of applications.
Components required for pin hinge
To create a pin hinge, you will need two main components: the base part and the pin. The base part should have a hollow section, typically in the form of a tube or a cylindrical cavity. The size and dimensions of the base part will depend on the specific application and the desired range of movement. The pin, on the other hand, should fit snugly into the hollow section of the base part, allowing for smooth rotation.
Step-by-step instructions for designing pin hinge
Designing a pin hinge in Fusion 360 or any other CAD software requires careful planning and consideration. Here are some step-by-step instructions to guide you through the process:
-
Start by creating the base part: Begin by designing the base part with the desired dimensions and shape. Remember to include the hollow section where the pin will fit.
-
Design the pin: Next, create a separate component for the pin. The pin should have a diameter that matches the inner diameter of the hollow section in the base part. Ensure that the length of the pin is sufficient to provide stability and smooth movement.
-
Align the parts: Position the pin within the hollow section of the base part. Ensure that the pin runs through the entire length of the hollow section, allowing for rotational movement.
-
Test and refine: Once you have the initial design, it’s crucial to test the functionality of the pin hinge. Make any necessary adjustments to improve the smoothness of the movement and overall stability.
Tips for printing and assembly
To ensure successful printing and assembly of your pin hinge design, consider the following tips:
- Choose a suitable filament material: Select a filament material that offers the desired level of strength and flexibility for your specific application. PLA is a common choice for hinges due to its rigidity and ease of printing.
- Optimize print settings: Adjust the print settings, such as layer height and infill density, to achieve the desired level of strength and durability for your pin hinge. Experiment with different settings to find the optimal balance.
- Use support structures if needed: Depending on the complexity of your design, you may need to add support structures during the printing process to ensure accurate and clean prints.
- Test fit before assembly: Before final assembly, test the fit of the pin within the base part. Make any necessary adjustments to ensure a snug fit without binding or excessive play.
- Consider post-processing techniques: If desired, you can use post-processing techniques such as sanding or polishing to smoothen the surfaces of the pin hinge components, resulting in smoother movements.
Variation of Pin Hinge Design
Overview of the variation design
While the traditional pin hinge design is simple and effective, there are variations that offer additional benefits and functionalities. One such variation involves the use of circular nubs for interlocking parts. This design provides added stability and ease of assembly while maintaining the fundamental elements of a pin hinge.
Exploring circular nubs for interlocking parts
In this variation of the pin hinge, instead of a single pin running through the hollow section of the base part, there are circular nubs or protrusions on one side that interlock with corresponding recesses on the other side. These circular nubs act as the rotation point, allowing for the desired movement while providing secure locking between the two parts.
Design considerations for improved functionality
When incorporating circular nubs into your hinge design, there are several design considerations to keep in mind:
- Size and placement of nubs: The size and placement of the circular nubs should be carefully considered to ensure a proper fit and secure locking. They should be large enough to provide stability and prevent unwanted movement but not too large to cause friction or binding.
- Alignment of nubs and recesses: It is crucial to ensure proper alignment between the circular nubs and the corresponding recesses in the other part. This will ensure smooth rotation and prevent any misalignment issues during assembly.
- Flexibility of the material: The flexibility of the filament material used for printing the hinge components can significantly affect the functionality of the circular nubs. Choose a material that offers the right balance of rigidity and flexibility to allow for smooth rotation and easy assembly.
Printing and assembly techniques
To successfully 3D print and assemble a pin hinge with circular nubs, consider the following techniques:
- Print with precision: Use accurate print settings to ensure the precise dimensions of the circular nubs and recesses. Pay attention to the layer height and nozzle size to achieve the desired level of detail.
- Test fit before final assembly: As with any hinge design, it is essential to test the fit of the circular nubs and recesses before final assembly. Make any necessary adjustments to ensure a secure and smooth interlocking mechanism.
- Consider multi-color printing: If desired, you can employ multi-color printing techniques to enhance the visibility and aesthetic appeal of the circular nubs and recesses. This can make the hinge design more visually appealing and easier to assemble.

Living Hinge Design
Understanding the concept of living hinges
A living hinge is a unique type of hinge that takes advantage of certain properties of specific types of plastics to create a foldable mechanism. Unlike traditional hinges that consist of separate components, a living hinge is created from a single piece of flexible material that bends or flexes to allow for movement.
Choosing suitable plastic materials for living hinges
To create successful living hinges, it is important to choose the right type of plastic material. Certain plastics, such as polypropylene (PP) or thermoplastic elastomers (TPE), exhibit the necessary flexibility and durability to withstand repeated bending without breaking or fatiguing.
Design guidelines for creating foldable hinges
When designing a living hinge, consider the following guidelines:
- Thickness: The thickness of the plastic material is crucial in determining the flexibility and lifespan of the living hinge. It should be thin enough to allow for bending but thick enough to provide sufficient strength.
- Geometric design: The shape and geometry of the living hinge play a significant role in its functionality. A gradual taper or curve along the hinge line can distribute stress evenly and prevent premature failure.
- Reinforcement: In some cases, incorporating reinforcement elements, such as ribs or grooves, along the living hinge can improve its strength and durability. These reinforcements help distribute the stress and prevent excessive bending in a single area.
- Testing and refinement: Prototyping and testing different iterations of the living hinge design can help identify weaknesses and areas for improvement. Consider experimenting with different thicknesses, angles, and reinforcement techniques to optimize the performance of the hinge.
Testing and refining living hinge designs
Once you have designed and 3D printed your living hinge, it is important to test its functionality and refine the design if needed. Perform repetitive bending and observe any signs of stress or wear. Make adjustments to the thickness or reinforcement elements as necessary to ensure a durable and long-lasting living hinge.
Lever and Pin Locking Hinge Design
Exploring lever and pin locking mechanism
The lever and pin locking hinge design offers a secure locking mechanism that can be easily released when needed. This type of hinge utilizes a lever or pin that locks into place, holding the two parts securely together.
Utilizing plastic as a lever or pin
In the lever and pin locking hinge design, plastic is used as the lever or pin that locks the hinge. The plastic lever is designed with a specific shape or cutout that engages with a corresponding feature on the opposite part, creating a lock. By applying pressure or lifting the lever, the lock is released, allowing for easy separation of the parts.
Design considerations for secure locking and easy release
When designing a lever and pin locking hinge, the following considerations are essential:
- Locking mechanism: The shape or cutout of the lever or pin should be designed to ensure a secure lock when engaged with the opposite part. Consider the size, angle, and fit of the locking mechanism to prevent accidental disengagement.
- Ease of release: The locking mechanism should be designed for easy release when desired. It should require minimal force or manipulation to unlock and separate the parts.
- Material flexibility: The flexibility of the plastic material used for the lever and pin is crucial to ensure smooth operation and durability. Choose a material with the right balance of rigidity and flexibility to withstand repeated locking and release cycles.
Print settings to ensure optimal performance
To achieve optimal performance with lever and pin locking hinges, consider the following print settings:
- Orientation: Orient the hinge components in a way that minimizes the need for support structures. This will ensure cleaner prints and easier assembly.
- Precision: Pay attention to the precision of print settings, such as layer height and infill density, to achieve accurate dimensions for the locking mechanism. A precise fit is crucial for the smooth operation of the hinge.
- Material selection: Choose a plastic material that offers the necessary strength and flexibility for your specific application. Consider experimenting with different materials to find the one that best suits your needs.
Fastener-based Hinge Design
Introduction to fastener-based hinges
fastener-based hinges offer a heavy-duty solution for applications that require additional strength and durability. These hinges incorporate hardware fasteners, such as screws or bolts, to ensure a secure connection between the parts.
Types of hardware fasteners for heavy-duty hinges
When designing a fastener-based hinge, consider the following types of hardware fasteners:
- Screws: Wood screws or machine screws are commonly used in fastener-based hinges. They provide a strong and reliable connection between the hinge components.
- Bolts: Bolts offer excellent strength and stability for heavy-duty hinges. They are often used in conjunction with nuts or washers to secure the hinge components.
- Rivets: Rivets can be an alternative option for fastening hinges. They provide a permanent connection that is not easily removable.
Incorporating fasteners into 3D printed designs
To incorporate fasteners into 3D printed hinge designs, there are a few considerations to keep in mind:
- Design for access: Ensure that the design allows for easy access to the fasteners during assembly and disassembly. Provide sufficient clearance and space for tools, such as screwdrivers or wrenches.
- Reinforcement: Consider adding reinforcement elements, such as ribs or thicker sections, around the fastener holes to distribute the stress and prevent any potential cracking or weakening of the hinge components.
- Threaded inserts: If necessary, you can use threaded inserts to create strong threads within the 3D printed part. This allows for the use of machine screws or bolts, providing added strength and durability.
Tips for ensuring strong and durable hinges
To ensure strong and durable hinges with fasteners, consider the following tips:
- Choose appropriate fastener sizes: Select fasteners that are suitable for the size and weight of the hinge components. Consult standard size charts and guidelines to determine the best fastener sizes for your specific application.
- Consider materials compatibility: Make sure the chosen fasteners are compatible with the materials you are using for your 3D printed hinge components. Consider factors such as corrosion resistance and material strength.
- Tighten properly: When assembling the hinge components with fasteners, ensure that the fasteners are tightened securely but not over-tightened. Over-tightening can lead to stress concentration and potential failure of the hinge.
Testing and Validation
Importance of testing hinge designs
Testing is a crucial step in the design and development of 3D printed hinges. It allows you to validate the functionality, durability, and performance of the hinges before incorporating them into your final design.
Methods for validating hinge functionality
To validate the functionality of your hinge designs, consider the following methods:
- Manual testing: Perform manual tests by manually operating the hinge through its full range of motion. Observe any issues such as binding, sticking, or excessive play.
- Load testing: Apply a controlled load or weight to the hinge to simulate real-world conditions. Ensure that the hinge can withstand the intended load without failure or deformation.
- Cycle testing: Perform repetitive opening and closing movements to simulate the expected lifespan of the hinge. Monitor for any signs of wear, fatigue, or failure.
Troubleshooting common issues
During testing, you may encounter common issues with your hinge designs. Some common issues and their potential solutions include:
- Binding or sticking: If the hinge components are not moving smoothly, check for any misalignment or interference between parts. Consider adjusting the dimensions or tolerances to ensure proper clearance.
- Excessive play: If there is too much play or looseness in the hinge, consider adding reinforcement elements or increasing the size of the hinge components to improve stability.
- Premature failure: If the hinge fails prematurely under load or repetitive movements, evaluate the material selection and design parameters. Make adjustments to improve strength and durability.
Iterating and improving hinge designs
Through testing and validation, you may identify areas for improvement or necessary design iterations. Utilize the feedback and data gathered during testing to refine your hinge designs. Make necessary adjustments to dimensions, tolerances, or material selection to optimize the performance and functionality of the hinges.

Fusion 360 Archive Files
Availability of Fusion 360 archive files
To assist in the design and implementation of the discussed hinge designs, Fusion 360 archive files are available. These files provide a starting point and serve as a reference for creating your own hinge designs.
How to access and utilize the provided files
To access and utilize the Fusion 360 archive files, follow these steps:
- Visit the Maker’s Muse website or Patreon page where the files are available.
- Download the provided Fusion 360 archive files to your computer.
- Open the files in Fusion 360 or any compatible CAD software to view the designs.
- Explore the designs and learn from the provided examples to create your own custom hinge designs.
Customizing and modifying hinge designs
The provided Fusion 360 archive files are not limited to a specific design. Feel free to customize and modify the designs to suit your specific requirements. Adjust dimensions, change features, or incorporate additional elements based on your unique needs and preferences.
Sharing results on social media platforms
Once you have implemented the hinge designs and achieved successful results, don’t forget to share your progress and outcomes on social media platforms. Share your photos, videos, or experiences with the Maker’s Muse community and inspire others to explore and innovate in the world of 3D printed hinges.
Tips for Successful 3D Printing
Choosing suitable filament materials
When 3D printing hinges, selecting the right filament material is crucial. Consider the following factors when choosing filament materials:
- Strength and flexibility: Determine the level of strength and flexibility required for your specific hinge design. Different materials offer varying levels of rigidity and flexibility.
- Durability: Consider the expected lifespan and environmental conditions that the hinges will endure. Choose a material that can withstand the intended use and potential wear and tear.
- Compatibility: Ensure that the chosen filament material is compatible with your 3D printer. Some printers may have limitations on the types of filaments they can use.
Optimal print settings for hinges
To achieve successful 3D prints of hinges, optimize the following print settings:
- Layer height: Smaller layer heights, such as 0.1mm or 0.2mm, can improve the accuracy and detail of the hinge components.
- Infill density: Adjust the infill density to provide sufficient strength and rigidity to the hinge. Higher infill densities, such as 20-30%, are recommended for hinges that require additional strength.
- Print speed: Slow down the print speed for intricate hinge designs to ensure that each layer is printed accurately. This can prevent any potential issues, such as warping or misalignment.
Post-processing techniques for smoother movements
To achieve smoother movements and improve the overall functionality of the hinges, consider the following post-processing techniques:
- Sanding: Use sandpaper or sanding tools to smooth any rough or uneven surfaces on the hinge components. This can reduce friction and allow for smoother rotational movements.
- Polishing: Polish the surfaces of the hinge components using polishing compounds or buffing pads to achieve a smoother finish. This can also enhance the aesthetics of the hinges.
- Lubrication: Apply a thin layer of lubricant, such as silicone spray or dry lubricant, to reduce friction and improve the movement of the hinge parts. This is particularly useful for hinges that experience high levels of wear and tear.
Maintenance and troubleshooting tips
Maintaining and troubleshooting 3D printed hinges can ensure their long-lasting functionality. Consider these tips:
- Regular cleaning: Clean the hinges regularly to remove any dust, debris, or residual filament that may affect their movement. Use compressed air or a soft brush to gently remove any particles.
- Lubrication: Periodically apply a small amount of lubricant to the hinge components to keep them operating smoothly. Be careful not to apply excessive lubrication, as it may attract dust and debris.
- Check for wear or damage: Inspect the hinges periodically for signs of wear, cracking, or damage. Replace any worn or damaged hinges to prevent failure or unexpected issues.

Inspiration from Other Designs
Exploring other 3D printed hinge designs
As you delve deeper into the world of 3D printed hinges, explore and learn from other designs created by the community. Various online platforms, such as Thingiverse or MyMiniFactory, offer a wide range of hinge designs that you can adapt and incorporate into your own projects.
Adapting and incorporating ideas into own designs
When exploring other 3D printed hinge designs, don’t be afraid to adapt and incorporate ideas into your own designs. Take inspiration from different designs and combine elements to create unique and innovative hinge solutions for your specific applications.
Acknowledging and crediting original creators
While incorporating ideas from other designs, it is essential to acknowledge and credit the original creators. Respect intellectual property rights and give proper attribution to those whose work has influenced your own designs. This fosters a culture of collaboration and innovation within the 3D printing community.
Promoting innovation through community collaboration
Share your own hinge designs, ideas, and experiences with the community to promote innovation and further advancements in the field of 3D printed hinges. Engage in discussions, provide feedback on other designs, and collaborate with fellow enthusiasts to push the boundaries of what is possible with 3D printing.
Conclusion
Summary of key hinge designs discussed
In this comprehensive article, we explored various hinge designs that are suitable for 3D printing and the creation of moving parts. We discussed the pin hinge, which consists of a hollow part and a pin, and its variation design with circular nubs for interlocking parts. We also covered the unique concept of living hinges, lever and pin locking hinge designs, and fastener-based hinges.
Importance of experimenting and iterating
Throughout the design process, it is crucial to experiment and iterate to achieve optimal results with 3D printed hinges. Testing, validation, and refinement play a key role in maximizing the functionality, durability, and performance of the hinges. By continuously improving the designs, you can create hinges that meet your specific requirements and deliver the desired results.
Encouragement to explore new designs and share results
We encourage you to explore new hinge designs beyond the ones discussed in this article. Embrace your creativity and push the boundaries of what can be achieved with 3D printed hinges. Share your designs, experiences, and results with the community to inspire others and contribute to the collective knowledge and innovation in the field.
Closing thoughts on the versatility of 3D printed hinges
The versatility of 3D printed hinges opens up a world of possibilities for designers and makers. From simple pin hinges to complex fastener-based designs, hinges provide the functionality and flexibility needed for movable parts in 3D printed creations. With the right techniques, materials, and creativity, you can bring your designs to life and create impressive, functional, and durable hinges using 3D printing technology. So go ahead, embrace the world of 3D printed hinges, and let your imagination run wild!
In this video, you will learn about different hinge designs that you can use to create moving parts in your 3D Printed designs. If you’re interested in the Fusion 360 archive files used in this video, you can find them here: Fusion 360 archive files.
If you enjoy our content, make sure to visit us at makersmuse.com for more information about Makers Muse. You can also connect with us on Twitter and Instagram @makersmuse.
There are several ways you can support Maker’s Muse:
- If you’re looking to buy a 3D printer but don’t know where to start, check out our eBook here: Get our eBook.
- Support us on Patreon: Become a Patreon
- Purchase a Maker’s Muse T-shirt: Buy a T-shirt
- Support us by using our Amazon affiliate links:
- You can also make a direct donation through YouTube.
We would like to express a BIG thanks to the community and those who have supported us here at Maker’s Muse!

ELEGOO PLA+ Filament 1.75mm White 1KG, High Toughness PLA Plus 3D Printer Filament Dimensional Accuracy +/- 0.02mm, 1kg Spool(2.2lbs) for Most FDM 3D Printers
$14.99 (as of June 18, 2025 23:32 GMT +00:00 - More infoProduct prices and availability are accurate as of the date/time indicated and are subject to change. Any price and availability information displayed on [relevant Amazon Site(s), as applicable] at the time of purchase will apply to the purchase of this product.)
Creality Wood Filament PLA, 3D Printer Filament 1.75 mm, Smooth Silk Texture, Toughness, 1kg(2.2lbs)/Spool Printing Filament, for All FDM Printers (Wood)
$23.98 (as of June 18, 2025 23:32 GMT +00:00 - More infoProduct prices and availability are accurate as of the date/time indicated and are subject to change. Any price and availability information displayed on [relevant Amazon Site(s), as applicable] at the time of purchase will apply to the purchase of this product.)
Creality K1C 3D Printer, 2024 New Version 600mm/s High-Speed Auto Leveling Clog-Free Robust Direct Extruder K1 SE Upgraded 3D Printer with AI Camera 300°C Printing Support Carbon Fiber Filaments
$559.00 (as of June 18, 2025 23:32 GMT +00:00 - More infoProduct prices and availability are accurate as of the date/time indicated and are subject to change. Any price and availability information displayed on [relevant Amazon Site(s), as applicable] at the time of purchase will apply to the purchase of this product.)
Creality 3D Printer, K1 SE Fully Assembled Auto Leveling FDM 3D Printers for Kids and Beginners, 600mm/s Max High-Speed Printing, Core XY All Metal Structure, Larger Print Size 250x220x220mm
$279.00 (as of June 18, 2025 23:32 GMT +00:00 - More infoProduct prices and availability are accurate as of the date/time indicated and are subject to change. Any price and availability information displayed on [relevant Amazon Site(s), as applicable] at the time of purchase will apply to the purchase of this product.)