
FLASHFORGE Adventurer 5M 3D Printer with Fully Auto Leveling System, Max 600mm/s High-Speed, 280℃ Quick-Detach Nozzle, CoreXY Structure for Superior Print Quality, Rookies & Experts Smart Choice
$259.00 (as of June 18, 2025 23:32 GMT +00:00 - More infoProduct prices and availability are accurate as of the date/time indicated and are subject to change. Any price and availability information displayed on [relevant Amazon Site(s), as applicable] at the time of purchase will apply to the purchase of this product.)Have you ever wondered how to get the most out of your Creality Ender 3 S1 Pro? Do you find yourself craving faster prints and better precision? Upgrading your 3D printer’s firmware to Klipper could be the solution you’ve been searching for. Klipper is an advanced firmware that utilizes a secondary controller, typically a Raspberry Pi, to unlock a host of new functionalities and speed improvements. In this guide, I will walk you through the installation process, from gathering the necessary equipment to performing the essential calibrations.

Anycubic 3D Materials Sale: Resin & PLA from $9.49/kg
What is Klipper?
Klipper is an innovative, open-source firmware that combines the strengths of a Raspberry Pi with your printer’s mainboard. This powerful pairing allows you to achieve greater control over your printer, significantly enhancing print quality and speed. By shifting some of the computational workload to the Pi, Klipper enables higher printing speeds while maintaining precision.
You might be wondering, why go through the trouble of installing Klipper when the stock firmware works just fine? Well, the answer lies in the array of benefits Klipper brings to the table. Let’s delve into why you should consider this upgrade for your Ender 3 S1 Pro.
Why Install Klipper on Ender 3 S1 Pro?
The stock firmware that comes with your Ender 3 S1 Pro is perfectly functional, but it has its limitations. Upgrading to Klipper can offer you the following advantages:
- Faster Printing: Klipper optimizes the way your printer handles G-code, allowing for enhanced printing speeds without sacrificing quality.
- Remote Control: With Klipper, you can control your printer remotely via Wi-Fi through an easy-to-use web interface.
- Advanced Features: Klipper supports features like Pressure Advance and Input Shaper, which can significantly improve the performance of your Sprite Pro Extruder.

Anycubic 3D Materials Sale: Resin & PLA from $9.49/kg
Test Prints with Klipper
Before you get started, it’s helpful to have an understanding of what Klipper can achieve. For instance, consider running a test print using the following parameters:
40mm Voron Calibration Cube
- Material: Sunlu Red PLA
- Layer Height: 0.2mm
- Nozzle Temperature: 215°C
- Bed Temperature: 65°C
- Print Speed: 100 mm/s
- Acceleration: 3000mm/s²
Conducting a test print like this can give you a tangible sense of the improvements Klipper brings.
Prerequisites
Before diving into the installation, make sure you have all the necessary components:
- Raspberry Pi: Any version will do, but a Raspberry Pi 4 is recommended for optimal performance.
- MainsailOS or FluiddPi: Choose either one for the web interface you’ll use to control your printer.
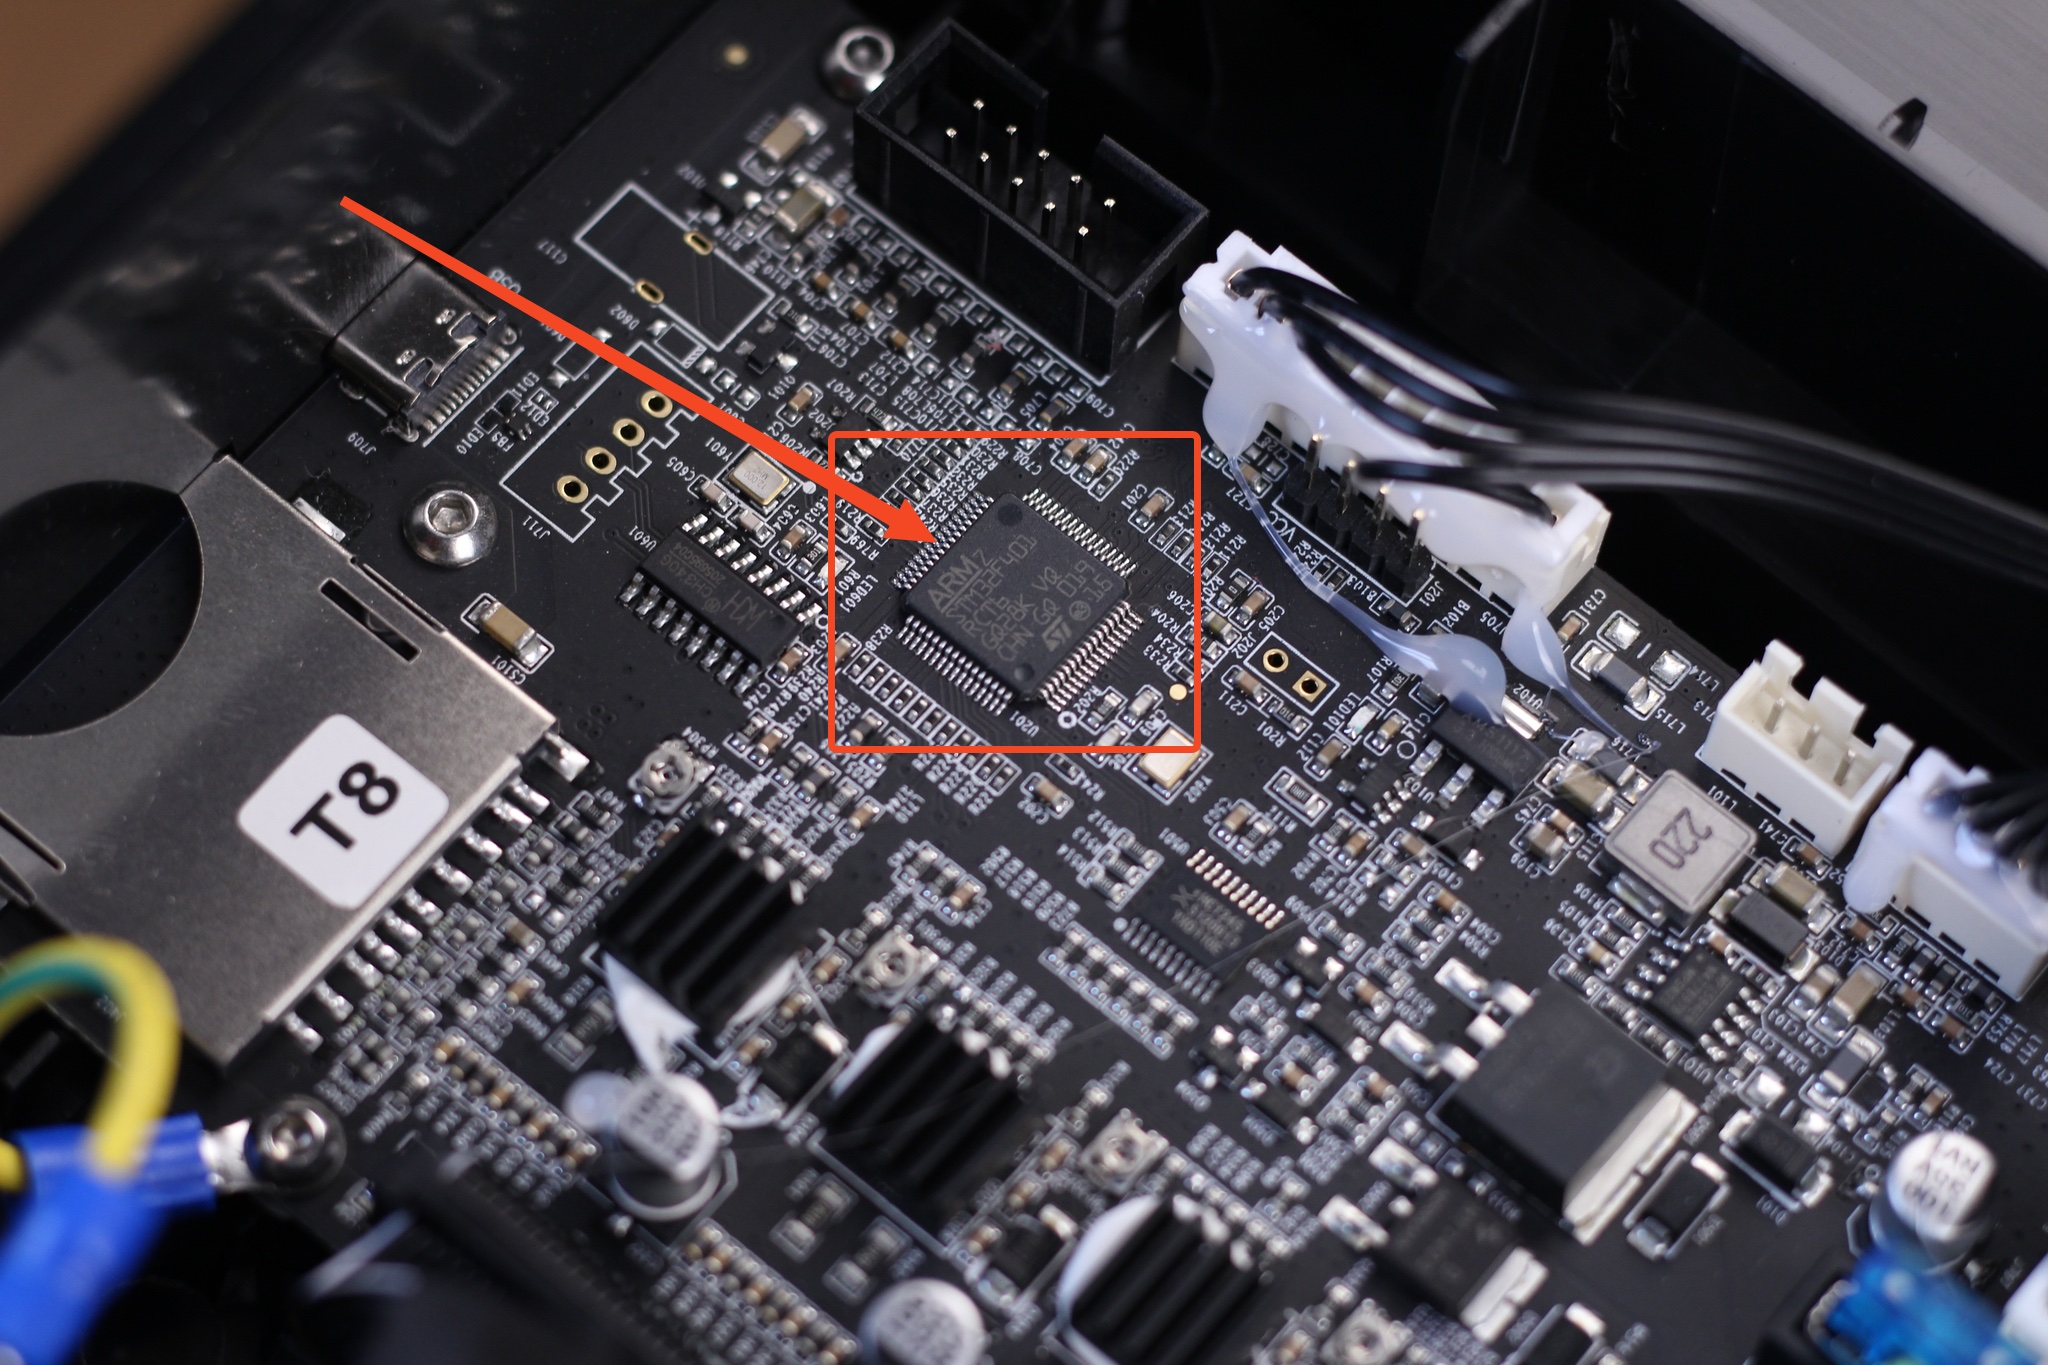
- Stock Creality Ender 3 S1 Pro: Ensure your printer has the STM32F401 CPU.
- Essential Accessories: You’ll need a quality power supply, a Type C cable, and the specific Ender 3 S1 Pro Klipper config file from 3DPrintBeginner.

Before You Begin
A word of caution: installing Klipper involves some technical know-how. If you have prior experience with 3D printers and hardware, you should be fine, but here are a couple of important notes:
- Touchscreen Functionality: The stock touchscreen will become non-functional post-installation. To control your printer, you should use the web interface or consider investing in a BIQU PI TFT50 with KlipperScreen.
If you’re ready to proceed, let’s move on to the installation steps.
Installation Steps
Step 1: Install Mainsail or Fluidd
First, you’ll need to install MainsailOS or FluiddPi on your Raspberry Pi. These interfaces allow you to interact with your printer directly from your computer or smartphone.
- Download the Image: You can find the available images on their respective websites. Download the image file.
- Write the Image to the SD Card: Use a program like Etcher to flash the image onto an SD card compatible with your Raspberry Pi.
Step 2: Configure Klipper Firmware
Once you have the web interface set up, it’s time to configure Klipper.
-
SSH Access: Use an SSH console like Putty to access your Raspberry Pi.
-
Clone Klipper: Run the command to clone Klipper onto your Pi.
git clone https://github.com/Klipper3d/klipper.git cd klipper
Step 3: Build and Flash Firmware
Now that Klipper is on your Pi, you need to build the firmware for the Ender 3 S1 Pro.
-
Build Firmware: In the SSH console, run the make command to build the firmware.
make menuconfig
Configure settings to match your printer’s specifics. Save and exit when done.
-
Download Bin File: After building, download the produced
klipper.binfile. -
Copy to SD Card: Transfer the
klipper.binfile onto an SD card, insert it into your printer, and reboot it to flash the new firmware.
Step 4: Configure the Printer
With Klipper now installed on your printer, the next step is to upload the configuration file.
- Upload Config File: In Mainsail or Fluidd, navigate to the configurations section and upload the specific Ender 3 S1 Pro Klipper config file you’ve downloaded from 3DPrintBeginner.
- Restart Firmware: Restart Klipper from the web interface to apply the new configuration.

Final Steps
You’re almost there! Here are the remaining steps to ensure everything is functioning correctly:
Home the Printer
- Testing Movement: Use the web interface to home your printer. Verify that all axes move correctly.
Check Temperature Readings
- Verification: Make sure that the temperature readings for the nozzle and the bed are accurate. Adjust your settings in the config file if necessary.
Calibrate Essential Settings
- Z-Offset: Properly calibrate your Z-offset to ensure the first layer sticks well.
- Pressure Advance: Tweak the settings to minimize extrusion issues.
- Input Shaper: Optimize the settings to reduce artifacts and improve print quality.
Following these steps will ensure that your printer is performing at its best.
Reverting to Stock Firmware
It’s essential to know how to revert to the stock firmware, just in case you run into any issues or decide that Klipper isn’t for you.
- Download Stock Firmware: Go to Creality’s official website and download the necessary stock firmware files.
- Flash Stock Firmware: Follow Creality’s guide to flash the stock firmware back onto your printer.

Additional Support
Even with the best guides, things don’t always go as planned. If you run into issues or have questions, you can join forums like the 3DPrintBeginner Forum. Engaging with a community can provide assistance and detailed queries to help you troubleshoot and optimize your setup.
Setting up Klipper on your Creality Ender 3 S1 Pro can feel like a monumental task, but the rewards are worth the effort. With faster print speeds, remote control capabilities, and advanced features like Pressure Advance and Input Shaper, you’ll be taking your 3D printing game to a whole new level. Happy printing!
Anycubic 3D Materials Sale: Resin & PLA from $9.49/kg

MYNT3D 3D Pen Mat Kit, DesignPad + FreePad,Black
$19.00 (as of June 18, 2025 23:32 GMT +00:00 - More infoProduct prices and availability are accurate as of the date/time indicated and are subject to change. Any price and availability information displayed on [relevant Amazon Site(s), as applicable] at the time of purchase will apply to the purchase of this product.)
【2025 Special Bundle】SUNLU Official Filament Dryer Box S4,Four-Spool 3D Printer Dehydrator with Rapid Heating, Auto Humidity Control, and Advanced Triple Fan Upgrade, Fits PLA,PETG,ABS,TPU,PA,etc.
$139.99 (as of June 18, 2025 23:32 GMT +00:00 - More infoProduct prices and availability are accurate as of the date/time indicated and are subject to change. Any price and availability information displayed on [relevant Amazon Site(s), as applicable] at the time of purchase will apply to the purchase of this product.)
3D Scanning Marker & Turntable Kit – 6.0mm Inner Diameter Adhesive Dots with Auto Rotating Turntable, 600 Reference Markers for Handheld 3D Scanners, Reverse Engineering & Metrology
(as of June 18, 2025 23:32 GMT +00:00 - More infoProduct prices and availability are accurate as of the date/time indicated and are subject to change. Any price and availability information displayed on [relevant Amazon Site(s), as applicable] at the time of purchase will apply to the purchase of this product.)
Revopoint 28 Pieces 3D Marker Block Kit for 3D Scanning, 3D Scanning Markers for 3D Scanners, 3D Tracking Dots for Preventing Tracking Loss and Enhance Accuracy, Magnetic 3D Reference Point Marker
$220.00 (as of June 18, 2025 23:32 GMT +00:00 - More infoProduct prices and availability are accurate as of the date/time indicated and are subject to change. Any price and availability information displayed on [relevant Amazon Site(s), as applicable] at the time of purchase will apply to the purchase of this product.)