Creality K1C 3D Printer, 2024 New Version 600mm/s High-Speed Auto Leveling Clog-Free Robust Direct Extruder K1 SE Upgraded 3D Printer with AI Camera 300°C Printing Support Carbon Fiber Filaments
$559.00 (as of June 19, 2025 23:45 GMT +00:00 - More infoProduct prices and availability are accurate as of the date/time indicated and are subject to change. Any price and availability information displayed on [relevant Amazon Site(s), as applicable] at the time of purchase will apply to the purchase of this product.)In the realm of 3D printing, there’s a fine line between ingenuity and recklessness. “Jankiest 3D Printing Tips that Actually Work” explores this precarious boundary by presenting a series of unconventional yet effective techniques highlighted by Teaching Tech. The video underscores methods such as fixing parts with fire, using household items for cooling, and crafting makeshift enclosures, offering practical solutions that are far from optimal yet remarkably functional.
As you navigate these tips, you’ll encounter everything from budget-friendly bed solutions to creative uses of Sharpies for support coloring. Though these hacks can serve as quick fixes, the video emphasizes the importance of quality materials and proper techniques for long-term success. Viewers are encouraged to share their own experiences and perhaps even brave enough to try some of these audacious methods themselves.
Jankiest 3D Printing Tips That Actually Work
Fixing 3D Printer Parts with Fire
Temporary Fixes Using a Flame When No Heat Gun is Available
In the realm of 3D printing, stringing is a common issue. These fine wisps of plastic can be quite annoying, but when you’re in a pinch without a heat gun, you can use a naked flame. This unconventional method involves carefully applying a small torch to the stringing, causing the unwanted plastic to melt away. This technique is useful for quick fixes, particularly when you don’t have access to more sophisticated tools.
Safety Precautions to Avoid Burns and Plastic Melting
While this method can be effective, it comes with certain risks. To avoid burns, it is crucial to use heat-resistant gloves and handle the torch with care. Additionally, applying the flame for too long can cause the main body of your print to melt, ruining your model. Always use short, controlled bursts of flame and maintain a safe distance from your hands and workspace.
Appropriate Uses and Limitations of This Method
This method is most appropriate for minor stringing issues and when other tools are unavailable. It is not a substitute for proper printer calibration or filament drying, which are more permanent solutions for preventing stringing. The flame method is best viewed as a last-resort option when you need a quick fix. Limit its use to non-essential parts or prototypes rather than final, critical components.
Old-School Methods for Part Cooling
Utilizing Household Fans for Makeshift Cooling
Before built-in part cooling fans were standard on 3D printers, hobbyists would often use ordinary household fans. When pointed at the extruder, these fans can provide decent cooling, aiding in the solidification of the filament and thus improving print quality.
Testing and Validating with a Torture Test Model
To validate the effectiveness of this low-tech solution, you can utilize a torture test model, such as the Benchy or other intricate designs. By running two tests—one with the fan and one without—you can compare the results. This will help you assess the cooling performance of your makeshift setup.
Pros and Cons Compared to Built-In Part Cooling
The main advantage of using a household fan is cost savings and the ease of setup. However, this method is less efficient than built-in part cooling, which is specifically designed to direct airflow precisely where it’s needed. Household fans may also introduce dust and debris into your print area, potentially causing other issues. Thus, while useful in certain scenarios, it is generally a stopgap measure.

Find 3D Printing Accessories Here
Makeshift Enclosure for ABS Printing
Using a Garbage Bag to Maintain Temperature Consistency
When printing with ABS, maintaining a stable temperature is vital to prevent warping and layer separation. If you don’t have a commercial enclosure, a large plastic garbage bag can serve as a makeshift solution. Simply drape the bag over your entire printer setup to trap heat and minimize temperature fluctuations.
Improving Print Quality with a DIY Enclosure
The use of a garbage bag or other DIY enclosures like cardboard boxes or cling film can significantly improve ABS print quality. By creating a more stable and warmer environment, these improvised solutions reduce warping and increase adhesion between layers, resulting in more reliable prints.
Linked Resources for ABS Printing and Commercial Enclosures
There are numerous resources available for those looking to delve deeper into ABS printing, including tutorials on creating more advanced DIY enclosures. For those seeking more permanent solutions, commercial enclosures provide superior temperature control and build quality. These alternatives, while more costly, offer long-term benefits for serious 3D printing enthusiasts.
3D Modeling Without CAD Software
Overlapping Models in Slicer Software
If you need to combine multiple models but lack proficiency in CAD software, slicer programs like Cura and Prusa Slicer offer a quick fix: simply overlap the models. This might create some errors due to intersecting geometries, but it will merge the parts sufficiently for most practical purposes.
Different Techniques in Cura and Prusa Slicer
In Cura, you can utilize the “Combine Type” feature to handle overlapping geometries, while in Prusa Slicer, the “Object Intersection” feature can be used to join models. Both slicers provide ways to visualize and adjust the merged model, ensuring that the tool paths are reasonable enough for printing.
Advantages of This Quick Approach Versus Traditional CAD
This approach is advantageous for rapid prototyping and situations where you don’t have the time or skills to use CAD software. It allows for creativity and flexibility in model design without a steep learning curve. However, it lacks the precision and optimization that CAD offers, making it less suitable for highly detailed or complex projects.

Budget-Friendly G10 Bed Solution
Using the Non-Copper Side of a PCB as a Print Bed
For a budget-friendly alternative to expensive print surfaces, you can utilize the non-copper side of a single-sided PCB (Printed Circuit Board). This method is particularly beneficial for those looking to economize without sacrificing print quality.
Benefits for Printing with PETG
The G10 material, found on the non-copper side of a PCB, provides excellent adhesion for PETG filament, reducing warping and improving layer bonding. It withstands high temperatures and offers a durable, long-lasting print surface for PETG and other challenging materials.
Linked Discussions on G10 Print Surfaces
Numerous online forums and communities discuss the advantages and limitations of using G10 as a print surface, providing valuable insights and troubleshooting tips. These discussions can guide beginners in setting up and maintaining their G10 print beds effectively.
Coloring Supports with Sharpies
Using Permanent Markers to Color Support Structures
Permanent markers like Sharpies can be used to color support structures before printing. This innovative approach can visually differentiate supports from the main model, aiding in the post-processing phase.
Method to Reduce Adhesion Between Model and Supports
Coloring supports with Sharpies can also reduce adhesion between the model and supports, making them easier to remove. The ink creates a slight barrier, preventing the supports from bonding too strongly to the primary print material.
Optimizing Support Removal While Maintaining Quality
By strategically placing and coloring supports, you can streamline the removal process and maintain the quality of the finished model. This technique is particularly useful for complex prints with numerous support structures, saving time and effort during post-processing.
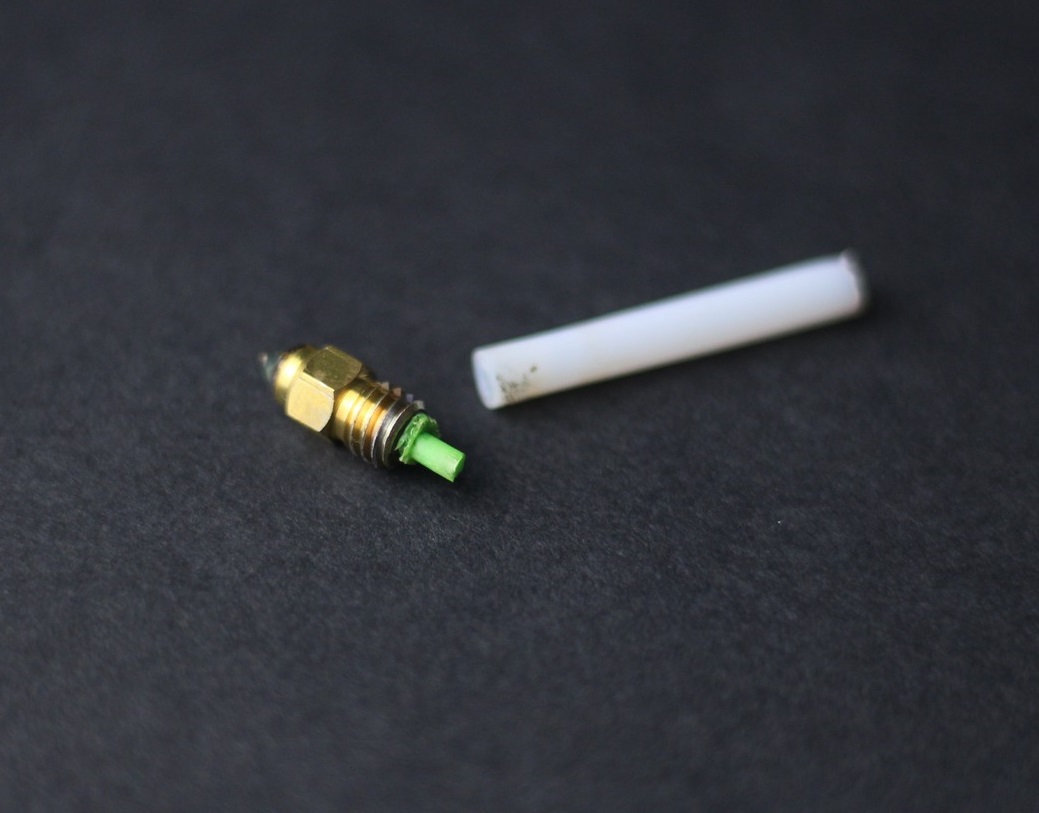
Unconventional Filament Joining
Joining Filament Pieces with PTFE Tubing and a Heat Gun
To join filament pieces, you can use a short length of PTFE (Polytetrafluoroethylene) tubing and a heat gun. This method involves inserting the filament ends into the PTFE tube and applying heat to fuse them together, creating a continuous filament strand.
Creating Strong, Near-Normal Diameter Joins
With careful application of heat, this technique produces strong joins that closely match the diameter of the original filament. This ensures a consistent feed through the extruder, minimizing print defects and interruptions.
Safety Tips to Avoid Overheating and PTFE Risks
PTFE tubing can release harmful fumes when overheated, so it’s crucial to work in a well-ventilated area and use a respirator if necessary. Apply heat sparingly and monitor the process closely to avoid exceeding safe temperatures.
General Tips and Cautions
Discretion Advised Due to Risks and Suboptimal Performance
Many of the methods discussed here carry inherent risks and may not deliver optimal performance compared to traditional techniques. Viewer discretion is advised, and these tips should primarily be used in non-critical scenarios or emergency situations.
Encouraging Viewer Interaction and Feedback
Engaging with the community can provide additional insights and improvements to these unconventional methods. Viewers are encouraged to share their experiences and suggestions, fostering a collaborative learning environment.
Sharing Experiences and Additional Suggestions
By discussing the successes and failures of various approaches, the community can evolve and refine these janky tips. Sharing your experiences can help others avoid pitfalls and discover new, effective shortcuts.
Promotional Content for Quality Products
Emphasizing the Importance of Quality Filament and Resins
While these tips offer temporary solutions, investing in high-quality filament and resins can significantly improve your printing experience. Premium materials reduce the likelihood of issues like stringing, warping, and layer separation.
Exclusive Offerings and Discounts for Teaching Tech Subscribers
Subscribers to Teaching Tech can enjoy exclusive offers and discounts on quality filament and resins. These deals provide an opportunity to upgrade your materials at a reduced cost, enhancing the overall quality of your prints.
Call to Action to Support the Channel
Supporting the channel through subscriptions and purchases helps maintain the availability of educational content and innovative tips. Viewers are encouraged to take advantage of these offers and support ongoing production.
Final Conclusion and Call to Action
Summary of Shared Unconventional Tips
In this video, we have explored several unconventional 3D printing tips, including using flames for stringing, household fans for part cooling, makeshift enclosures for ABS printing, combining models without CAD, budget-friendly G10 beds, coloring supports with Sharpies, and unconventional filament joining methods. These methods, while not perfect, can be effective in certain situations.
Encouraging Viewers to Subscribe and Share Content
If you’ve found these tips helpful or amusing, consider subscribing to the channel and sharing the content with others. Your support helps us continue providing creative solutions and educational materials for the 3D printing community.
Promoting Secondary YouTube Channel TT Racing
Additionally, check out our secondary YouTube channel, TT Racing, for more exciting content. Subscribing to both channels ensures you stay updated with the latest innovations and tutorials in the world of 3D printing and beyond.
By embracing creativity and resourcefulness, these janky tips and tricks can help you navigate the challenges of 3D printing, even when ideal solutions are out of reach.
Maintain Your 3D Printer with these Tools
ELEGOO PLA Filament 1.75mm Black 1KG, 3D Printer Filament Dimensional Accuracy +/- 0.02mm, 1kg Cardboard Spool(2.2lbs) 3D Printing Filament Fits for Most FDM 3D Printers
$13.99 (as of June 19, 2025 23:45 GMT +00:00 - More infoProduct prices and availability are accurate as of the date/time indicated and are subject to change. Any price and availability information displayed on [relevant Amazon Site(s), as applicable] at the time of purchase will apply to the purchase of this product.)
Polymaker PLA PRO Filament 1.75mm 1kg, Tough & High Rigidity Black 3D Printing Filament, PolyLite PLA PRO 3D Printer Filament 1.75mm, Print with Most 3D Printers
$24.99 (as of June 19, 2025 23:45 GMT +00:00 - More infoProduct prices and availability are accurate as of the date/time indicated and are subject to change. Any price and availability information displayed on [relevant Amazon Site(s), as applicable] at the time of purchase will apply to the purchase of this product.)
ANYCUBIC Photon Mono 4, Resin 3D Printer with 7'' 10K Mono LCD Screen, Stable LighTurbo Light Source and 70mm/h Fast Printing, Print Volume 6.04'' x 3.42'' x 6.49''
$159.99 (as of June 19, 2025 23:45 GMT +00:00 - More infoProduct prices and availability are accurate as of the date/time indicated and are subject to change. Any price and availability information displayed on [relevant Amazon Site(s), as applicable] at the time of purchase will apply to the purchase of this product.)
ELEGOO Mars 5 Ultra 9K MSLA Resin 3D Printer, Smart Mechanical Sensor, Fast Printing Up to 150mm/h, AI Camera, WiFi Cluster Printing, Automatic Leveling, Large Printing Size 6.04 * 3.06 * 6.49 inch
$284.89 (as of June 19, 2025 23:45 GMT +00:00 - More infoProduct prices and availability are accurate as of the date/time indicated and are subject to change. Any price and availability information displayed on [relevant Amazon Site(s), as applicable] at the time of purchase will apply to the purchase of this product.)