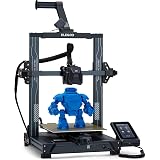
ELEGOO Neptune 3 Pro FDM 3D Printer with Auto Bed Leveling, Dual-Gear Direct Extruder, Dual Lead Screw Drive, Removable Capacitive Screen, 8.85x8.85x11in Large Printing Size
$209.99 (as of June 8, 2025 21:50 GMT +00:00 - More infoProduct prices and availability are accurate as of the date/time indicated and are subject to change. Any price and availability information displayed on [relevant Amazon Site(s), as applicable] at the time of purchase will apply to the purchase of this product.)In this tutorial, you’ll learn how to use Microsoft 3D Builder in collaboration with i.materialise, an online 3D printing service. The tutorial covers various aspects of using 3D Builder, starting from the different options on the opening screen to creating and modifying 3D models, changing appearance, and preparing the models for printing. The tutorial also guides you through uploading and ordering the 3D printed model through the i.materialise 3D printing service. Whether you’re a beginner or an experienced user, this tutorial will help you navigate through the features and functionalities of Microsoft 3D Builder to create models for 3D printing.
So, if you’re ready to embark on your 3D printing journey, join this tutorial and discover how to bring your ideas to life with Microsoft 3D Builder and i.materialise. From starting with an empty workspace to scanning existing objects, manipulating models, and preparing them for printing, this tutorial will walk you through the entire process. Get ready to unleash your creativity and learn new skills in 3D modeling and printing.
Microsoft 3D Builder Tutorial: How to Create Models for 3D Printing
Welcome to this tutorial on how to use Microsoft 3D Builder in collaboration with i.materialise, an online 3D printing service. In this tutorial, we will take you through the process of creating models for 3D printing using Microsoft 3D Builder. We will cover the different options on the opening screen, the features and functionalities of Microsoft 3D Builder, and how to prepare and upload your models for 3D printing through the i.materialise 3D printing service. Let’s get started!


Options on the Opening Screen
When you open Microsoft 3D Builder, you will be presented with several options on the opening screen. These options include starting with an empty workspace, loading an existing 3D geometry, turning a 2D image into a 3D object, and scanning an existing object.
- Empty Workspace: This option allows you to start with a blank canvas and create your 3D model from scratch.
- Load an Existing 3D Geometry: If you have an existing 3D geometry that you would like to work with, you can select this option to import it into Microsoft 3D Builder.
- Turn a 2D Image into a 3D Object: This option allows you to take a 2D image and convert it into a 3D object.
- Scan an Existing Object: If you have a physical object that you would like to recreate in 3D, you can use this option to scan it and create a 3D model.
These options provide flexibility and cater to different starting points for your 3D modeling journey.
Features and Functionalities of Microsoft 3D Builder
Before we dive into the tutorial, let’s take a look at the features and functionalities of Microsoft 3D Builder. Understanding these features will help you navigate and utilize the software more efficiently.
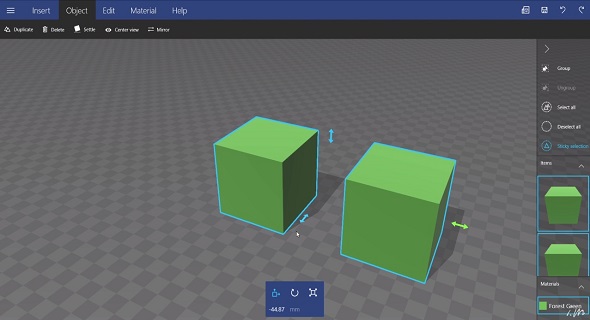
3D Workspace
In the center of the screen, you will see the 3D workspace. This is where you will create and manipulate your 3D models. You can rotate, zoom, and pan in the workspace using your mouse. Left-click and drag to rotate the view, scroll to zoom in and out, and right-click and drag to pan.
Selecting and Grouping Models
On the right side of the screen, you will find options for selecting and grouping models. These options allow you to manipulate multiple models simultaneously. You can select models by left-clicking on them, and you can group models together by left-clicking on one model and then left-clicking on another while holding the Shift key.
Item and Material Lists
Adjacent to the options for selecting and grouping models, you will find the item and material lists. The item list displays the models currently in your workspace, while the material list allows you to assign different materials to your models, which can affect their appearance when 3D printed.
Main Menu
Located on the top left of the screen, the main menu provides options for opening, saving, printing, and accessing account settings. This menu is where you can manage your projects and customize your editing preferences.

Inserting Standard Shapes or Existing Files
To start creating your 3D model, you can insert standard shapes or existing files into the workspace.
Inserting Standard Shapes
From the insert menu, you can choose from a variety of standard shapes such as cubes, spheres, and cylinders. These shapes serve as a foundation for your model and can be customized further to suit your design.
Inserting Existing Files
If you already have existing 3D or 2D files that you would like to work with, you can use the insert menu to import these files into Microsoft 3D Builder. This allows you to build upon existing designs or incorporate elements from other projects.
Inspecting and Editing Models
Once you have inserted your models into the workspace, you can inspect and make edits to them to refine your design. Microsoft 3D Builder provides several tools for translation, rotation, scaling, duplicating, deleting, and mirroring models.
Translation
You can translate or move your models by clicking and dragging one of the arrows on the model. Alternatively, you can enter a value in the translation field to move the model to a specific position.
Rotation
To rotate your models, click on the rotation button on the menu. You can then click and drag one of the arrows to rotate the model in the desired direction. Entering a value in the rotation field is also an option for precise rotation.
Scaling
Scaling allows you to adjust the size of your models. You can click and drag one of the arrows to scale your models proportionally. If you want to scale your models without locking the proportions, you can click on the lock symbol to release the connection between the different dimensions.
Duplicating Models
If you want to create multiple copies of a model, you can use the duplicate function. Once you have selected a model, left-click on another model to add it to your selection. This allows you to perform edits on multiple models simultaneously.
Deleting Models
To remove a model from your workspace, you can select it and press the delete key on your keyboard. Alternatively, you can use the delete function in the menu.
Mirroring Models
The mirror function allows you to create mirror images of your models. This comes in handy when you need a left and right version of an object. You can mirror your models to achieve symmetrical designs.
Modifying Models
Microsoft 3D Builder provides additional tools for modifying your models to achieve specific shapes or effects. These tools include simplify, split, smooth, and emboss.
Simplifying Models
The simplify tool reduces the number of triangles in your model, resulting in a model with sharper edges. This can be useful for optimizing your 3D models and reducing file size.
Splitting Models
The split tool allows you to cut your models according to a given plane. You can set the position and angle of the plane by dragging or entering its values. This tool helps you create separate parts or sections within your models.
Smoothing Models
The smooth tool rounds off the edges and surfaces of your models, giving them a smoother appearance. It can be used to refine the details and aesthetics of your designs.
Embossing Models
The emboss tool enables you to add text, signs, or symbols to your models. You can type your text in the field and adjust its size, rotation, and position on the model. This tool allows you to customize your models and add personalization.
Changing the Appearance of Models
In addition to modifying the structure of your models, you can also change their appearance by altering their color. Microsoft 3D Builder provides options for changing the color of your models.
From the material menu, you can select predefined colors or choose a specific color for your models. This allows you to give your models a distinct look and feel.

Preparing Models for Printing
Before you can 3D print your models, it is important to ensure they are ready for the printing process. Microsoft 3D Builder provides tools for checking and repairing models, as well as options for rescaling and adding supports.
Checking for Errors
Using the check feature, you can identify and fix any errors or issues in your models that may affect the printing process. This ensures that your models are structurally sound and printable.
Repairing Models
If your models have any issues or errors, you can use the repair tool to automatically fix them. This saves time and effort in manually addressing the problems.
Rescaling Models
If you need to adjust the size of your models before printing, you can use the rescale feature. This allows you to resize your models to the desired dimensions.
Adding Supports
Supports are structures that help maintain the stability and form of 3D printed models. Microsoft 3D Builder provides an option to add supports to your models, ensuring successful and accurate 3D printing.
Uploading and Ordering 3D Printed Model
Once your models are prepared, you can upload and order them through the i.materialise 3D printing service.
Uploading the Model
Clicking the 3D print button in the main menu will take you to the layout tab. Here, you can inspect your model and make any final modifications. Once you are satisfied with your design, click the “Order Online” button. This will redirect you to the i.materialise website.
Ordering through i.materialise 3D Printing Service
On the i.materialise website, you can choose the material, color, and finish for your 3D printed model. Explore the different options available and select the ones that best suit your needs and preferences. You will be able to see pricing information and make your selection accordingly. Once you are ready, add your project to the cart and proceed with the order. Sit back and wait for your 3D printed model to be delivered to your doorstep.

Conclusion
In this tutorial, we have covered the different options on the opening screen of Microsoft 3D Builder, the features and functionalities of the software, and how to create, modify, and prepare models for 3D printing. We also explored the process of uploading and ordering 3D printed models through the i.materialise 3D printing service. Microsoft 3D Builder offers a user-friendly and versatile platform for creating 3D models, allowing users to unleash their creativity and bring their designs to life. Whether you are a beginner or an experienced user, Microsoft 3D Builder provides the tools and resources you need to dive into the exciting world of 3D printing.

ELEGOO Upgraded 8K Standard Photopolymer 3D Printer Resin 405nm UV-Curing Resin Best for 8K/12K/14K Saturn MSLA DLP LCD 3D Printing Space Grey 1000G
$21.99 (as of June 8, 2025 21:49 GMT +00:00 - More infoProduct prices and availability are accurate as of the date/time indicated and are subject to change. Any price and availability information displayed on [relevant Amazon Site(s), as applicable] at the time of purchase will apply to the purchase of this product.)
Ender 3 V3 KE PEI Spring Steel 235x235mm, Texture PEI Sheet Magnetic Flexible Heated Bed, Ender 3 V3 SE Build Plate for Creality K1C/K1/Ender 3 V3/Ender 3/Ender 3 Pro/Ender 3 V2/Ender 3 V2 Neo
$12.59 (as of June 8, 2025 21:49 GMT +00:00 - More infoProduct prices and availability are accurate as of the date/time indicated and are subject to change. Any price and availability information displayed on [relevant Amazon Site(s), as applicable] at the time of purchase will apply to the purchase of this product.)
3DTOOLS 3D Scanner Spary for Revopoint 3D Scanners, for Reflective, Transparent or Highly Textured 400ml
$37.99 (as of June 8, 2025 21:49 GMT +00:00 - More infoProduct prices and availability are accurate as of the date/time indicated and are subject to change. Any price and availability information displayed on [relevant Amazon Site(s), as applicable] at the time of purchase will apply to the purchase of this product.)
Revopoint POP3 Plus 3D Scanner for 3D Printing, Handheld 3D Printer Scanner 0.04mm Precision, Full-Color Scan for Medium Object, Support for Android/iOS/Win/MacOS, Standard
$619.00 (as of June 8, 2025 21:49 GMT +00:00 - More infoProduct prices and availability are accurate as of the date/time indicated and are subject to change. Any price and availability information displayed on [relevant Amazon Site(s), as applicable] at the time of purchase will apply to the purchase of this product.)