Ever battled the frustration of warped ABS prints? You’re not alone. Many makers grapple with this issue, especially when working with larger parts. But what if a simple shift in your printing strategy could drastically reduce warping and deliver more dimensionally accurate results? Let’s journey into the world of 45-degree prints and how this technique can be your secret weapon against ABS warping.
Anycubic Coupon – $5 off $50+ sitewide with code DIY5OFF
Taming ABS Warping: The 45-Degree Print Approach
Acrylonitrile Butadiene Styrene, or ABS, filament is a popular choice for 3D printing due to its strength and durability. However, it’s also notorious for warping, a frustrating phenomenon where the corners or edges of a print lift off the bed during printing. This is primarily due to the uneven cooling of the material, which causes stress and contraction, eventually leading to warping.
The 45-degree print approach offers a unique solution to this problem. By orienting your part at a 45-degree angle on the print bed, you can minimize the contact area between the first layer and the bed, reducing the force that causes warping. This approach can be particularly effective for large, rectangular parts that are prone to warping along their long edges.
Understanding the Warping Challenge
Warping is a common headache for 3D printing enthusiasts, especially those working with ABS filament. It stems from the material’s tendency to contract as it cools, creating internal stresses that can lift the print away from the bed.
Uneven cooling exacerbates this issue. When the top layers of a print cool faster than the bottom layers, the resulting stress can lead to significant warping. This is especially noticeable in large, flat prints where the surface area exposed to cooling is considerable.
The 45-Degree Advantage: A Shift in Perspective
So, how does printing at a 45-degree angle help combat warping? It’s all about reducing the contact area and changing the direction of stress.
By orienting your part at a 45-degree angle, you minimize the surface area of the first layer that adheres to the print bed. This reduces the overall force that can cause the print to warp upwards. Additionally, the angled orientation distributes stress more evenly across the part, making it less likely to lift at specific points.
Reduced Bed Contact, Reduced Warping
The primary advantage of the 45-degree approach lies in its ability to minimize contact between the print and the bed. By reducing the surface area of the first layer, you effectively reduce the force that can cause warping.
Imagine trying to pull a large sheet of paper off a table. It’s much easier to lift a corner than it is to lift the entire sheet at once. Similarly, by minimizing the contact area of your print, you make it harder for warping to occur.
Distributing Stress for Stability
Another benefit of the 45-degree orientation is the distribution of stress across the part. Instead of concentrated stress points along the edges, the stress is spread more evenly, making the print more stable and less prone to warping.
Think of a bridge. A well-designed bridge distributes weight evenly across its structure, preventing any single point from bearing too much load. The 45-degree print approach works similarly, distributing stress to improve overall stability.

Anycubic Coupon – $5 off $50+ sitewide with code DIY5OFF
Implementing the 45-Degree Strategy: A Step-by-Step Guide
Ready to give this a try? Here’s a step-by-step guide to implementing the 45-degree strategy for mitigating ABS warping:
- Preparation Is Key: Ensuring that your printer is properly calibrated, and your bed is clean and level sets the stage for success.
- Slicer Configuration: Orienting your model in your slicer software, adjusting settings to enhance adhesion, and generating g-code prepares the blueprint your printer will follow.
- Printing and Monitoring: Initiating the print, keeping a watchful eye on progress, and intervening if problems arise are essential for a successful outcome.
- Post-Processing: Removing the print from the bed, excising any support structures, and refining the surface complete the process, delivering a finished product.
Step 1: Preparation Is Key
The first step in mitigating ABS warping is ensuring that your printer is properly prepared. This includes:
- Calibration: Calibrating your printer ensures that the nozzle is the correct distance from the bed and that all axes are moving accurately.
- Bed Leveling: A level bed is crucial for good adhesion. Make sure your bed is properly leveled before starting your print.
- Bed Adhesion: Improving bed adhesion can help prevent warping. Consider using a PEI sheet, glue stick, or hairspray to enhance adhesion.
- Enclosure: An enclosure can maintain a consistent temperature around the print, reducing warping. If you don’t have an enclosure, consider building one or using a cardboard box to insulate your printer.
Step 2: Slicer Configuration
Once your printer is prepared, you need to configure your slicer software:
-
Orientation: Rotate your model 45 degrees in your slicer software. Ensure the model is properly oriented on the bed and that there are no overhangs that require excessive support.
-
Adhesion Settings: Tweak the slicer settings to promote optimal bed adhesion. A wider and slower first layer increases surface contact, improving overall adhesion.
- Slow Printing Speeds: Slower printing speeds, ideally below 40mm/s, provide the plastic more time to adhere to the bed.
- Layer Height: Aim for a 0.2mm layer height to maintain a balance between detail and stability.
- Infill Density: Set the infill density to 15% for a lightweight yet sturdy structure.
- Temperature Settings: Set the nozzle temperature to 230 degrees Celsius and the bed temperature to 100 degrees Celsius for optimal ABS adhesion.
-
Supports: Decide whether your print needs supports based on its geometry. If so, add supports as needed, keeping in mind that they may leave marks on your print.
-
G-Code Generation: After configuring your settings, generate the G-code file and transfer it to your 3D printer.
Here is a complete .ini file to import into Prusa Slicer
generated by Prusa Slicer 2.4.2+win32 on 2024-01-01 at 16:55:45 UTC
[print:3DWOX1] avoid_crossing_perimeters = 0 avoid_crossing_perimeters_max_detour = 0 bottom_fill_pattern = monotonic bottom_solid_layers = 3 bottom_solid_min_thickness = 0 bridge_acceleration = 0 bridge_angle = 0 bridge_flow_ratio = 1 bridge_speed = 30 brim_separation = 0 brim_type = outer_only brim_width = 5 clip_multipart_objects = 1 compatible_printers = compatible_printers_condition = complete_objects = 0 default_acceleration = 0 dont_support_bridges = 1 draft_shield = disable delefant_foot_compensation = 0 ensure_vertical_shell_thickness = 0 external_perimeter_extrusion_width = 0.45 external_perimeter_speed = 50% external_perimeters_first = 0 extra_perimeters = 1 extruder_clearance_height = 20 extruder_clearance_radius = 20 extrusion_width = 0.45 fill_angle = 45 fill_density = 15% fill_pattern = stars first_layer_acceleration = 0 first_layer_acceleration_over_raft = 0 first_layer_extrusion_width = 0.42 first_layer_height = 0.2 first_layer_speed = 10 first_layer_speed_over_raft = 30 fuzzy_skin = none fuzzy_skin_point_dist = 0.8 fuzzy_skin_thickness = 0.3 gap_fill_enabled = 1 gap_fill_speed = 20 gcode_comments = 0 gcode_label_objects = 0 gcode_resolution = 0.0125 gcode_substitutions = infill_acceleration = 0 infill_anchor = 600% infill_anchor_max = 50 infill_every_layers = 1 infill_extruder = 1 infill_extrusion_width = 0.45 infill_first = 0 infill_only_where_needed = 0 infill_overlap = 25% infill_speed = 30 inherits = interface_shells = 0 ironing = 0 ironing_flowrate = 15% ironing_spacing = 0.1 ironing_speed = 15 ironing_type = toplayer height = 0.2 max_print_speed = 40 max_volumetric_speed = 0 min_skirt_length = 0 mmu_segmented_region_max_width = 0 notes = only_retract_when_crossing_perimeters = 0 ooze_prevention = 0 output_filename_format = [input_filename_base].gcode overhangs = 1 perimeter_acceleration = 0 perimeter_extruder = 1 perimeter_extrusion_width = 0.45 perimeter_speed = 40 perimeters = 3 post_process = print_settings_id = raft_contact_distance = 0.1 raft_expansion = 1.5 raft_first_layer_density = 90% raft_first_layer_expansion = 3 raft_layers = 0 resolution = 0 seam_position = aligned single_extruder_multi_material_priming = 1 skirt_distance = 6 skirt_height = 1 skirts = 0 slice_closing_radius = 0.049 slicing_mode = regular small_perimeter_speed = 15 solid_infill_below_area = 70 solid_infill_every_layers = 0 solid_infill_extruder = 1 solid_infill_extrusion_width = 0.45 solid_infill_speed = 20 spiral_vase = 0 standby_temperature_delta = -5 support_material = 1 support_material_angle = 0 support_material_auto = 0 support_material_bottom_contact_distance = 0 support_material_bottom_interface_layers = -1 support_material_buildplate_only = 0 support_material_closing_radius = 2 support_material_contact_distance = 0.2 support_material_enforce_layers = 19 support_material_extruder = 1 support_material_extrusion_width = 0.35 support_material_interface_contact_loops = 0 support_material_interface_extruder = 1 support_material_interface_layers = 3 support_material_interface_pattern = concentric support_material_interface_spacing = 0 support_material_interface_speed = 100% support_material_pattern = honeycomb support_material_spacing = 3 support_material_speed = 30 support_material_style = snug support_material_synchronize_layers = 0 support_material_threshold = 48 support_material_with_sheath = 1 support_material_xy_spacing = 50% thick_bridges = 1 thin_walls = 1 threads = 2 top_fill_pattern = monotonic top_infill_extrusion_width = 0.4 top_solid_infill_speed = 15 top_solid_layers = 3 top_solid_min_thickness = 0 travel_speed = 60 travel_speed_z = 0 wipe_tower = 0 wipe_tower_bridging = 10 wipe_tower_brim_width = 2 wipe_tower_no_sparse_layers = 0 wipe_tower_rotation_angle = 0 wipe_tower_width = 60 wipe_tower_x = 180 wipe_tower_y = 140 xy_size_compensation = 0 [filament:3DWOX1] bed_temperature = 100 bridge_fan_speed = 100 compatible_printers = compatible_printers_condition = compatible_prints = compatible_prints_condition = cooling = 1 disable_fan_first_layers = 3 end_filament_gcode = “; Filament-specific end gcode \n;END gcode for filament\n” extrusion_multiplier = 1 fan_always_on = 0 fan_below_layer_time = 60 filament_colour = #29B2B2 filament_cooling_final_speed = 3.4 filament_cooling_initial_speed = 2.2 filament_cooling_moves = 4 filament_cost = 0 filament_density = 0 filament_deretract_speed = nil filament_diameter = 1.75 filament_load_time = 0 filament_loading_speed = 28 filament_loading_speed_start = 3 filament_max_volumetric_speed = 0 filament_minimal_purge_on_wipe_tower = 15 filament_notes = “” filament_ramming_parameters = “120 100 6.6 6.8 7.2 7.6 7.9 8.2 8.7 9.4 9.9 10.0| 0.05 6.6 0.45 6.8 0.95 7.8 1.45 8.3 1.95 9.7 2.45 10 2.95 7.6 3.45 7.6 3.95 7.6 4.45 7.6 4.95 7.6” filament_retract_before_travel = nil filament_retract_before_wipe = nil filament_retract_layer_change = nil filament_retract_length = nil filament_retract_lift = nil filament_retract_lift_above = nil filament_retract_lift_below = nil filament_retract_restart_extra = nil filament_retract_speed = nil filament_settings_id = “” filament_soluble = 0 filament_spool_weight = 0 filament_toolchange_delay = 0 filament_type = ABS filament_unload_time = 0 filament_unloading_speed = 90 filament_unloading_speed_start = 100 filament_vendor = (Unknown) filament_wipe = nil first_layer_bed_temperature = 100 first_layer_temperature = 240 full_fan_speed_layer = 0 inherits = max_fan_speed = 100 min_fan_speed = 35 min_print_speed = 10 slowdown_below_layer_time = 5 start_filament_gcode = “; Filament gcode\n” temperature = 230 [printer:3DWOX1] bed_custom_model = bed_custom_texture = bed_shape = 0x0,210×0,210×200,0x200 before_layer_gcode = between_objects_gcode = color_change_gcode = M600 cooling_tube_length = 5 cooling_tube_retraction = 91.5 default_filament_profile = default_print_profile = deretract_speed = 0 end_gcode = M104 S0 ; turn off temperature G28 X0 ; home X axis M84 ; disable motors M2 ;g-code end extra_loading_move = -2 extruder_colour = “” extruder_offset = 0x0 gcode_flavor = marlin high_current_on_filament_swap = 0 host_type = octoprint inherits = layer_gcode = machine_limits_usage = time_estimate_only machine_max_acceleration_e = 10000,5000 machine_max_acceleration_extruding = 1500,1250 machine_max_acceleration_retracting = 1500,1250 machine_max_acceleration_travel = 1500,1250 machine_max_acceleration_x = 9000,1000 machine_max_acceleration_y = 9000,1000 machine_max_acceleration_z = 500,200 machine_max_feedrate_e = 60,60 machine_max_feedrate_x = 60,60 machine_max_feedrate_y = 60,60 machine_max_feedrate_z = 12,12 machine_max_jerk_e = 2.5,2.5 machine_max_jerk_x = 10,10 machine_max_jerk_y = 10,10 machine_max_jerk_z = 0.2,0.4 machine_min_extruding_rate = 0,0 machine_min_travel_rate = 0,0 max_layer_height = 0 max_print_height = 195 min_layer_height = 0.07 nozzle_diameter = 0.4 parking_pos_retraction = 92 pause_print_gcode = M601 print_host = printer_model = printer_notes = printer_settings_id = printer_technology = FFF printer_variant = printer_vendor = printhost_apikey = printhost_cafile = remaining_times = 1 retract_before_travel = 2 retract_before_wipe = 0% retract_layer_change = 0 retract_length = 2 retract_length_toolchange = 10 retract_lift = 0 retract_lift_above = 0 retract_lift_below = 0 retract_restart_extra = 0 retract_restart_extra_toolchange = 0 retract_speed = 40 silent_mode = 1 single_extruder_multi_material = 0 start_gcode = ;G28 ; home all axes\n;G1 Z5 F5000 ; lift nozzle\nG28 ;Home\nM298 ;Move Nozzles on Bed plate\nG0 F9000 Z3.00 ;Z-leveling\nM206 X0.0 Y0.0 Z-0.15 ;Offset z direction\n\nG1 F2400 E-6.000000 ;Retraction to prepare for printing template_custom_gcode = thumbnails = toolchange_gcode = use_firmware_retraction = 0 use_relative_e_distances = 0 use_volumetric_e = 0 variable_layer_height = 1 wipe = 0 z_offset = 0 [presets] print = 3DWOX1 sla_print = sla_material = printer = 3DWOX1 filament = 3DWOX1
Step 3: Printing and Monitoring
Once you’ve configured your slicer settings, it’s time to start printing!
- Initial Layers: Pay close attention to the first few layers. If you notice any signs of warping, such as the corners lifting off the bed, stop the print immediately and adjust your settings accordingly.
- Ambient Conditions: Ensure that the ambient temperature around your printer is stable. Drafts and sudden temperature changes can exacerbate warping.
- Active Monitoring: Keep an eye on the print throughout the process. If any issues arise, such as layer separation or nozzle clogging, address them promptly.
- Patience: ABS printing can be challenging, so be patient and don’t get discouraged if you encounter problems. Experiment with different settings and techniques until you find what works best for your printer and filament.
Step 4: Post-Processing
After the print is complete, carefully remove it from the bed.
- Support Removal: Remove any support structures that were generated during printing. Use a sharp knife or pliers to carefully detach the supports without damaging the print.
- Surface Finishing: If desired, you can further refine the surface of your print by sanding, polishing, or applying a coating. This can help to improve the appearance and durability of the finished part.
Advanced Techniques for Warping Reduction
Beyond the 45-degree print orientation, several advanced techniques can further reduce warping:
- Brims and Rafts: Adding a brim or raft increases the surface area of the first layer, improving adhesion.
- Temperature Control: Maintaining a consistent temperature within the printer enclosure minimizes temperature fluctuations and warping.
- Filament Drying: Drying your ABS filament before printing removes moisture, improving print quality and reducing warping.
Brims and Rafts: Anchoring Your Print
Brims and rafts are effective tools for improving bed adhesion and preventing warping. A brim is a single-layer outline that surrounds the base of your print, while a raft is a multi-layer platform that sits between the print and the bed.
Both brims and rafts increase the surface area of the first layer, providing a larger anchor for the print. This can be particularly helpful for parts with small footprints or sharp corners.
Temperature Control: Consistent Heat for Stability
Maintaining a consistent temperature within the printer enclosure is crucial for reducing warping. Temperature fluctuations can cause the plastic to expand and contract unevenly, leading to stress and warping.
If you don’t have an enclosure, consider building one or using a simple cardboard box to insulate your printer. This will help to maintain a stable temperature and reduce warping.
Filament Drying: Removing Moisture for Quality Prints
ABS filament is hygroscopic, meaning it absorbs moisture from the air. Moisture in the filament can cause printing problems, such as stringing, blobs, and warping.
Drying your ABS filament before printing removes moisture and improves print quality. You can dry filament using a dedicated filament dryer, a food dehydrator, or even your printer’s heated bed.
Materials and Tools: Gear Up for Success
- 1.75mm ABS Filament: High-quality filament ensures reliable printing with minimal imperfections.
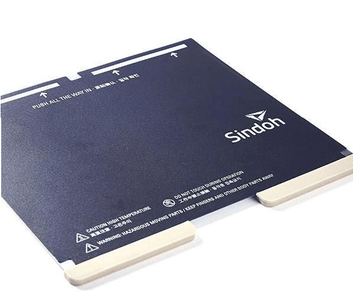
- 3DWOX1 3D Printer: This setup description utilizes a printer known for its temperature management.
- Tack Spray Glue: Enhancing bed adhesion with adhesives such as spray glue leads to a successful execution.
Filament Choice: Quality Matters
The quality of your ABS filament can significantly impact the success of your prints. High-quality filament is less likely to contain impurities or inconsistencies that can cause printing problems.
Look for filament from reputable brands that offer consistent diameter and color. Store your filament in a dry, airtight container to prevent moisture absorption.
Printer Selection: Temperature Control
The 3DWOX1 printer is known for its consistent temperature management, making it a great choice for printing ABS. However, other printers with good temperature control can also be used.
Ensure that your printer is properly calibrated and that all axes are moving accurately. A level bed is crucial for good adhesion.
Bed Adhesion: The Glue That Holds It Together
Enhancing bed adhesion is essential for preventing warping. Tack spray glue is a popular choice for ABS printing, but other options include PEI sheets and glue sticks.
Apply a thin, even coat of adhesive to the bed before starting your print. Allow the adhesive to dry completely before heating the bed.
Conclusion: A New Angle on ABS Printing
By implementing the 45-degree print approach, you can significantly reduce ABS warping and achieve more dimensionally accurate prints. While the estimated remaining time may display as “0h 0m” during printing, the Prusa Slicer consistently produces G-code that results in complete, dimensionally accurate prints. Combining this technique with proper printer preparation, slicer configuration, and advanced warping reduction strategies, you’ll be well on your way to mastering ABS printing and creating high-quality, warp-free parts.
Anycubic Coupon – $5 off $50+ sitewide with code DIY5OFF
