Creality K1C 3D Printer, 2024 New Version 3D Printers with 600mm/s Fast Printing Speed, Support Carbon Fiber Filament 300℃ High-Temp Print, Auto Leveling and Clog-Free Direct Extruder
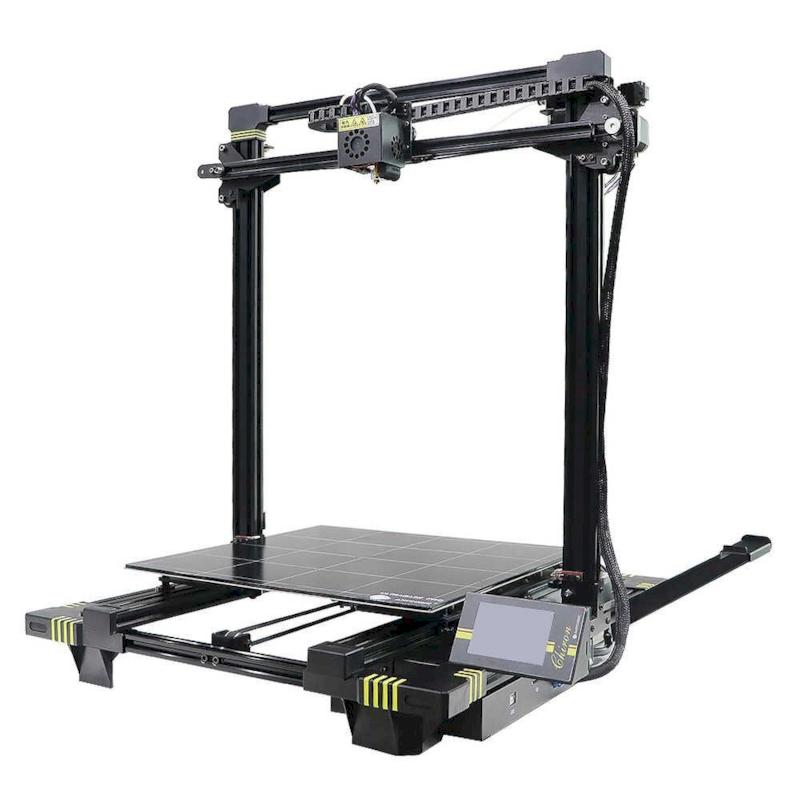
$509.15 (as of June 4, 2025 21:32 GMT +00:00 - More info)In this article, you’ll find an insightful review of the Creality Ender-3 V3 Plus 3D Printer, a popular bedslinger FDM model. With its semi-large build and unique Core XZ structure, the printer boasts a substantial print size of 300x300x330 mm. Despite an initial defective unit, which was swiftly replaced, the review covers various features including the assembly process, print quality, and customer support provided by Deokyu Air, the official distributor in Korea.
As you explore, you’ll learn about the key components and build quality of the Ender-3 V3 Plus, from its PEI textured bed and dual bristle rods to the 350W power supply. The article dives into real-world usage experiences, initial setup complexities, and calibration efforts, highlighting both strengths and potential shortcomings. If you’re considering adding this versatile and reasonably priced 3D printer to your collection, this review will guide you through all you need to know.
$30 off $400+ Anycubic Products with code AC30OFF
Unboxing and Initial Impressions
Large and Heavy Packaging
When you first receive the Creality Ender-3 V3 Plus 3D Printer, the size and weight of the package will be immediately noticeable. Measuring 626 x 503 x 245 mm and weighing approximately 11.5 kilograms, the box commands a significant presence. This bulkiness is expected, given the printer’s impressive output size of 300x300x330 mm and its substantial build quality.
Contents of the Box
Upon opening the box, you’ll first encounter a well-organized array of components. The first items you’ll likely come across are the manual and installation guide, essential tools for the assembly, and a host of smaller accessories. Nestled within the packing foam are the filament holder, filament samples, power cable, and various necessary tools, including nippers and cable ties. You’ll also find the control panel with an LCD screen, nearly identical to those found in other Creality K series printers.
First Look at Components
Your initial glance at the components reveals a system designed with attention to detail and durability. Each part appears to be crafted to fit seamlessly into the semi-assembled structure, making the process considerably less daunting for the user. The filament holder, power cable, and various other items are all placed methodically to ensure you have everything you need right at your fingertips.
Assembly Process
Semi-Assembled Design
One of the appealing aspects of the Creality Ender-3 V3 Plus is its semi-assembled design. This means that although some assembly is required, a significant portion of the printer comes pre-assembled. This can help reduce the intimidation factor for beginners and speed up the setup process for more experienced users.
Installation Guide and Manual
The installation guide and manual are crucial companions during the assembly process. These documents provide step-by-step instructions with clear diagrams that help you understand where each component goes. They’re designed to ease you through the assembly, with well-labeled parts and straightforward language.
Common Assembly Challenges
Despite the semi-assembled nature of the Ender-3 V3 Plus, you may still encounter some challenges. Tightening screws and ensuring correct alignment can be tricky. Misalignment, in particular, is a common issue that can lead to operational problems later on.
Essential Tools and Accessories
Included in the box are several essential tools and accessories that facilitate the assembly process. These include nippers for cutting filament, various Allen wrenches, and zip ties for cable management. Having these tools at your disposal makes the entire process smoother.
Connection of LCD Control Unit
Connecting the LCD control unit is one of the key steps in the assembly process. The control unit is a touchscreen interface that manages the printer’s operations. Properly connecting it involves plugging in several cables and ensuring that each one is securely fastened.
Connecting Motor Cables and Sensors
Equally important is the connection of motor cables and sensors. These components are crucial for the printer’s functionality, controlling various movements and detecting filament presence. Misconnections here can lead to operational issues, so careful attention and following the manual to the letter are necessary.
Design and Build Quality
Core XZ Structure
The Core XZ structure of the Ender-3 V3 Plus sets it apart from many other 3D printers. This design eliminates the typical cantilevered design seen in other models, providing greater stability and accuracy. The rail system behind the XZ structure is robust, aiming to support larger build volumes.
PEI Textured Bed
The build platform features a PEI textured bed, which has excellent adhesion properties for various filaments. This ensures that your print sticks well during the printing process and can be easily removed once it has cooled.
Dual Bristle Rods for Y-axis Movement
Movements along the Y-axis are handled by dual bristle rods. This design choice enhances stability and precision, reducing the chance of layer shifts and providing smoother prints.
350W Power Supply
A 350W power supply powers the Ender-3 V3 Plus. This provides sufficient power for the printer’s operations, ensuring consistent performance without the risk of overheating or power shortages.
Filament Holder and Filament Samples
The filament holder is designed to be both functional and easy to assemble. Accompanied by filament samples, it’s ready to use right out of the box. This allows you to start printing as soon as the assembly and calibration are complete.

$30 off $400+ Anycubic Products with code AC30OFF
Structural Integrity and Stability
Initial Setup and Testing Observations
Once assembled, your initial setup will involve conducting several test prints to ensure everything is functioning correctly. Observations during this phase might include minor adjustments needed for optimal performance.
Issues with Alignment and Tightening Parts
Misalignment and issues with tightening parts are common during the initial setup. Ensuring that all screws are properly tightened and that parts are correctly aligned is crucial for the printer’s overall performance and print quality.
Wobbling and Vibration Compensation
Wobbling and vibration can significantly impact print quality. The Ender-3 V3 Plus has mechanisms to compensate for these issues, but you may still need to make additional adjustments to minimize these effects, especially if your setup isn’t on a perfectly stable surface.
Potential Transportation Damage
It’s also worth noting that transportation can sometimes cause minor damage or misalignment of parts. Be sure to inspect everything thoroughly and address any issues before starting your first print.
Calibration and Quality Inspection
Challenges in Initial Calibration
Initial calibration of the Ender-3 V3 Plus can be challenging. Proper bed leveling and adjusting the extruder can be time-consuming, but these steps are crucial for ensuring high-quality prints.
First Print Quality and Adjustments
Your first prints will serve as a quality inspection. Minor adjustments may be necessary to improve the print quality, such as tweaking the print speed, temperatures, and re-leveling the bed.
Re-calibration for Improved Results
Regular re-calibration is often necessary to maintain optimal print quality. This ensures that the printer compensates for any wear and tear and continues to produce high-quality prints.
Printing Performance
Various Filament Compatibility
The Creality Ender-3 V3 Plus is compatible with a wide range of filaments, including PLA, ABS, and TPU. This versatility allows you to experiment with different materials and find the best one for your specific needs.
Output Quality with Different Filaments
The output quality can vary depending on the filament used. Some materials may produce sharper details and smoother finishes, while others might require more fine-tuning to achieve the best results.
Testing with Low-End and High-Quality PLA
Testing the printer with low-end and high-quality PLA provides valuable insights into its performance range. While low-end PLA might show acceptable results, high-quality PLA generally produces superior prints with fewer issues.
Vibration Issues Affecting Output
Vibration issues can still affect the output quality, causing wavy patterns or layer misalignments. Addressing these issues through additional stabilization methods, such as using a vibration-dampening mat, can help improve print results.
Customer Support and Warranty
Support by Dukyu Air in Korea
In Korea, support for the Ender-3 V3 Plus is provided by Dukyu Air. While the response time might not be the fastest, the support is generally effective and can help resolve most issues.
Exchange Process for Defective Units
If you encounter a defective unit, the exchange process through Dukyu Air is relatively straightforward. They stand by their products and ensure that replacements are provided when necessary.
Response Time and Effectiveness
While the response time could be faster, the effectiveness of the support is generally satisfactory. Customer concerns are addressed adequately, ensuring that problems are resolved.
Advantages and Disadvantages
Pros: Print Size and Price
The Ender-3 V3 Plus offers a large print size at a competitive price. This makes it an appealing option for both hobbyists and professionals looking for cost-effective, high-volume 3D printing.
Cons: Stability Issues and Complex Assembly
However, there are some drawbacks, such as stability issues and a somewhat complex assembly process. These might pose challenges, especially for beginners.
Potential for Multi-Color Use
Future models might offer the potential for multi-color printing, adding another layer of versatility to an already capable machine.
User Experience and Observations
Handling Filament Crumpling
Filament crumpling during Z-axis movements is an issue worth noting. Adjusting the filament path and ensuring that it feeds smoothly can help mitigate this problem.
Suggested Design Improvements
Adding a motor to the filament feeder could prevent filament crumpling, enhancing the overall user experience. This is a design improvement that could be beneficial in future iterations.
Unique yet Flawed Engineering Decisions
While the engineering decisions behind the Ender-3 V3 Plus are unique and innovative, they are not without their flaws. The Core XZ structure, for example, offers both enhanced stability and some inherent instability that needs careful handling.
Comparisons to Similar Models
Compared to similar models, the Ender-3 V3 Plus stands out for its large print size and Core XZ structure. However, it also shares some common issues like complex assembly and vibration problems.
Final Thoughts
Overall Performance and Value
The Creality Ender-3 V3 Plus delivers good performance and offers great value for its price. With its large print size and versatile filament compatibility, it’s a strong contender in the 3D printer market.
Best Practices for Setup and Use
For the best results, take your time with the initial setup and calibration. Make sure to place the printer on a stable surface and address any wobbling or vibration issues early on.
Final Recommendations
Purchasing from authorized distributors ensures that you receive proper support and a straightforward exchange process if needed. This can save you time and frustration in the long run.
Significance of Authorized Purchases
Authorized purchases are crucial for ensuring that you receive a fully functional product and have access to effective customer support. This can make a significant difference in your overall experience with the printer.
By following this guide and being mindful of the mentioned points, you’ll be well on your way to making the most out of your Creality Ender-3 V3 Plus 3D Printer. Happy printing!
$30 off $400+ Anycubic Products with code AC30OFF


ELEGOO Mercury Plus V3.0 Wash and Cure Station, 7.5 L Large Capacity, Compatible with Mars Saturn Photon Halot MSLA LCD DLP 3D Printers
$159.99 (as of June 5, 2025 21:38 GMT +00:00 - More info)
Revopoint MIRACO Plus 3D Scanner for 3D Printing Handheld, 3D Printer Scanner with Photogrammetry, Up to 0.02mm Precision, Full-Color Scan for Small to Large Objects, 32GB RAM
$1,529.14 (as of June 5, 2025 21:38 GMT +00:00 - More info)