Bambu Lab A1 Mini 3D Printer, Support Multi-Color 3D Printing, Set Up in 20 Mins, High Speed & Precision, Full-Auto Calibration & Active Flow Rate Compensation, ≤48 dB Quiet FDM 3D Printers
$399.00 (as of June 18, 2025 23:32 GMT +00:00 - More infoProduct prices and availability are accurate as of the date/time indicated and are subject to change. Any price and availability information displayed on [relevant Amazon Site(s), as applicable] at the time of purchase will apply to the purchase of this product.)Want to ignite your students’ passion for engineering and design?

Anycubic Coupon – $5 off $50+ sitewide with code DIY5OFF
Teaching Innovation Through Rubber Band Cars
This project-based learning experience uses 3D-printed rubber band cars to teach the engineering design cycle. By following this guide, your students can investigate, experiment, and create their innovative rubber band cars. This approach moves away from “guess and check” and introduces a systematic engineering approach.
Project Overview
This method walks you through a four-week project designed for middle school students. It concentrates on the engineering design cycle through the creation of custom-designed, 3D-printed rubber band cars. You’ll be equipped with all the necessary teaching videos, lab notebooks, and CAD files.
Materials Required
Before starting, gather these supplies:
- Classroom access to a 3D printer
- PLA Filament (assorted colors)
- Tinkercad access
- Rubber bands for wheels (Alliance Rubber 54625 Advantage Rubber Bands Size #62)
- Rubber bands to drive the car (Alliance Rubber 00721 Advantage Rubber Bands Size #32)
- Small rubber bands (Cra Z Art Cra-Z-Loom Ultimate Tub 8000 Latex-Free Rubber Bands)
- Super Glue (cyanoacrylate)
- Meter tapes for each group
- 180mm x 120mm x 120mm sizing box (cardboard with 3D printed corners)
- Laptops/Chromebooks/Tablets for Tinkercad use

Anycubic Coupon – $5 off $50+ sitewide with code DIY5OFF
Teacher Preparation
These steps should be completed before the unit begins to ensure a smooth and engaging learning experience.
Step 1: Print and Assemble the Basic Car
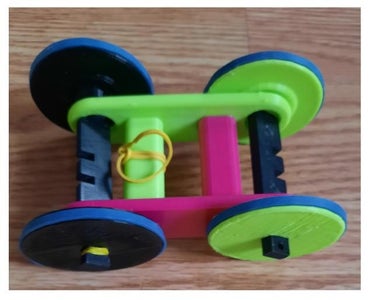
Using the provided CAD file, 3D print enough cars for each group of two students. Each car consists of two body parts, four wheels, and two axles.
Assembly:
- 3D print the required parts for each car.
- Follow the assembly video, using super glue to put the cars together.
Step 2: Print Additional Components for Experimentation
Prepare larger wheels, longer car bodies, and rubber band holders for controlled experiments. These components allow students to explore how different design factors influence the car’s performance. The CAD files are tagged with mm lengths to record sizes during experiments.
Step 3: Create the Sizing Box
A sizing box is critical for students struggling to visualize metric dimensions. This tool helps them understand the physical constraints their car designs must adhere to.
Construction:
- Cut box sides from sturdy cardboard.
- Attach the 3D-printed edge pieces to create the box.
Step-by-Step Student Activities
Below you will find the process for student learning!
Step 4: Introducing the Challenge
Hand out the student notebooks and start the first day by introducing your learners to the engineering cycle as a “systematic approach to problem-solving.” Explain the challenge, referring to pages 2 and 3 of the notebook.
Activities:
- Distribute 3D-printed cars.
- Demonstrate car operation.
- Allow free exploration and collaborative problem-solving.
Step 5: Explaining the Engineering Design Cycle
Day 2 clarifies each phase of the engineering design cycle. Read page 5 of the notebook together, ensuring comprehension and answering questions.
Tasks:
- Define key vocabulary (criteria, constraints).
- Complete page 6, extracting information from page 3.
- Brainstorm additional constraints (CAD skills, printing time).
- Complete page 7 with teacher-provided information.
Step 6: Data Collection and Experimentation
Spend days 3 and 4 collecting data on the existing car. This will help students understand the system and determine optimal car and wheel sizes.
Experiments:
- Work in pairs to complete data tables.
- Draw basic findings for each experiment.
Step 7: Tinkercad Introduction and Basics
Now, this is the time to let the students explore Tinkercad! Students will need time to become familiar with Tinkercad basics. A “snowman” project is ideal for teaching object manipulation.
Key Concepts:
- Grouping
- Resizing
- Aligning
- Prepare for 3D printing
Step 8: Designing Custom Cars
Students apply collected data to design their custom cars. This phase typically spans several days for design and printing.
Design Considerations:
- Longer car bodies
- Larger wheels
- Rubber band holders
- Hub caps
Step 9: Evaluation and Sharing
Allocate a few days for testing and refining the cars. Conduct final notebook revisions.
Evaluation Criteria:
- Sizing box compliance
- 3-meter distance run
- Aesthetic design

Detailed Breakdown of Each Step
Now, let’s get into the more intricate details!
Teacher Prep: 3D Printing the Basic Car Explained
Before your students get their hands on Tinkercad, you’ve got a bit of 3D printing to take care of. The goal is to provide each pair of students with a basic car they can examine, test, and modify.
CAD File Breakdown:
- The CAD file includes:
- Two Body Parts: These form the chassis of the car.
- Four Wheels: Standard size for initial experiments.
- Two Axles: Connect the wheels to the body.
Printing Tips:
- No Supports Needed: Design the parts to print without supports to save time and material.
- Material: Use PLA filament in assorted colors to make the cars visually appealing.
- Quantity: Print enough cars so each group of two students has one.
Assembly Process:
- Print all Parts: Ensure you have all the components printed.
- Axle Attachment: Glue the axles to the body parts using super glue. Refer to the assembly video for guidance.
- Wheel Placement: Attach the wheels to the axles, making sure they rotate freely.
Teacher Prep: Enhanced Components
To encourage deeper exploration, it’s helpful to provide additional components for students to experiment with. We are talking larger wheels and longer car bodies to show the variation.
CAD File Breakdown:
You’re going to need to know exactly what you are dealing with! * Larger Wheels: These wheels will vary in size, allowing students to see how wheel diameter affects speed and distance. * Longer Car Bodies: Varying the car body length can influence stability and rubber band tension. * Rubber Band Holders: These can be added to the car’s design to experiment with different anchor points for the rubber band.
Printing Recommendations:
- Labeling: The CAD files have mm lengths printed on the parts. This simplifies data recording during experiments.
- Customization: If students want unique wheel sizes, the video links provide guidance.
Teacher Prep: The Sizing Box
Explain about the visual aspects of sizes and space.
Construction Steps:
- Cardboard Sides: Cut sturdy cardboard pieces to the dimensions of 180mm x 120mm x 120mm.
- 3D Printed Edges: Print the corner pieces from the provided CAD file.
- Assembly: Attach the edges to the cardboard to form a rigid box.
Functionality:
- Visual Aid: Helps students visualize the size constraints in metric units.
- Design Compliance: Ensures the final car design fits within the challenge limits.
Student Activity: Introducing the Challenge
Explain to your Students what they will need to focus on during the processes!
Notebook Distribution:
- Start by giving a Rubber Band Car Challenge notebook to each student to keep record of their experience.
Challenge Explanation:
-
Engineering Cycle: Describe it as a methodical way to solve problems.
-
Challenge Overview:
- Refer to pages 2 and 3 in the notebook.
- Explain the core goal: to design and build the car that travels the farthest given our materials.
-
Constraints:
- Size limitations.
- Material restrictions.
-
Incentives: Make sure students are engaged by offering some kind of prize!
Initial Exploration:
- Start by letting them explore the car and the materials in their own way!
- Allow students to work with the cars you printed.
- Encourage them to struggle and collaborate towards solutions.
Student Activity: Engineering Design Cycle
This stage helps the students understand the principles behind the design process. The design process is important, because it helps the student grasp the whole operation and project!
Notebook Reference:
- Vocabulary Check: Ensure students understand “criteria” and “constraints”.
- Notebook Completion: Have students fill in details on pages 6 and 7.
Student Activity: Data Collection
Students learn the importance of methodically gathering experimental data.
Notebook Data Tables:
- Parameters: Car body length, wheel size, and rubber band type measurements.
- Performance Metrics: Distance traveled and stability.
Process:
- Car Prep:
- Wheel Swaps: They’ll change the wheels and see the different results.
- Body Mods: Can alter the body length and material to affect the weight.
- Testing Stage:
- Control: Make sure they know why this the base measurements.
- Trials: Repeat runs of the car to average for accuracy.
Student Activity: Intro to Tinkercad
This stage helps to get the basics down.
- Account Creation:
- Each student must create a Tinkercad account.
- Snowman Project:
- Object Manipulation: Show the students how to resize, align, and the different actions to get the snowman printed.
- Practice: Let the snowmen be virtual, but students use it to hone their designing skills.
Student Activity: Custom Car Design
Starting with the basics:
- CAD Access:
- Each student will have to start with the CAD File for their journey. Help:
- The student should be able to look for the video for assistance without bothering you! New elements:
- The studnets should be able to add body and wheels now and should be comfortable.
Student Activity: Evaluation
Here is the space for the students to show off their end product!
Car Testing:
-
Distance: Have them run the vehicle to see what the length is.
-
Inspection Stations:
- Sizing Box: Make sure the art passes the size requirements.
- Distance Check: Verify the 3-meter distance run.
- Aesthetics: The Art Teacher judges.
-
Final Race!
NGSS Alignment
Engineering Design Standards:
- MS-ETS1-1: Define the criteria and constraints of a design problem with sufficient precision to ensure a successful solution, taking into account relevant scientific principles and potential impacts on people and the natural environment that may limit possible solutions.
- MS-ETS1-2: Evaluate competing design solutions using a systematic process to determine how well they meet the criteria and constraints of the problem.
- MS-ETS1-3: Analyze data from tests to determine similarities and differences among several design solutions to identify the best elements of each that can be combined into a new solution to better meet the criteria for success.
- MS-ETS1-4: Develop a model to generate data for iterative testing and modification of a proposed object, tool, or process such that an optimal design can be achieved.
Crosscutting Concepts:
- Influence of Science, Engineering, and Technology on Society and the Natural World
- Systems and System Models
Science and Engineering Practices:
- Asking Questions and Defining Problems
- Developing and Using Models
- Planning and Carrying Out Investigations
- Analyzing and Interpreting Data
- Using Mathematics and Computational Thinking
- Constructing Explanations and Designing Solutions
- Engaging in Argument from Evidence
- Obtaining, Evaluating, and Communicating Information
By following this approach, your students will build technical skills and become innovative problem-solvers.
Anycubic Coupon – $5 off $50+ sitewide with code DIY5OFF


