FLASHFORGE Adventurer 5M 3D Printer with Fully Auto Leveling, Max 600mm/s High Speed Printing, 280°C Direct Extruder with 3S Detachable Nozzle, Core XY All Metal Structure, Print Size 220x220x220mm
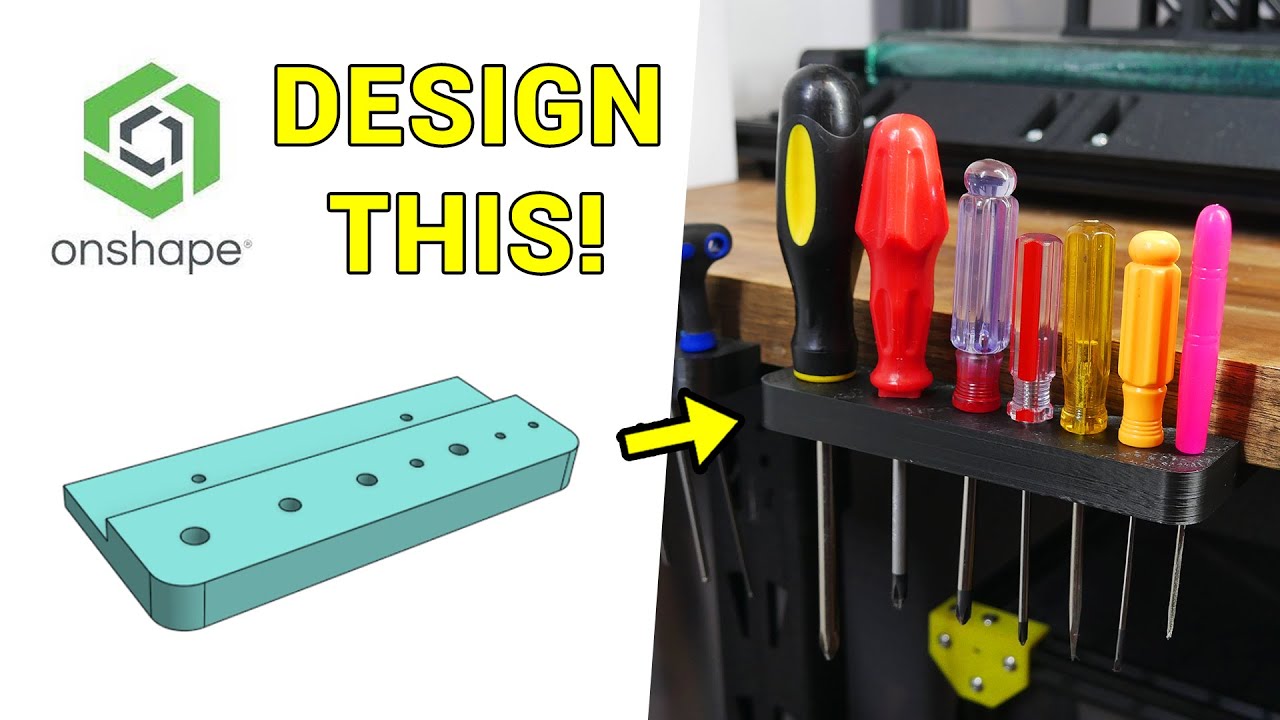
$259.00 (as of June 18, 2025 23:32 GMT +00:00 - More infoProduct prices and availability are accurate as of the date/time indicated and are subject to change. Any price and availability information displayed on [relevant Amazon Site(s), as applicable] at the time of purchase will apply to the purchase of this product.)In this tutorial series titled “Tool holder using Onshape sketches and extrusion – 3D design for 3D printing pt2,” you will be guided through the process of designing a simple tool holder using a free 3D CAD program. The focus of this episode is on using 2D sketches and extrusion in Onshape. The tutorial covers various steps such as taking measurements, design considerations for 3D printing, creating sketches, drawing lines and shapes, applying constraints, adding dimensions, using the extrude tool, adding fillets, and exporting an STL file for printing. The author also discusses designing a mounting boss, revisiting design considerations, and provides links for purchasing filament and resin, as well as supporting the creator on Patreon.
The video, created by Teaching Tech, aims to teach viewers how to design their own 3D printable parts using a free 3D CAD program. The tutorial begins by explaining the process of designing a tool holder for allen keys and screwdrivers using 2D sketches and extrusion in Onshape. The video covers various aspects of the design process, including taking measurements, design considerations for 3D printing, creating sketches, applying constraints and dimensions, using the extrude tool, adding fillets, and exporting an STL file for printing. The author also demonstrates the option to add a mounting boss and discusses the satisfaction of printing the design themselves. The tutorial concludes by inviting suggestions for future content.

Creating a new document and setting up the workspace
To begin using Onshape for your 3D CAD design, the first step is to open the Onshape software. Once you have launched the program, you can create a new document by clicking on the “Create” button. This will open a new tab where you can name your document and set up the workspace.
Setting up the workspace is essential for an organized and efficient design process. You can use the camera controls in Onshape to navigate and manipulate your workspace. These controls allow you to zoom in and out, orbit the camera, and pan across the workspace. Familiarize yourself with these controls to make your designing experience smoother.
Drawing the initial sketch
After setting up your workspace, it’s time to create a sketch. A sketch is a 2D representation of the object you want to design. To create a sketch, click on the “Sketch” button in the toolbar. This will open a new sketch tab where you can draw the lines, rectangles, and circles that will form the foundation of your design.
You can use the drawing tools in Onshape to create your sketch. These tools include lines, rectangles, and circles. By selecting the appropriate tool, you can draw these shapes on your sketch tab.


Applying constraints and adding dimensions
Once you have drawn the initial sketch, it’s important to apply constraints and add dimensions to ensure accuracy and precision in your design. Constraints in Onshape are used to define relationships between different elements of the sketch, while dimensions specify the size and position of these elements.
To apply constraints, select the lines or points you want to constrain and use the available constraint tools in Onshape. These tools allow you to make lines equal in length, parallel, perpendicular, or coincident to other elements.
To add dimensions, select the lines or points you want to dimension and use the dimension tool in Onshape. This tool allows you to specify the exact measurements of your design elements.
Extruding the sketch and adding fillets
After applying constraints and adding dimensions to your sketch, it’s time to extrude the sketch and add some fillets to your design. This will give your 2D sketch a 3D appearance and make it more visually appealing.
To extrude the sketch, select the sketch and click on the “Extrude” button in the toolbar. This will open the extrude tool where you can specify the thickness of your design. You can either use the default thickness or enter a specific measurement.
Once the extrusion is complete, you can rename the solid body to easily identify it later.
To add fillets, select the external edges of your design and use the fillet tool in Onshape. This tool allows you to round the sharp edges of your design, making it smoother and more aesthetically pleasing.

Editing dimensions and finalizing the sketch
If you need to make any changes to the dimensions of your design, you can easily edit them in Onshape. Simply double-click on the dimension you want to edit and enter the new measurement.
After editing the dimensions, you may need to expand gaps or add final dimensions to fully constrain your sketch. This will ensure that all elements of the design are accurately positioned and sized.
Once you are satisfied with the dimensions and overall appearance of your sketch, you can finalize it by finishing the sketch. This will complete the 2D representation of your design and prepare it for the next steps in the process.
Exporting the design for 3D printing
Before you can 3D print your design, you need to export it from Onshape in the appropriate format. To do this, select the design and click on the “Export” button in the toolbar.
In the export settings, choose the correct file format for your 3D printer. The most common file format for 3D printing is STL (Standard Triangle Language). Additionally, select the desired quality preset for the resolution of your print.
Once the export settings are configured, click on the “Export” button to save the file to your local storage. This file can then be used with your 3D printer software for printing.
If you want to quickly prototype your design before printing the final version, you can edit the extrusion and make the thickness thinner. This will use less material and allow for a faster prototype print.

Adding a mounting boss to hold the tools
To enhance the functionality of your design, you can add a mounting boss to hold the tools securely. A mounting boss is a raised section that provides support and stability for the tools.
To add a mounting boss, select the design and use the available tools in Onshape to create the desired shape and size. There are different ways to build onto the design, depending on your specific requirements.
One way to add a mounting boss is by using the “use” tool to trace existing geometry. This allows you to create additional lines and shapes based on the existing design. By adding triangular brackets for mounting and clearance holes for screws, you can customize the mounting boss to suit your needs.
Adding additional features to the mounting boss
To further enhance the functionality of the mounting boss, you can add additional features such as triangular brackets for mounting and clearance holes for screws. These features provide stability and improve the overall usability of the tool holder.
Using the available tools in Onshape, you can easily create triangular brackets and clearance holes on the mounting boss. The sketching tools and extrusion tool will allow you to complete the design and create the desired features.
By using two extrusions, one to cut a hole through and one to remove material without going all the way through, you can achieve the desired design for the mounting boss.
Considering design factors for 3D printing
When designing for 3D printing, it’s important to consider various factors that can affect the final print outcome. These factors include the design fit within the bed, the presence of a flat surface underneath the design, avoiding overhangs, and layer line orientation.
Ensure that your design fits within the printing bed of your 3D printer. This will ensure that the entire design can be printed without any issues.
Include a flat surface underneath the design to ensure proper adhesion to the printing bed. This will prevent warping and improve the overall print quality.
Avoid overhangs in your design as much as possible. Overhangs require support material during printing, which can affect the final result. Design your model in a way that minimizes the need for support structures.
Consider the orientation of the layer lines in your design. Layer lines are the individual layers that make up a 3D printed object. Orienting your design in a way that aligns the layer lines with the desired strength or aesthetic appearance can improve the overall print quality.
Conclusion
Designing your own parts for 3D printing can be a rewarding and creative process. By using a free 3D CAD program like Onshape, you can easily create custom designs for various applications.
In this tutorial series, we focused on designing a simple tool holder using 2D sketches and extrusion in Onshape. We covered various aspects of the design process, including sketching, applying constraints and dimensions, extruding the sketch, adding fillets, and exporting the design for 3D printing.
By following these steps, you can create functional and customized designs for your 3D printing needs. Designing your own parts allows you to tailor the design to your specific requirements and can provide a sense of satisfaction and accomplishment.
We hope that this tutorial series has been helpful in guiding you through the process of using Onshape for 3D CAD design. We encourage you to explore and experiment with different designs and techniques to further enhance your skills.
We value your feedback and suggestions for future content. If you have any ideas or topics you would like us to cover in future tutorials, please feel free to reach out and share your thoughts. Happy designing and happy 3D printing!
To get the best out of 3D printing, it will be helpful if you are able to design your own parts. In this tutorial series, you will learn how to use the Onshape CAD program, which is free, to accomplish just that.
In this episode, we will be creating our first object: a simple tool holder for allen keys, screwdrivers, and other similar tools. To achieve this, we will primarily be using 2D sketches and extrusion in Onshape. Additionally, we will focus on construction lines, constraints, dimensioning, prototyping, and exporting the design for printing.
You can find the entire playlist for 3D design for 3D printing using Onshape here: 3D design for 3D printing tutorials
If you don’t have an account yet, you can create a free one by following this direct link: Create a free Onshape account
For accurate measurements, you can use digital calipers, which you can find on Amazon here: Digital calipers on Amazon
If you need to purchase filament for your 3D printer, I recommend checking out X3D. They offer great quality and affordable options, and you even get a free sample pack and 1 free filament when you buy 3. Visit their website here: X3D
For high-quality resins, you can visit 3D Printers Online. As a Teaching Tech subscriber, you can get 5% off your order using the code “tech5”. Check them out here: 3D Printers Online
Feel free to explore the resources mentioned above, and if you find them useful, please consider subscribing to my channel. If you’d like to support me even further, you can do so on Patreon here: Support me on Patreon

SUNLU 3D Printer Filament Bundle Multicolor PETG Filament 1.75mm, Individually Vacuum-Sealed, 2kg in Total, 0.25kg per Spool, 8 Pack, 8 Colors, Black+White+Red+Yellow+Pink+Blue+Orange+Green
$35.99 (as of June 18, 2025 23:32 GMT +00:00 - More infoProduct prices and availability are accurate as of the date/time indicated and are subject to change. Any price and availability information displayed on [relevant Amazon Site(s), as applicable] at the time of purchase will apply to the purchase of this product.)
BIQU PC4-M10 Pneumatic Connector Fittings Bowden Tube Coupler Male Straight PTFE Tube Push for E3D-V6 Bowden Extruder Compatible with Ender-3 Ender-3 V2 3D Printers (Pack of 10pcs)
$5.99 (as of June 18, 2025 23:32 GMT +00:00 - More infoProduct prices and availability are accurate as of the date/time indicated and are subject to change. Any price and availability information displayed on [relevant Amazon Site(s), as applicable] at the time of purchase will apply to the purchase of this product.)
ELEGOO Mars 5 Ultra 9K Resin 3D Printer, 150mm/h High Speed Printing, Smart Automatic Leveling, Intelligent Detection, WiFi-Transfer, Printing Size of 6.04 x 3.06 x 6.49 inch
$284.99 (as of June 18, 2025 23:32 GMT +00:00 - More infoProduct prices and availability are accurate as of the date/time indicated and are subject to change. Any price and availability information displayed on [relevant Amazon Site(s), as applicable] at the time of purchase will apply to the purchase of this product.)
ELEGOO Mercury Plus V3.0 Wash and Cure Station, 7.5 L Large Capacity, Compatible with Mars Saturn Photon Halot MSLA LCD DLP 3D Printers
$159.99 (as of June 18, 2025 23:32 GMT +00:00 - More infoProduct prices and availability are accurate as of the date/time indicated and are subject to change. Any price and availability information displayed on [relevant Amazon Site(s), as applicable] at the time of purchase will apply to the purchase of this product.)