FLASHFORGE 3D Printer AD5M, CoreXY 600mm/s High-Speed Printer with 1-Click Auto Leveling, High-Temp Direct Drive Extruder, 3s Quick-Swap Nozzle, 220×220×220mm Build Volume
$259.00 (as of June 18, 2025 23:32 GMT +00:00 - More infoProduct prices and availability are accurate as of the date/time indicated and are subject to change. Any price and availability information displayed on [relevant Amazon Site(s), as applicable] at the time of purchase will apply to the purchase of this product.)Ever paused to consider how some structures seem to defy gravity, hanging in mid-air with an almost magical balance? This is the captivating world of tensegrity, a structural principle you can explore through 3D printing. Let’s get into how you can create complex 3D printed structures using the principle of tensegrity.

Anycubic Coupon – $5 off $50+ sitewide with code DIY5OFF
Understanding Tensegrity
Tensegrity, short for “tensile integrity,” is a structural system characterized by isolated components under compression within a network of continuous tension. Imagine a floating structure where rods appear to hover, connected only by strings. Sounds like science fiction, right? Actually, it’s a clever application of physics.
The beauty of tensegrity lies in its ability to distribute stress evenly throughout the structure, making it incredibly strong and resilient. The forces of tension and compression are in equilibrium, creating a stable and lightweight form.
Tensegrity in Action
You might be surprised to learn that tensegrity isn’t just a theoretical concept. It’s used in various real-world applications, from bridges to sculptures. One notable example in India is the structure at Science City in Kolkata, showcasing the possibilities of this principle in civil engineering.

Anycubic Coupon – $5 off $50+ sitewide with code DIY5OFF
Your Tensegrity Project: A Step-by-Step Guide
Ready to try your hand at building a tensegrity structure? This guide will walk you through designing and assembling your own 3D printed tensegrity model. Teachers, this is also a great way to explain this concept to your students and teach them about center of gravity.
Supplies You’ll Need
Before getting started, gather these supplies:
- 3D Printer
- 3D Printing Filament
- Thread
- Toothpicks/Matchsticks
- Measuring Scale
- Glue
Designing with Tinkercad
Tinkercad is a free, user-friendly web application for 3D design. If you don’t already have an account, create one using your Gmail ID. Once you’re logged in, follow these steps to design the components for your tensegrity structure:
Creating the First Square Prism
Let’s start with the first piece of our tensegrity structure, the square prism. We will use this basic shape for our other pieces, so it’s important to understand how to create and modify it.
Step 1: Drag a Cube onto the Workplane
Once in Tinkercad, you will be able to access a work plane. Begin by dragging a solid box from the “Basic Shapes” menu on the right-hand side onto the workplane.
Step 2: Adjust the Cube’s Dimensions
Select the cube and click on the white squares at each vertex to view its dimensions. Modify these dimensions to 50x10x10mm. The first number represents the length, and the last two dimensions represent the width and height.
Step 3: Add a Hollow Cube
Now, drag a hollow cube onto the workplane. This hollow cube will create a void within our solid prism, making it lighter and providing space for the tension elements.
Step 4: Resize the Hollow Cube
Adjust the dimensions of the hollow cube to 47x7x7mm. This will create a smaller void inside the solid prism, leaving a 1.5mm thick wall on each side.
Step 5: Insert the Hollow Cube
Drag the hollow cube inside the solid shape. The goal is to center the hollow cube within the solid one, creating a uniform wall thickness all around.
Step 6: Align the Shapes
Use the “Align” command in the top toolbar to center the hollow shape within the solid shape. Click on the three black center circles to align the shapes along their respective axes. Once selected, these circles will fade in color.
Step 7: Group the Shapes
Select both the hollow and solid shapes, then click the “Group” icon in the top toolbar. This will combine the two shapes into a single object, creating a square prism with a hollow interior.
Creating the Cylinder Hole
Next, we’ll add a hole through the prism. This hole will serve as an anchor point for the tension elements that hold the tensegrity structure together.
Step 8: Drag a Hollow Cylinder
Drag a hollow cylinder onto the workplane.
Step 9: Change the Cylinder’s Size
Adjust the cylinder’s dimensions to 12x3x3mm. This will create a small, cylindrical void that we’ll use to create the hole.
Step 10: Position the Cylinder
Drag the cylinder into the solid prism shape, positioning it where you want the hole to be.
Step 11: Align the Shapes
Use the “Align” command again to precisely center the cylinder along the width of the prism.
Step 12: Group the Shapes
Select both the prism and the cylinder, then click the “Group” icon to create the hole.
Step 13: Finalize the First Prism
The final shape, a square prism with a hole, is now ready.
Step 14: Make Three Copies
Use the “Copy” and “Paste” icons in the top toolbar to create three copies of this prism. You should now have four identical prisms.
Step 15: Export the Design
You now have 4 copies of the square prism with the size 50x10x10mm. Export the file in *.stl format and send it to a 3D printer.
Designing the Second Square Prism
Now, we need to create another type of square prism, so that we can assemble the module. The main difference will be the final dimensions.
Step 16: Repeat Steps 1–13
Repeat steps 1 to 13. When changing the size of Cube in step 2 change the size of the cube with dimension 29x10x10mm. Then continue with the steps to create square prism with hole.
Step 17: Copy and Print
Copy the final shape to create another prism. Export the file in *.stl format and send it to a 3D printer.
Designing the Third Square Prism
Now, we need to create another type of square prism, so that we can assemble the module. The main difference will be the final dimensions.
Step 18: Drag a Cube onto the Workplane
Begin by dragging a solid box from the “Basic Shapes” menu on the right-hand side onto the workplane.
Step 19: Change the Cube’s Dimensions
Change the size of the cube with dimension 25x10x10mm.
Step 20: Copy New Shape
Copy the final shape to create another prism.
Step 21: Paste shape
Paste the shape that you copied.
Step 22: Export the Design
You now have 2 copies of the square prism with the size 25x10x10mm. Export the file in *.stl format and send it to a 3D printer.
Designing the Fourth Square Prism
Now, we need to create another type of square prism, so that we can assemble the module. The main difference will be the final dimensions.
Step 23: Repeat Steps 18–21
Repeat steps 18 to 21 to create the final design.
With the square prism dimensions now at 44x10x10mm.
Assembling Your Tensegrity Structure
Now that all the components are 3D printed, it’s time to assemble your tensegrity structure:
Step 24: Prepare the Base
Take two of the 50mm prisms and one 25mm prism. Glue these together, paying attention to the position of the holes.
Step 25: Add the 44mm Piece
Attach the 44mm piece at the center of the 25mm piece, using glue.
Step 26: Attach the 29mm Piece
Paste the 29mm piece as shown in the picture. Make sure the hole on this piece is away from the 44mm piece.
Step 27: Complete the Second Structure
Paste two of the 50mm prisms with one 25mm prism as shown in the image.
Connecting the Structures
Now comes the critical part: connecting the two structures with thread to create the tensegrity effect. Remember, the tension in these threads is what will give your structure its stability and unique floating appearance.
Step 28: Connect the Pieces With Thread
Use thread and toothpicks/matchsticks to connect the two structures.
- Connect the 29mm pieces: Start by connecting the holes on the 29mm long pieces. The thread should be about 4cm long from the outer edge of each piece. Insert the thread into the hole and secure it with a toothpick or matchstick. Alternatively, you can use a dab of super glue gel.
- Connect the 50mm pieces: Next, connect the holes on the 50mm long pieces. The thread length should be about 8.7mm from the outer edge of both pieces. We need to connect these pieces from the top and bottom.
- Adjust the Tension: Ensure there is enough tension in all three threads so they remain straight; this will help stabilize the structure.
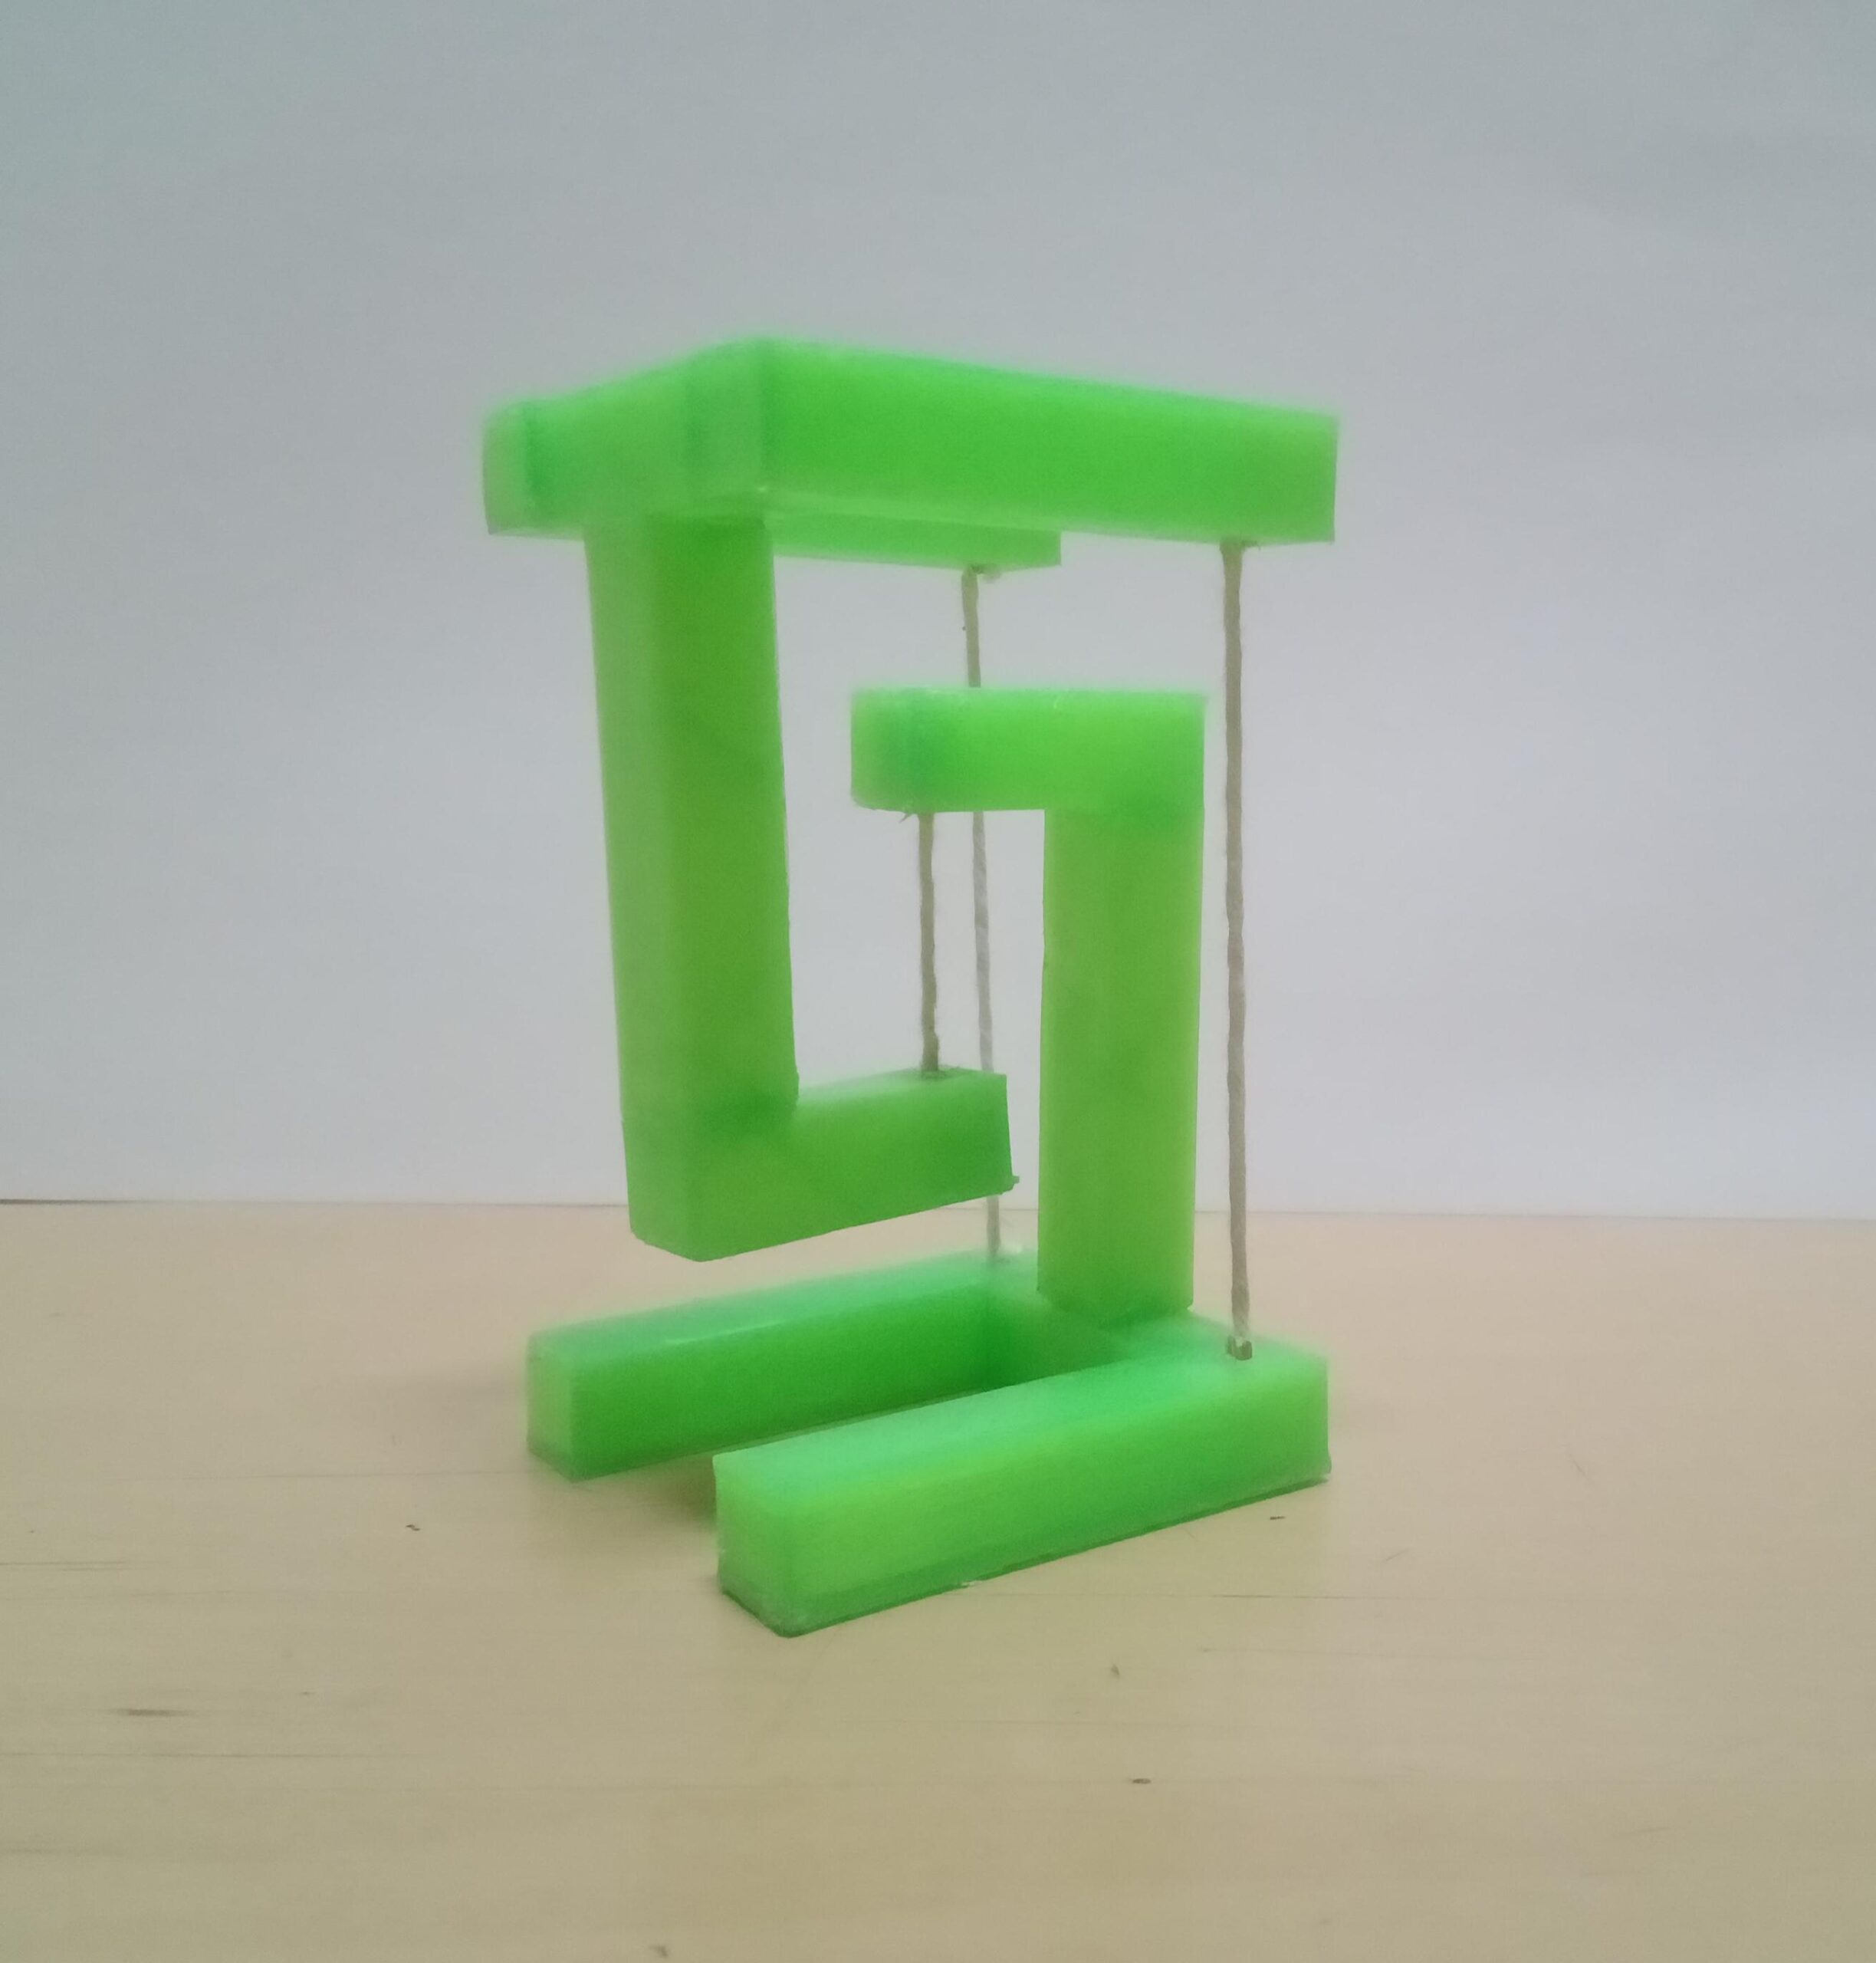
Step 29: Completed 3D Printed Mini Tensegrity Structure
Your mini tensegrity structure is now complete! Note, the structure relies on balance so play with it until you observe the tensegrity structure working correctly. Note, that sometimes the structure can fall but keep trying.
Step 30: Video
https://youtube.com/shorts/1rWmQqm1_0I?feature=share
Step 31: Test With the Box
8cm x 8cm x 5.5 cm empty card board box is kept on the tensegrity structure. It is very important note that center of the gravity of tensegrity structure is somewhere at the front of the middle string. While putting card board box one should adjust the card board box’s position such that even after putting box on the structure it remains stable.
Step 32: Load Test With More Weight
8cm x 8cm x 5.5 cm empty card board box plus 3.5cm x 7cm x 12cm wooden calendar kept on tensegrity structure. It is holding it comfortably. With this teachers can explain concept of tensegrity & center of gravity.

Teaching with Tensegrity
This project isn’t just about building a cool structure; it’s also a fantastic educational tool. Here are some concepts you can teach using this model:
- Tensegrity: Explain the principle of tensegrity, tensile integrity, and how tension and compression work together to create a stable structure.
- Design Thinking: Engage students in learning how to make designs using Tinkercad.
- Center of Gravity: Use the tensegrity structure to demonstrate the concept of the center of gravity and how it affects stability.

Final Thoughts
Creating a tensegrity structure is a rewarding project that combines design, 3D printing, and fundamental physics principles. By following these steps, you can build your own model and gain a deeper understanding of this fascinating structural system.
Anycubic Coupon – $5 off $50+ sitewide with code DIY5OFF

Creality 3D Printer Glue Sticks for Hot Bed Warping Reducing 3D Printer Bed Adhesive PVP Solid 3D Print Glue Stick 3D Gloop for PLA/ABS/PETG/PC/PA/TPU(Pack of 4)
$13.59 (as of June 18, 2025 23:32 GMT +00:00 - More infoProduct prices and availability are accurate as of the date/time indicated and are subject to change. Any price and availability information displayed on [relevant Amazon Site(s), as applicable] at the time of purchase will apply to the purchase of this product.)
ELEGOO PLA Filament 1.75mm Black 1KG, 3D Printer Filament Dimensional Accuracy +/- 0.02mm, 1kg Cardboard Spool(2.2lbs) 3D Printing Filament Fits for Most FDM 3D Printers
$13.99 (as of June 18, 2025 23:32 GMT +00:00 - More infoProduct prices and availability are accurate as of the date/time indicated and are subject to change. Any price and availability information displayed on [relevant Amazon Site(s), as applicable] at the time of purchase will apply to the purchase of this product.)
Shining 3D Einstar Handheld 3D Scanner with Detail-Oriented Enhancement Technology Support Scanning Hair and Body, Up to 14FPS Scanning Speed High Quality Collecting Data 3D Scanner for 3D Printer
$759.00 (as of June 18, 2025 23:32 GMT +00:00 - More infoProduct prices and availability are accurate as of the date/time indicated and are subject to change. Any price and availability information displayed on [relevant Amazon Site(s), as applicable] at the time of purchase will apply to the purchase of this product.)
ELEGOO Mercury Plus V3.0 Wash and Cure Station, 7.5 L Large Capacity, Compatible with Mars Saturn Photon Halot MSLA LCD DLP 3D Printers
$159.99 (as of June 18, 2025 23:32 GMT +00:00 - More infoProduct prices and availability are accurate as of the date/time indicated and are subject to change. Any price and availability information displayed on [relevant Amazon Site(s), as applicable] at the time of purchase will apply to the purchase of this product.)